Introduction
This website contains exercises (TPs, TDs, and homework assignments) for the course 3TC31 (De la porte logique au système d'exploitation), at Télécom Paris / Polytechnique Institute of Paris.
Part 1 — De la porte logique au processeur
Overview
| Session | Type | Chapter |
|---|---|---|
| 1 | Lecture | Combinatorial logics |
| 2 | TD | Exercises on combinatorial logics |
| 2' | Homework | Homework on Arithmetic Logic Unit |
| 3 | Lecture | Sequential logics |
| 4 | TD | Exercises on synchronous sequential logic |
| 5-6 | Lecture | Building a RISC-V processor |
| 7-8 | TP | Implementing a single-cycle core |
| 8' | Homework | Assembler programming |
TD - Combinatorial Logic
Overview
Setup
In order to do this exercise, you need to download the archive with the logisim circuits. Save it somewhere in your home directory. Open a terminal and change to the directory where you just saved the archive. Then type the following commands:
tar xzf td-logisim.tar.gz
cd td-logisim
If there are any error messages in the terminal, ask your teacher for help.
The Multiplexer
Exercise: Build a multiplexer ciruit using basic logic gates (AND, OR, NOT, etc).

First draft a circuit with paper and pencil. Remember the ciruit equation from the lecture:
\[S = \overline{Sel}\cdot E_0 + Sel\cdot E_1 \]
Now open a terminal and change into the root directory of the extracted archive (see the setup section above). Move into the subdirectory containing the multiplexer exercise and list the files it contains:
cd mux
ls
Here is a short explanation of the files :
- mux-impl.circ: Contains your implementation of the multiplexer circuit. You will need to edit it using logisim.
- mux-spec.circ: Contains a correct multiplexer circuit (in other words, the specification for this exercise), using logisim's circuit library.
- mux-tb.circ: Contains a test bench, i.e. a circuit driving a multiplexer with different inputs in order to observe its behavior.
- Makefile: Contains rules that can be evoked from the command line in order to simulate your circuit and display the results.
The only file that you need to change is mux-impl.circ. But let's start a simulation first. Switch back to the terminal and type
make
This command will read the first rule in the Makefile and try to execute it. In this case, it will simulate the test bench with both the specification and your implementation, generate a waveform file (a timing diagram) and start the program GTKWave to show the waveform. This is what you should see:

All the subsequent exercices work in a quite similar way, so let's take a minute to inspect the timing diagram. On the left hand side of the window, you can explore all the signals of the two circuits, which are named circ (your implementation) and spec (the correct circuit). In this case (and not surprisingly) they have the same interface. If necessary, you can add signals from the list on the left to the waveform on the right by right-clicking on them.
On the right hand side, you see the waveform of the simulated test bench. Time is progressing from left to right. There are two parts: Implementation shows your circuit's behavior, and Specifciation shows the expected behavior. Note that the inputs (DIN0, DIN1, and Sel) are identical in both cases, this is how a testbench actually works. Here, the testbench exhaustively simulates all (eight) possible input combinations. The only difference between the specification and the implentation part is the outputs. As you can see, there is just a red bar where the DOUT of your implementation should be. This means that the value is unknown. The reason is simply that the circuit does not have an implementation. Let's fix this.
Close the GTKWave window and switch back to the terminal. Type in the following command in order to open the implementation in logisim:
logisim mux-impl.circ &
Note that the little ampersand (&) at the end of the line will start logisim in the background, such that you can still enter new commands in the terminal. You should see something like this:
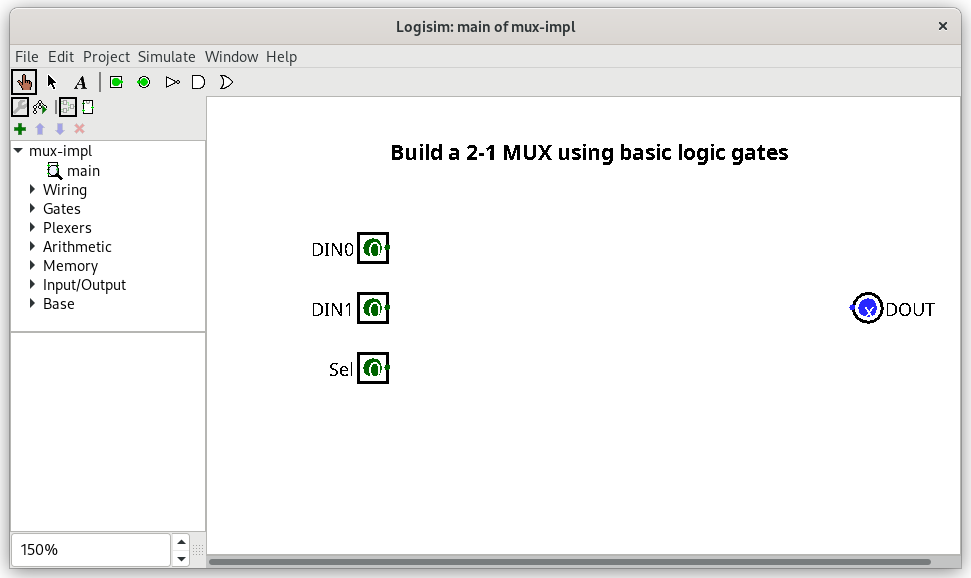
Let's have a quick look at logisim. On the left hand side, you see the current circuit library. For this exercise, the only thing you need is the Gates category. Above is the tool bar. Besides shortcuts for the most frequently used logic gates, there are two important tools that you should understand:
- The hand tool is used to change the values of the inputs in the circuit.
- The pointer tool is used to edit the circuit.
In the circuit view on the right hand side, you see the (empty) circuit. There is only the inputs (rectangular signals with connection points on the right) and the output (round signals with connection points on the left).
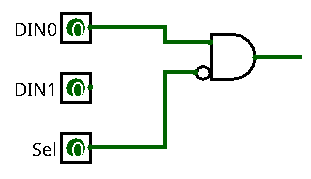
Let's build our first gate. Select the pointer in the tool bar. Choose an AND Gate from the Gates library or click on the AND gate in the tool bar. Then click somewhere in the circuit view to place the gate. You will see the properties of the newly created gate on lower left of the window. Perform the following actions:
- Change the Gate Size to Narrow
- Change the Number of Inputs to 2
- Set Negate 2 to Yes, this will add a small circle to the lower input
- Connect DIN0 to the upper gate input
- Connect Sel to the lower gate input
The result should look like this:
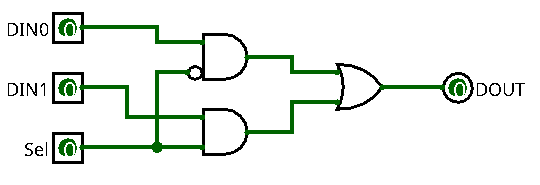
Congratulations, you just created your first gate! Now complete the exercise as follows:
- Create a second AND gate, without negation on the inputs
- Connect DIN1 and Sel to its inputs
- Create an OR gate with 2 inputs
- Connect the outputs of the two AND gates to its inputs
- Connect its output to DOUT
The result should look like this:
That's it.
Note: Be careful not to delete input or output signals of the circuit! Unfortunately, there is a bug in logisim: Even if you undo (ctrl-Z) the deletion of an input or output, this might break the connections of the circuit within the test bench, and you will get errors or wrong results in the simulation. If this happens, ask a teacher to help you. It might be necessary to restore the original file from the archive to "fix" this problem.
You can now do some basic simulations: Switch to the hand tool and click on the inputs in order to toggle their value. You should be able to observe the output value changing in turn. In order to check if this implementation is correct for all possible input values, switch back to the terminal and type
make
If everything goes fine, this will once again open the waveform viewer with the new waveform:

Note that now the waveform of DOUT is identical for both the specification and the implementation.
Building a Subtractor
In the lecture, we have seen the full adder circuit:
In the same way, we would like to construct a full subtractor, i.e. a circuit that performs one elementary subtraction with incoming carry (also called borrow for subtraction).
Question 1: Show that for subtraction, the carry has negative sign.
In the following, we will use a Boolean value to encode the value of the carry, 0 corresponding to 0 and 1 corresponding to -1.
Our circuit will have the following interface:
- Operand inputs \(A\) and \(B\)
- Incoming carry \(C_{in}\)
- Outgoing carry \(C_{out}\)
- Difference output \(D\)
Question 2: Establish the arithmetic equation connecting the inputs to the outputs.
Question 3: Fill in the truth table relating inputs and outputs:
| \(A\) | \(B\) | \(C_{in}\) | \(C_{out}\) | \(D\) |
|---|---|---|---|---|
| 0 | 0 | 0 | ||
| 0 | 0 | 1 | ||
| 0 | 1 | 0 | ||
| 0 | 1 | 1 | ||
| 1 | 0 | 0 | ||
| 1 | 0 | 1 | ||
| 1 | 1 | 0 | ||
| 1 | 1 | 1 |
Question 4: Establish the Boolean equations for te output signals.
Question 5: Draw a circuit implementing the full subtractor. Compare its structure to the full adder circuit.
In order to test your circuit, there is a testbench in the source archive. Switch to the terminal, move to the root folder of the extracted archive and execute the following commands:
cd sub
logisim sub-impl.circ &
Complete the circuit and type make to simulate it.
The Adder/Subtractor
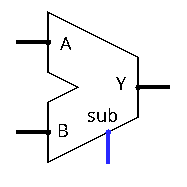
Exercise: Build an arithmetic operator that allows to compute either the sum or the difference between two numbers A and B, given as signed 8 bit integers.
Here are some additional constraints and assumptions:
- The circuit has an additional input sub to indicate wether to perform addition (sub = 0) or subtraction (sub = 1).
- The output of the operator is named Y and has 8 bits
- We will ignore any potential overflow
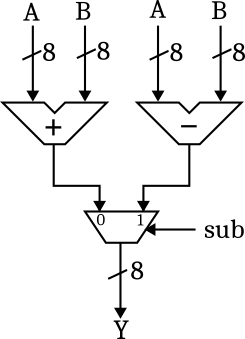
Question 1: Using pencil and paper, draft a first solution using an adder and subtractor (on 8 bits) and any additional circuit element you consider useful.
This solution is correct but not optimal regarding size (the number of logic gates used). We will build a second solution using the properties of the two's complement representation.
Question 2: Remember the equation used to obtain the (arithmetic) negation of a given number in two's complement.
Question 3: Show that we can implement the adder/subtractor using only one 8 bit adder and an additional operator that computes the bit-wise complement of a two's complement number.
Question 4: Which is the logic operation that allows to select a signal or its complement, depending on a control signal? Extrapolate your solution to 8 bits.
Question 5: Using the above results, propose a new optimized circuit for the adder/subtractor.
There is a testbench in the circuit archive for this exercise. Switch to the subfolder addsub and open the circuits:
cd addsub
logisim addsub-spec.circ addsub-impl.circ &
The specification corresponds to the first solution: two operators and a multiplexer. It is up to you to create the second implementation in the file addsub-impl.circ. In order to check your solution, switch to the terminal and type
make
Solution - Combinatorial Logic
Overview
Subtractor
Let A and B unsigned numbers encoded in N bits. Their binary representations are given by
\[ A = \sum_{i=0}^{n-1}A_{i}2^{i}, \quad B = \sum_{i=0}^{n-1}B_{i}2^{i}, \quad \text{where}\; A_i, B_i \in {0, 1} \]
Then their difference \(D = A-B\) is given by
\[ D= \sum_{i=0}^{n-1} (A_{i}-B_{i})2^{i} \]
In the above equation, the range of the individual weights is \(A_i-B_i \in \{-1, 0, 1\}\). So there are three different values, which we can encode in 2 bits \(\{C_{i+1},D_i\}\), where \(D_i\) is the (positive) difference bit, and \(C_{i+1}\) is the carry bit with negative weight. The result of the difference between the two bits is thus a 2-bit number encoded in 2's complement form.
The arithmetic equation connecting the inputs and outputs is therefore:
\[ A_i-B_i = -2 \cdot C_{i+1}+D_{i} \]
We need to generalise this equation in order to take into account en incoming carry bit. Having shown that the difference on two bits generates a carry with negative sign, we can conclude that the incoming carry will be of negative sign, too, resulting in the computation \(A_i - B-i - C_i\). The result has the range \(\{-2,-1,0,1\}\), which can again be represented as a 2-bit number encoded in 2's complement form.
As a conclusion, the complete equation for the subtractor is given by:
\[ A_i-B_i-C_i = -2\cdot C_{i+1}+D_i \]
Here is the truth table for the subtractor:
| \(A_i\) | \(B_i\) | \(C_{i}\) | \(A_i-B_i-C_i\) | \(C_{i+1}\) | \(D_i\) |
|---|---|---|---|---|---|
| 0 | 0 | 0 | 0 | 0 | 0 |
| 0 | 0 | 1 | -1 | 1 | 1 |
| 0 | 1 | 0 | -1 | 1 | 1 |
| 0 | 1 | 1 | -2 | 1 | 0 |
| 1 | 0 | 0 | 1 | 0 | 1 |
| 1 | 0 | 1 | 0 | 0 | 0 |
| 1 | 1 | 0 | 0 | 0 | 0 |
| 1 | 1 | 1 | -1 | 1 | 1 |
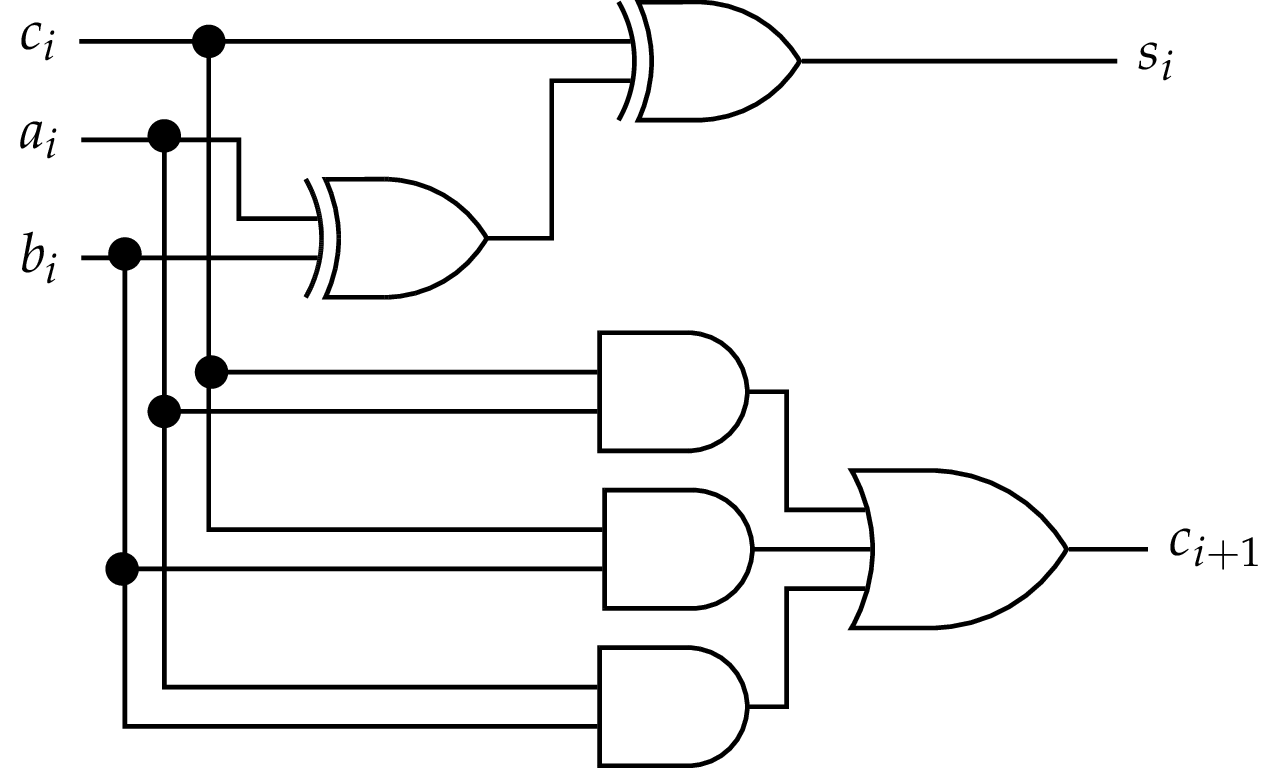
Starting from the above table, after some simplifications, we obtain the Boolean equations:
\[ C_{i+1} = \overline{A_i} B_i + \overline{A_i}C_i + B_i C_i \]
\[ D_i = A_i \oplus B_i \oplus C_i \]
These equations can be implemented as a combinatorial circuit as follows:

Comparing the structure to the full adder circuit, we can see that the two circuits are almost identical, except for the two inverters at the AND gates for the carry calculation.
Adder-Subtractor
A first solution is to use separate circuits for addition and subtraction (for example using the above subtractor circuit in the same way as a carry-ripple adder) and selecting the appropriate result with a multiplexer.
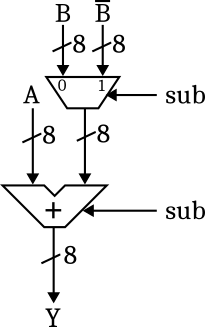
Can we do better? The answer is yes: We can calculate the difference with the adder circuit by feeding \(-B\) into the second input, since \(A-B\) is just \(A+(-B)\). But how do we compute \(-B\)? Remember from the first lecture on combinatorial logic that for a number represented in two's complement
\[ -B = \overline{B} + 1 \]
So computing \(-B\) can be done by inverting each individual bit of \(B\) and adding 1. So does this mean that we need a second adder circuit to compute \(-B\)? In this case, we wouldn't have gained anything, and the propagation time of the circuit would be even worse than in the first solution. It turns out that we can use the following trick: Since we do not have an incoming carry bit, we can use the carry input of the adder circuit to add 1 in case of subtraction. On the input side, we need to select among \(B\) and \(\overline{B}\):
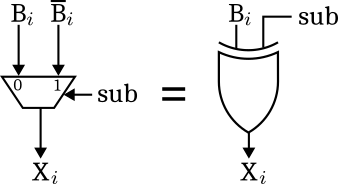
In the last step, we can slightly optimize the input part by observing that selecting \(B\) or \(\overline{B}\) is actually a controlled negation, which can be realised using exclusive or gates:
Homework: Building an Arithmetic-Logic Unit
Introduction
During the previous exercise, we have constructed an (optimised) adder/subtractor, for which we can select the performed operation with an input control signal. This is already quite nice. In this exercise however we would like to add even more operations, generalising our adder/subtractor to an Arithmetic-Logic Unit (ALU). As we will see later in the lecture, the ALU is a central component in every processor. It does an important part of the actual work when executing a program: adding or subtracting numbers, comparing values, shifting bits to the left or to the right, bit-wise logic operations etc.
Specification
How does such an ALU look like? We will keep the interface simple: There are two data inputs and , both representing 8 bit signed integers, and a single data output , also an 8 bit signed integer. Instead of a single control input, we have a 3 bit input , which selects among eight different operations:
| Name | Operation | Description | |
|---|---|---|---|
| 0 | ADD | Signed addition | |
| 1 | SLL | Left shift by positions | |
| 2 | SLT | Set less than | |
| 3 | SUB | Signed subtraction | |
| 4 | XOR | Bit-wise exclusive or | |
| 5 | SRL | Right shift by positions | |
| 6 | OR | Bit-wise or | |
| 7 | AND | Bit-wise and |
Addition and subtraction should be obvious. For the three bit-wise logic operations XOR, OR, and AND, the -ith bit of the output results from the respective logic operation between the -th bits of the inputs.
For left or right shifting, the second input represents the shift amount, i.e. the number of positions that the input is shifted. The direction corresponds to the bit order where the most significant bit (MSB) is on the left and the least significant bit (LSB) is on the right. Left shifting will shift out the most significant bits and fill up the least significant bits with zeros. Right shifting will shift out the least significant bits and fill up the most significant bits with zeros. Since we interpret the input as an unsigned integer (the shift amount), only the lower three bits of should be used, allowing for shift amounts between zero and seven.
Finally, the SLT operation compares two signed integers. If is less than , the output will be (i.e. only the LSB is one and the remaining bits are zero), otherwise the output will be .
Implementation
During the exercise on building an adder-subtractor, the goal was to create a combinatorial circuit optimized for its area: We found out that adding and subtracting could be done by a shared adder circuit, and switching the inputs depending on the requested operation. In this homework, the only goal is functional correctness, i.e. we do not care about the number of gates needed to build the final circuit. This means for example that you can use two separate operators for addition and subtraction without feeling bad about it.
As a starting point, we provide a circuit template and a testbench. Go to the alu subdirectory of the archive and open the file alu.circ:
cd alu
logisim alu.circ &
Note that for each of the eight operations (including shifting and comparison), there is a pre-defined component available in the LogiSim library. Feel free to explore the available components and to instantiate them in your implementation.
Testing your ciruit
In order to run the tests, execute the following command:
make
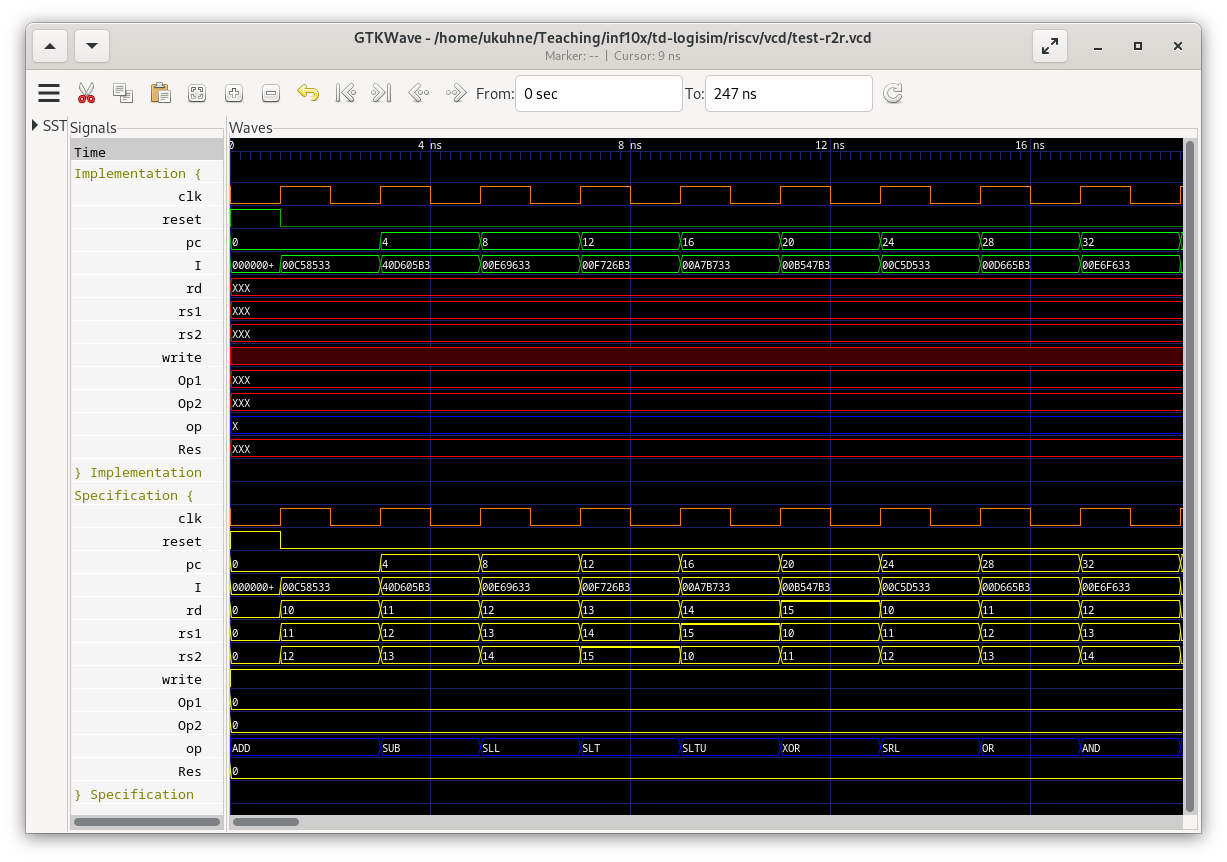
Do not forget to save your current implementation before running the tests. You should see a wave trace coming up like this:
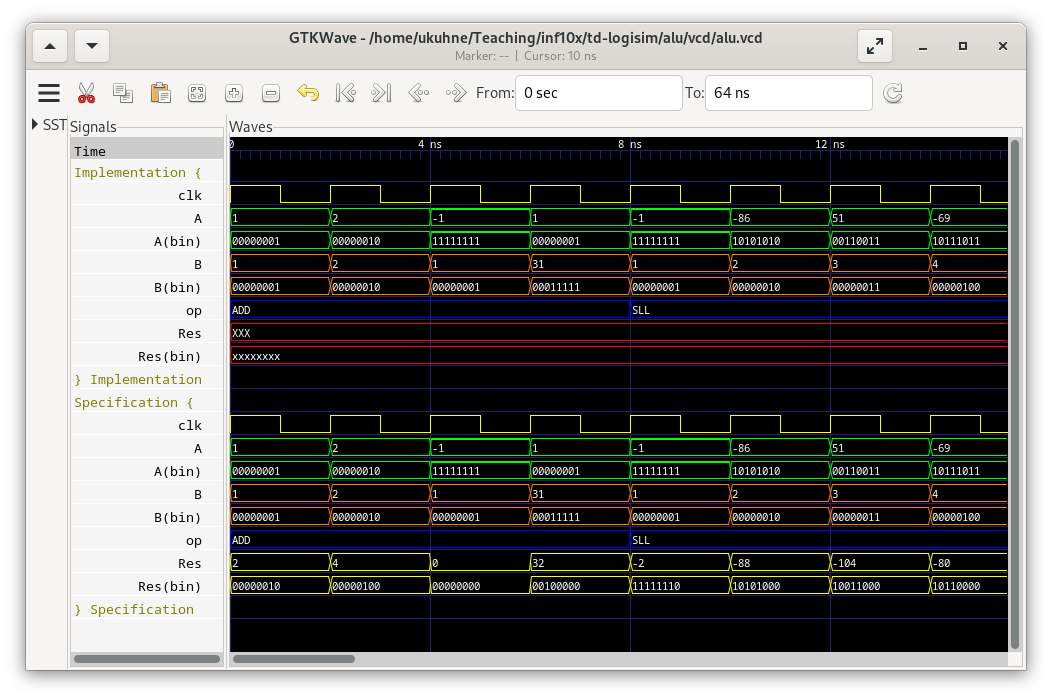
In the trace, the input and output signals and are shown twice, once in binary format and once as signed integers. It's the same signals. Even if the circuit is combinatorial, there is a clock signal. It is only used to generate the test sequence. There are four tests for each of the eight arithmetic and logic operations. Your goal is to reproduce the exact same results for all of the tests (compare between implementation and specification).
TD — Sequential Logic
Overview
D Flip-Flop with Enable
We would like to construct a D flip-flop with a synchronous and active high reset and an additional input en:
- When en is high, the flip-flop works as usual
- When en is low, the flip-flop is frozen such that the output Q maintains its value even after a rising clock edge
Question 1: Using paper and pencil, draw a schematics implementing the above specification, using a standard D flip-flop and additional logic gates.
In order to verify if your design is correct, switch to the terminal and go to root folder of the archive. Type
cd dff
logisim dff-impl.circ &
to open the template circuit. Once you are done with your design, execute the testbench by typing
make
In the waveform viewer, compare the two waveforms of Q.
Adressable Register
We now want to build a first basic block of a future processor core: An addressable register bank. Such a module contains multiple registers, each of which is build by several flip-flops. The register bank has an address input that selects the corresponding register and shows its contents on the dout data output. Additionally, there is a data input (din) and a write signal. If write is active at the rising edge of the clock, the value of din will be written to the register selected by addr. Finally, there is a reset signal that will reset all register values to zero when active.
The design files for the addressable register are in the reg subdirectory of
the source archive. Execute the following commands to start building and
simulating your circuit:
cd reg
logisim reg-impl.circ &
make
In the circuit template, there are already four 8-bit registers, labeled Reg 0 to Reg 3. Note that each of the registers has several functional inputs:
- The Clock input needs to be connected to the global clock signal for the register to work
- The Enable input controls the writing of the regiser: Its value is updated on the rising edge of the clock if Enable is active
- The Clear input (labeled 0) resets the value of the register to 0 if active
Question 1: Implement the reading logic: Depending on the address input, redirect the value of the correct flip-flop to the circuit's data output dout. Which circuit component should be used for this purpose? Find and use a pre-defined component in the available libraries.
Question 2: Implement the writing logic: If the write input is high, depending on the address input, update the correct flip-flop with the value of the data input din. Again, there are useful pre-defined components in the library, which can be used to implement the writing logic. Don't forget to connect the reset signal.
In order to test your design, execute the testbench by typing
make
In the waveform viewer, compare the two waveforms of the datat output dout.
Serial to Parallel Conversion
Serial communications are used in many applications. You might have heard of the USB standard, which stands for Universal Serial Bus. Other (simpler) protocols include SPI or I2C. The advantage of transmitting data serially (i.e. one bit at a time) is the small number of required signals, which reduces the number of input and output pins of integrated circuits and the hardware costs for transmission cables. However, since in a computer, data is stored as words, for example in chunks of 8 bits, we need to somehow reconstruct the (parallel) representation from the serial data received over time.
Consider the following specification:
- We are receiving in a synchronous manner, a sequence of bits on the input (serial in)
- We would like to transform the received data to words of 4 bit and present them at the output (parallel out)
- The bits are received in the order of their indices, i.e. the first bit received shall correspond to the least significant bit of the output
- An additional output valid shall indicate whenever the output is valid (i.e. whenever a full sequence of four bits has been received)
Question 1: Implement the serial-to-parallel converter using flip-flops and basic logic gates. You can leave out the generation of the valid signal and add it later.
Once you are satisfied with your design, implement it in logism and test it using the provided testbench:
cd ser2par
logisim ser2par-impl.circ &
make
Below is a timing diagram showing the transmission of three consecutive messages: 1001, 0101, and 1100.
Counters
In this exercise we will play with counters. The basic structure of a counter has been presented during the lecture:

The above figure shows an 8 bit counter (with a negative reset), which counts modulo 256. It consists basically of a register and an adder doing the arithmetics. Starting from this simple structure, we are going to add some more interesting functionality.
You can find the logisim environment for this exercise in the subdirectory count. Execute the following commands from the base directory of the exercise archive in order to open the circuit template in logisim:
cd count
logisim counter-impl.circ &
In this exercise, there is no specification, you can simulate your circuit in two different ways. In logisim, there is a top level circuit that drives the counter and shows its value on a 7 segment display:
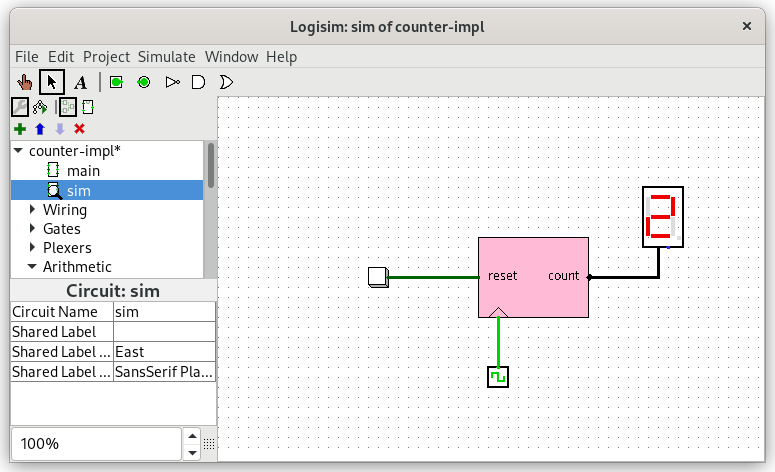
You can advance time by pressing ctrl-T and reset the simulation pressing ctrl-R.
The other possibility is to run logisim from the command line and inspect the waveform by typing make.
Question 1: Open the main circuit and implement a 4-bit modulo counter (thus counting from 0 to 15 and starting over at 0 again) with a positive reset. Do not use the ready-made counter component of the logisim library (we know it's there), but a register and any arithmetic or logic components you need. You can use the reset provided by the register component or use additional combinatorial logic. Simulate your counter to check if it works correctly.
Question 2: Instead of a modulo counter, we would like to build a counter with saturation arithmetic. This means that it will count up to 15 (shown as F on the 7 segment display) and then keep its value until is is reset.
Question 3: This time, we would like to have an up-and-down counter: It shall start with 0 and count up to 15, then decrement its value until it reaches 0, then start incrementing again.
Solution - Sequential Logic
Overview
D Flip-Flop with Enable
In order to add an enable signal to a flip-flop, let's consider the state of the circuit (i.e. the value of the flip-flop's output signal Q):
- If enable is 1, the state will be updated to the value of D
- If enable is 0, the state will remain unchanged, i.e. keep the current value of Q
So basically, we need to choose among two different input signals to set the new state. The basic circuit element to implement such a choice is a multiplexer. We can therefore use the following structure to realise the enable:

Now we want to add a synchronous reset to the above circuit. The reset should be considered to be of higher priority than the enable signal: If both reset and enable signals are active, we want the reset to take precedence such that Q will be reset to zero. This can be realised by adding an AND gate behind the multiplexer. In this way, the output of the multiplexer will be overridden by 0 if reset is active:

Addressable Register
Question 1: The component that we need to implement the reading logic is a multiplexer. Depending on the value of the address input, we want to forward the output value of the addressed register to the circuit's output dout. The multiplexer can be found in the Plexers category in LogiSim. The correct parameters are 8 data bits and 2 select bits.
Question 2: What we need is the possibility to set exactly one of the enable inputs of the registers to 1 and the others to 0, where the active enable signal corresponds to the one chosen by the address input. There are basically two possibilties: The first one uses a 1-to-4-decoder (we have seen this circuit in the lecture) in order to produce four signals one of which is active. In order to cover the case where the write input is 0, we need to add an AND gate with write and each of the four outputs in order to produce the four enable signals for the registers.
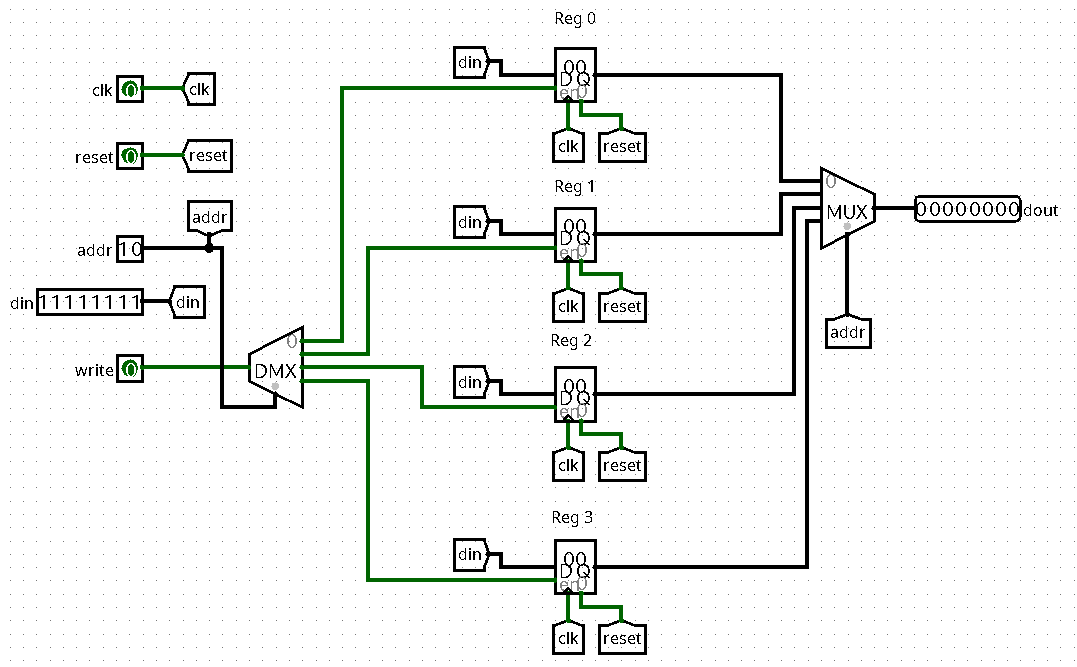
The second (and simpler) solution uses a 1-to-4-demultiplexer, which does both of the above at the same time. It distributes a single signal (in our case write) to four distinct signals, depending on an address input. Both the decoder and the demultiplexer can be found in the Plexers category in logisim.
Here is the complete circuit using a demultiplexer for the writing logic. Note that it uses labels in order to avoid excessive wiring:
Serial to Parallel Conversion
The circuit structure needed to implement the parallalisation of the serial input is a shift register, where we tap the outputs of the individual registers in parallel:

There are different solutions for the valid output: We can either use another shift register with a single 1 is shifted from the input to the output such that it arrives at the output at the moment when four inputs have been processed, and start over again. Another solution is to use a counter that counts the number of processed input bits:

Note that normally we would need to count to four, since this is the number of processed input bits for a complete output word. However, we will process a new bit in the same cycle when we output the parallel word, so we can use a two bit modulo counter, comparing it value with 3. We only need to delay the output of the comparator in order to synchronise it with the input sequence. Here is a complete timing diagram that shows how the circuit works:
Counters
For the basic version of the counter, there is not much to do. We just need to wire up the circuit as in the figure below:

In order to implement saturation arithmetics, we need to stop counting once we reach 15, and instead keep the current value of the counter register. This is basically the same mechanisme as the flip-flop with enable:

In the above circuit, once the output of the comparator goes high, the multiplexer will feed the current state of the counter back to the register, until the circuit is reset.
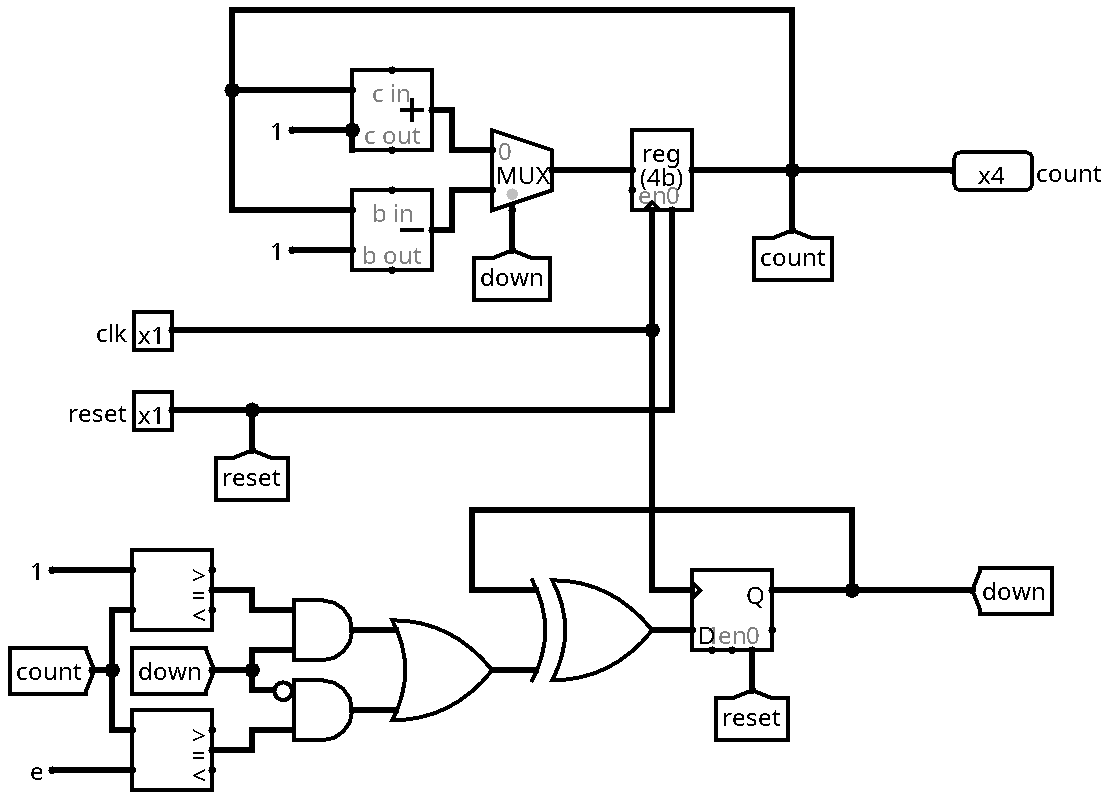
In the last exercise, the task was to realise an up-and-down counter. The first thing to notice is that besides the register holding the value of the counter, we need an additional information: Since during the incrementing phase and the decrementing phase we go through the same numbers, the circuit needs another input that decides if we shall add or subtract one from the current value. This information can be represented by a single bit, let's call the signal down:

Instead of an input, down needs to be an internal state of the circuit. We will store it in a single flip-flop. Let's think about the next state function that will determine the value of down in the next clock cycle, depending on the current state of the circuit (including the counter value and down itself): We will start counting up. Once we reach the value 15, we will start decrementing. Note however that we must not wait until we actually reach 15 before flipping down, since its value is stored in a register, so the value used by the multiplexer is delayed by one cycle. We need to decide one cycle before reaching the maximum (respectively the minimum) to switch the counting direction. Here is a truth table showing the above idea:
| Q | down | n_down |
|---|---|---|
| < 14 | 0 | 0 |
| 14 | 0 | 1 |
| > 1 | 1 | 1 |
| 1 | 1 | 0 |
Here, n_down is the next state of down. Here is a possible Boolean equation:
\[ \text{n_down} = \text{down} \oplus (\overline{\text{down}} \cdot (\text{count}=14) + \text{down} \cdot (\text{count}=1)) \]
Below is the screenshot of a logisim circuit that implements the above equation:
TP — Building a RISC-V Processor
Overview
Introduction
In this exercise, you will implement parts of the data path of a simple single-cycle implementation of the RISC-V base ISA in logisim. The encodings of the instructions to be implemented can be found in this document. A detailed documentation of all basic instructions can be found on this website.
Constraints and hypotheses
The goal of this exercise is not a realistic processor implementation, even if at the end you will be able to run a real RISC-V binary on your model. The goal is to deepen you understanding of the principals of processor design, and the role and interconnection of the different components that make up a processor core. In order to make things easier, there are a couple of constraints and hypotheses throughout this exercise:
- We will be only using 16 registers instead of the full 32. This corresponds to the RV32E variant, where E stands for embedded. This is to reduce the logic of the register bank.
- While addresses have a size of 32 bits, we will only use the lower 16 bits to address instruction and data memories. Regarding the simple test programs we are using, this is not a real restriction (64k ought to be enough for anyone), just be sure not to use higher addresss in your tests.
- As presented in the lecture, we will use memories with asynchronous read, i.e. the read data is available in the same cycle in which we present the address. For larger memories, this is not realistic, but needed here in order to build a single-cycle core.
Setup
Download the archive with the logisim sources and unpack it somewhere in your home directory:
tar xzf tp-riscv.tar.gz
cd tp-riscv/riscv
Register-to-register Data Path
For this exercise, you will be starting from a circuit template that already implements the basic data path for register-to-register instructions. However, neither the instruction decoding nor the ALU are finished. Starting from the root of the archive, change into the riscv subdirectory:
cd riscv
logisim riscv-r.circ &
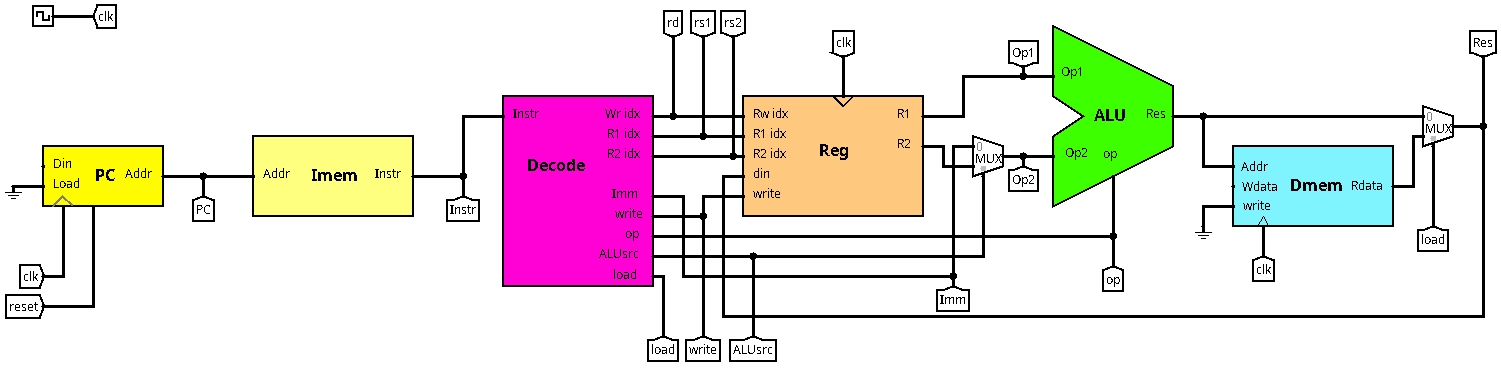
But before you start to play with the circuit, let's look at the data path:
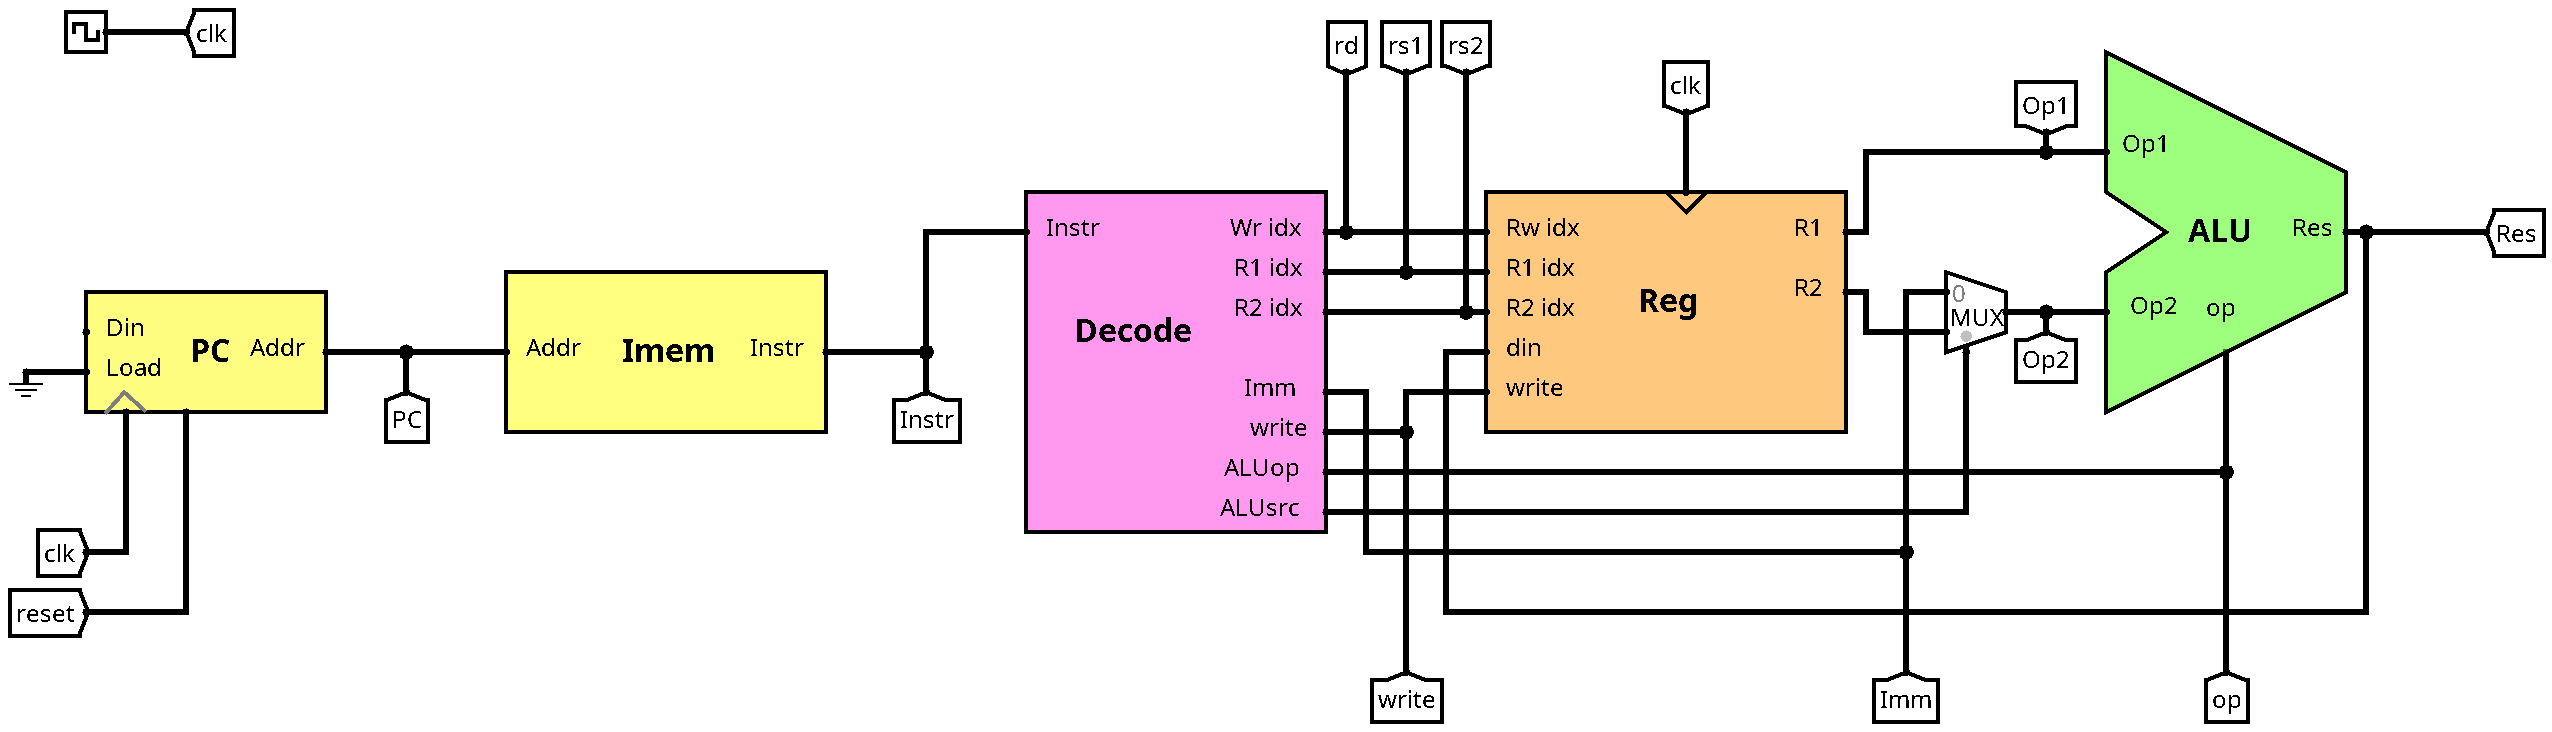
This should by now look familiar to you. Upstream in the data path, there is the program counter (PC). For now, it only counts by steps of four (each instruction is four bytes). The Load and Din inputs will come in handy later for jumps and branches. The output of the PC is connected to the instruction memory (Imem), which outputs the corresponding instruction word in the same cycle. Next in the data path comes the decode unit (Decode), which decomposes the instruction in order to command the remaining components: The register bank (Reg) and the arithmetic-logic unit (ALU). You can inspect and change the subcircuits by either right-clicking on them (View) or by double-clicking on them in the circuit list on the left hand side of the window. Note that some components are imported from external libraries and are not supposed to be changed (the register bank and the instruction memory).
Note that there are many labels on the different connections (called tunnels in logisim). On the one hand side, this is for documentation purposes. On the other hand side, tunnels can be used to avoid big ugly knots in the wiring: All tunnels with the same name will carry the same value throughout simulation. Feel free to use tunnels for your implementation in order to keep things readable. They can be found in the Wiring category. Note that all tunnels of the same name must have the same size, otherwise logisim will highlight them in orange and show a message on "incompatible widths".
Another component frequently used in this exercise are splitters, which can be used in both ways: splitting a multi-bit signal into single bits (or subvectors) and composing individual bits to a multi-bit signal. Splitters can also be found in the Wiring category in case you need them.
Simulating the Processor
As in previous exercises, there are two ways to simulate the processor in order
to help you debug your design. For both ways, the first thing we need is some
interesting input for the processor, in other words some machine code. If you
look into the asm subdirectory, you will find a few test programs in
assembler. They are compiled automatically during the build into a textual format that can be
read by logisim in order to initialise the instruction memory. To build the memory images, switch into the riscv subdirectory and call
make
This will produce some files ending with .mem which contain the machine code in hexadecimal format. This is how you can load one of these programs from within logisim:
- Right click on the Imem circuit instance, and choose View Imem. This will open a view of the internals of the instruction memory.
- Right click on the circuit component in the middle of the schema (the actual memory), and choose Load Image.
- In the file dialog, select the appropriate
.memfile
Alternatively, you can also edit the memory content by hand: just choose Edit Contents instead of Load Image. You can now start simulating the circuit by advancing the clock signal with control-T. If this does not work, you might need to enable simulation: There is a tick box in the Simulate menu of logisim for this. Note that whenever you reset the simulation (control-R), the contents of the memory are lost and you need to reload them from the file.
Alternatively, the Makefile also provides rules to run simulations from the command line, procuding wave traces that can be inspected with GTKWave. Executing make in the riscv directory will produce a wave trace for each exercise. For example, in order to view the trace for the register-to-register data path, call
make test_r2r
The trace files are stored in the vcd subdirectory. You can also open them directly with GTKWave:
gtkwave vcd/test-r2r.gtkw
Implementing the ALU
The first thing you are going to do is implementing the ALU. For the purpose of this exercise, here is an overview of the operations that must be supported:
| short name | description | value |
|---|---|---|
| ADD | Addition | 0000 |
| SLL | Logical left shift | 0001 |
| SLT | Set less than | 0010 |
| SLTU | Set less than unsigned | 0011 |
| XOR | Bitwise exclusive or | 0100 |
| SRL | Logical right shift | 0101 |
| OR | Bitwise or | 0110 |
| AND | Bitwise and | 0111 |
| SUB | Subtraction | 1000 |
The short names of the operations are actually identical to instruction names in the RISC-V base ISA, which is not surprising, since these instructions perform the corresponding operations. They should however not be confused with instructions, since the ALU operation is coded in four bits, while the instructions are 32 bit wide. Furthermore, We will see later that other instructions (such as memory loads or branches) will make use some of these operations, too.
Now open the ALU circuit and start implementing these nine operations. You can use any of the available library elements of logisim (note that there are such predefined circuits for all of them).
Implementing the Decode Unit
Now that you have completed one of the core elements of the data path, let's switch to the decode unit in order to feed the ALU with some real data. Let's have a look at the interface of the decode unit. It is a combinational circuit that takes the current instruction word as input and outputs
- The indices of the registers to be read: R1idx and R2idx
- The index of the register to be written (if applicable): Wridx
- A signal to indicate if the above register should be updated: write
- The ALU operation to be applied: ALUop
- An immediate value: Imm
- A signal selecting between the immediate (0) and the second register (1) to be fed into the ALU: ALUsrc
Let's have a look into the Decode circuit:
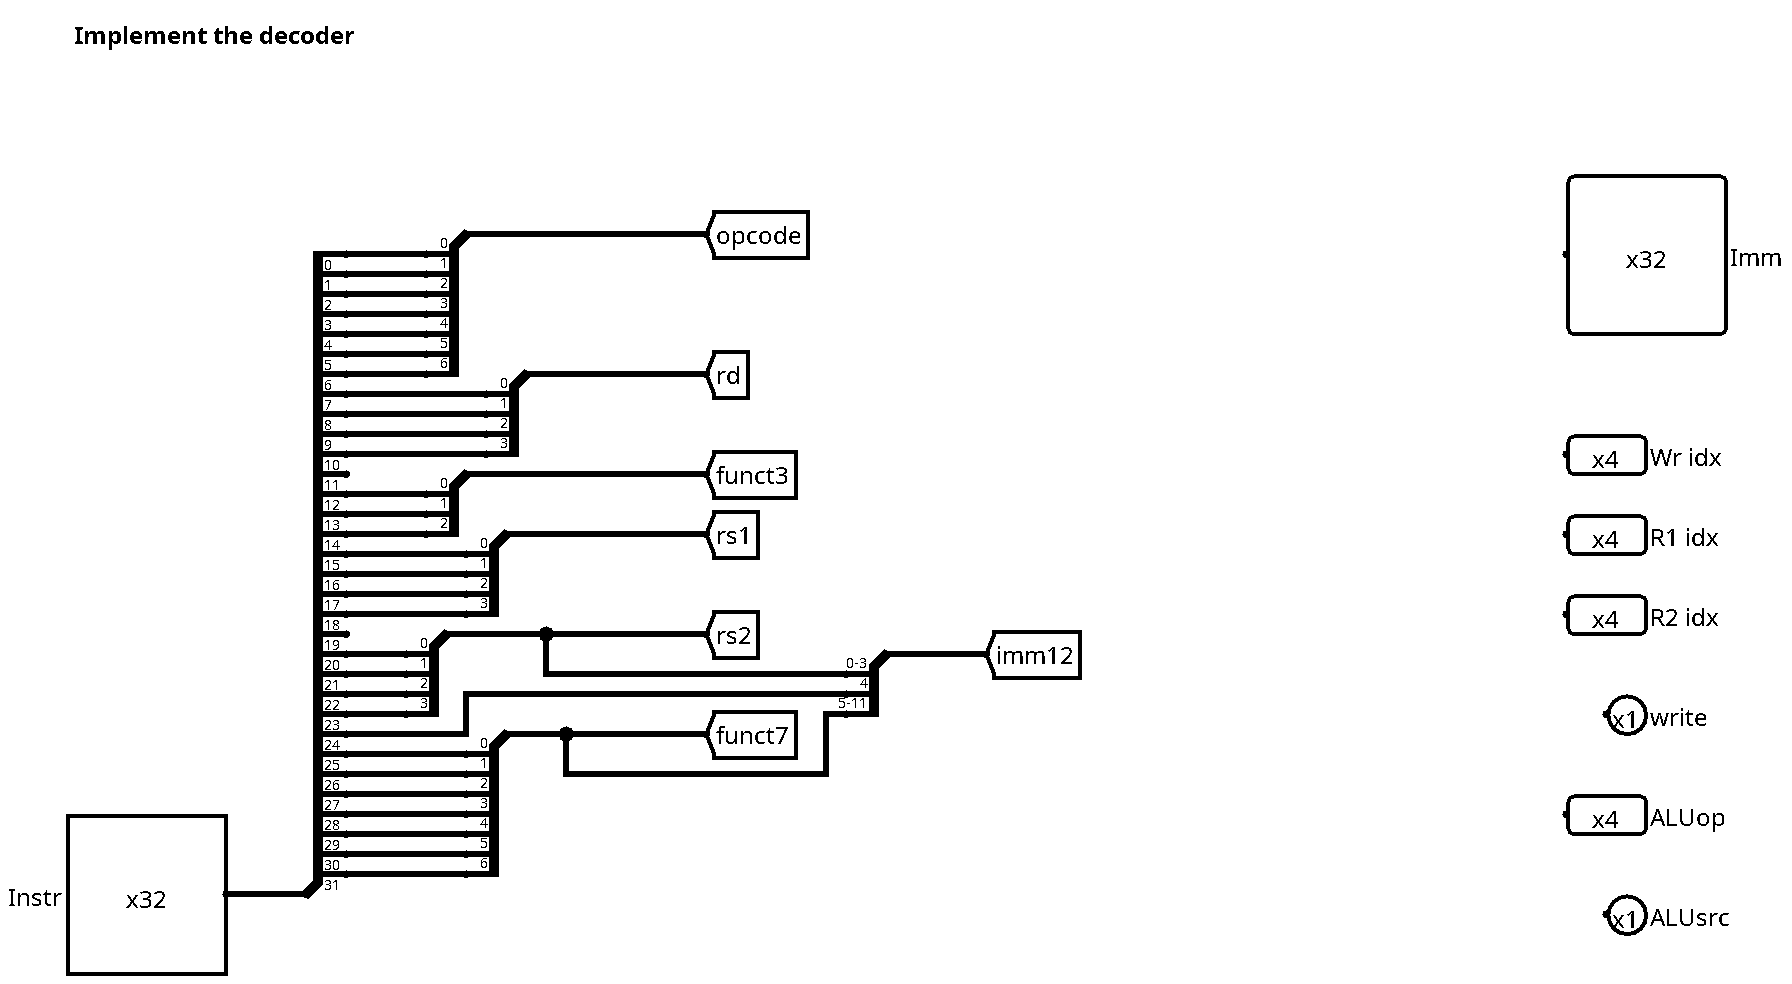
For now, it basically consists of splitters which decompose the instruction words into the different subfields according to the ISA specification of the basic instruction formats[^rv32e]. It is now up to you to use these fields in order to feed the outputs of the decoder unit with the correct values.
In a first step, you will implement the following register-to-register instructions: add, sub, sll, slt, sltu, xor, srl, or, and. These corrspond exactly to the implemented ALU operations. All of them take two registers as input and write the result to a register. Here is the encoding of the add instruction:

In order to test your decoder, you can run the following command in the riscv directory:
make test_r2r
This will show a wave trace with your simulation and a correct specification trace:
Immediate Instructions
As you can see in the above trace, there is not much computations going on,
since all the register values are zero. How do we start up the processor in
order to use some interesting values? The answer is immediate instructions.
These instructions perform computations between one source register and an
immmediate constant encoded in the instruction word, storing the result in a
register. In this step, you will implement the instructions addi, slti,
sltiu, xori, ori, andi, slli, and srli. Note that there is no subi
instruction, since we can use immediate addition and change the sign of the
immediate value. Here is the encoding of the xori instruction:

These are the changes that you need to make in your design:
- The signal ALUsrc must no longer be a constant, but choose between the immediate value or the second source register
- Connect the 12 bit immediate value from the instruction (sign extended) to the imm output of the decoder
You can test your implementation with the following command:
make test_imm
This test executes the program in asm/test-imm.asm, which mixes
register-to-register and immediate instructions. Compare your trace to the
specification trace in order to debug your circuit.
Load Instruction
Our circuit starts to resemble a real processor. The next thing we are going to add is the load instruction lw (load word). Instead of feeding immediate values to the registers, we can define a data section in the assembler code and load those values from the memory. Here is an example program (you can find it in the file asm/test-load.asm):
main:
	li s0, %lo(tab)  # s0 <- &tab
	lw a0, 0(s0)     # a0 <- MEM[s0]   (= tab[0])
	lw a1, 4(s0)     # a1 <- MEM[s0+4] (= tab[1])
	add a2, a0, a1   # a2 <- a0 + a1
	nop
	nop
	nop
	nop

	.align 4
tab:
	.word 0xcafe0123
	.word 0x5a5a5a5a
The second and third instruction are loads. lw a0, 0(s0) loads a memory word into register a0, where the address is computed as the value of register s0 plus a constant offset, which is zero in this case.
There is another new instruction in this code, namely
li. This is actually a pseudo instruction, which is not part of the machine code specification, but will be translated by the assembler into valid instructions. In this case,listands for load immediate, and it serves to initialise a register with a constant value. Depending on the size of the constant value, it will be translated into one or several machine code instructions. In the above program, we make use of another feature of gcc's RISC-V assembler, which is the%lomacro. During assembly, it will be replaced by the lower 16 bits (a half word) of the address that the argument (the labeltab) corresponds to. Since we using small addresses which fit into 16 bits, theliinstruction will be replaced by theaddiinstruction.
Here is the instruction encoding of the lw instruction:

Its format is identical to the immediate instructions, so hopefully we can reuse a lot of the things that are already in place.
Let's look at the data path needed to implement the load word instruction. As
before, there is a template circuit, which needs to be completed. In the riscv
directory, open the circuit riscv-load.circ with logisim. With respect to the previous exercise, there is only a slight difference: We have added an output signal to the decode unit, the signal load. Otherwise, there is space left on the right hand side of the ALU in order to add the data memory. Note that otherwise the decoder and the ALU already implement register-to-register and immediate instructions. This is what's left to do in order to do loads:
- Add the data memory to the data path. You can find it in the dmem category on the left hand side of the window.
- Connect the address input and the data output of the memory to the appropriate signals. You might need to add extra logic in order to correctly feed the register to be written (what are the possible inputs?).
- Complete the decoder unit.
For the last item, there are several changes: The added load signal, the ALU operation to be performed (signal op), and the selection of the second ALU operand (signal ALUsrc). All of those need to take into account the new lw instruction.
You can test your implementation with the build target
make test_load
Store Instruction
Loading is nice, but storing is even nicer. Here is the encoding of the sw (store word) instruction:

This instruction has the S format, where there is no destination register (we are writing the memory instead), but two source registers: The first one (rs1) is used for the address calculation, while the second one (rs2) is the register to be sent to the memory. The immediate field -- needed for the address offset -- is cut into two pieces in order to keep the position of the register addresses at the same place within the instruction word. Otherwise, the address calculation is the same as for the load instructions.
Open the file riscv-loadstore.circ and complete the data path in order to
implement the sw instruction. There is a new signal produced by the decoder
unit (store), indicating a memory store instruction. Otherwise, the circuit
already implements all register-to-register and immediate instructions as well
as the lw instruction. Here is what you need to do:
- Complete the data path by connecting the inputs Wdata and write of the data memory with the appropriate signals
- Complete the decode unit
For the decoder unit, the following changes need to be made:
- Implement the store signal
- Complete the write signal (we have now the first instruction which does not write the register bank)
- Complete the ALUsrc and op signals for the address calculation (same as for loads)
- Complete the imm calculation, taking into account the modified position of the immediate bits in the S-type format
You can test your circuit with the build rule
make test_store
The test executes the following program (see the file asm/test-loadstore.asm):
main:
	li s0, %lo(tab)  # s0 <- &tab      (Res = 0x0030)
	lw a1, 0(s0)     # a1 <- MEM[s0]   (Res = 0x000f)
	addi a1, a1, 1   # a1 <- a1 + 1    (Res = 0x0010)
	sw a1, 0(s0)     # MEM[s0] <- a1   (Res = 0x0030)
	addi a1, a1, 1   # a1 <- a1 + 1    (Res = 0x0011)
	sw a1, 4(s0)     # MEM[s0+4] <- a1 (Res = 0x0034)
	nop
	nop
	lw a1, 0(s0)     # a1 <- MEM[s0]   (Res = 0x0010)
	lw a2, 4(s0)     # a2 <- MEM[s0+4] (Res = 0x0011)
	nop
	nop

.align 2
tab:
	.word 0x000f
Branches
The RISC-V base instruction set has six different branch instructions, all of which share the same format and opcode. Here is the encoding of the blt (branch if less than) instruction:

The above encoding corresponds to the B-type instruction format, which is very similat to the S-type format of store instructions. The only difference is the immediate value, which is somewhat twisted (but don't worry, we already implemented the decoding for you). All branch instructions compare two registers (addressed by rs1 and rs2), where the type of the comparison is given by the funct3 field. If the condition is true, then the instruction will execute a jump to a relative address, which is calculated by adding the immediate offset value to the current PC value. Note that target addresses are always multiples of 2, and thus the immediate value does not encode the least signigicant bit, which is always zero. In this way, we can encode signed offsets of 13 bits.
We have already implemented one of the branch instructions, namely blt. Open the file ricscv-branch.circ in logisim. Compare the data path with the load-store version from the previous exercise:
- What does the new component BU do?
- How is the comparison realised?
Here is a short program that is used to thest the branch implementation:
main:
	li   a0, 0x80
	li   a1, 0x70
loop:
	addi a1, a1, 2
	blt  a1, a0, loop
	nop
What does the program do? You can simulate the circuit executing the above program with the build rule
make test_branch
Look at the generated trace and try to understand what is happening. Once you have fully understood the implementation of blt, try to implement at least one additional branch instruction:
beq: branch if equalbne: branch if not equalbge: branch if greater or equalbltu: branch if less than unsignedbgeu: branch if greater or equal unsigned
You might need to add new operation to the ALU for some of the instructions. Feel free to modify the branch unit, possibly adding new input or output signals. You will need to modify the test program in the file asm/test-branch.asm in order to validate your implementation.
[^rv32e] Note that the register indices only take four bits, since we are using the RV32E variant with 16 registers only.
Solutions for the RISC-V Exercises
Overview
You can download a source code archive with the completed logisim circuits.
R-Type Instructions
ALU
Here is a working solution for the ALU:
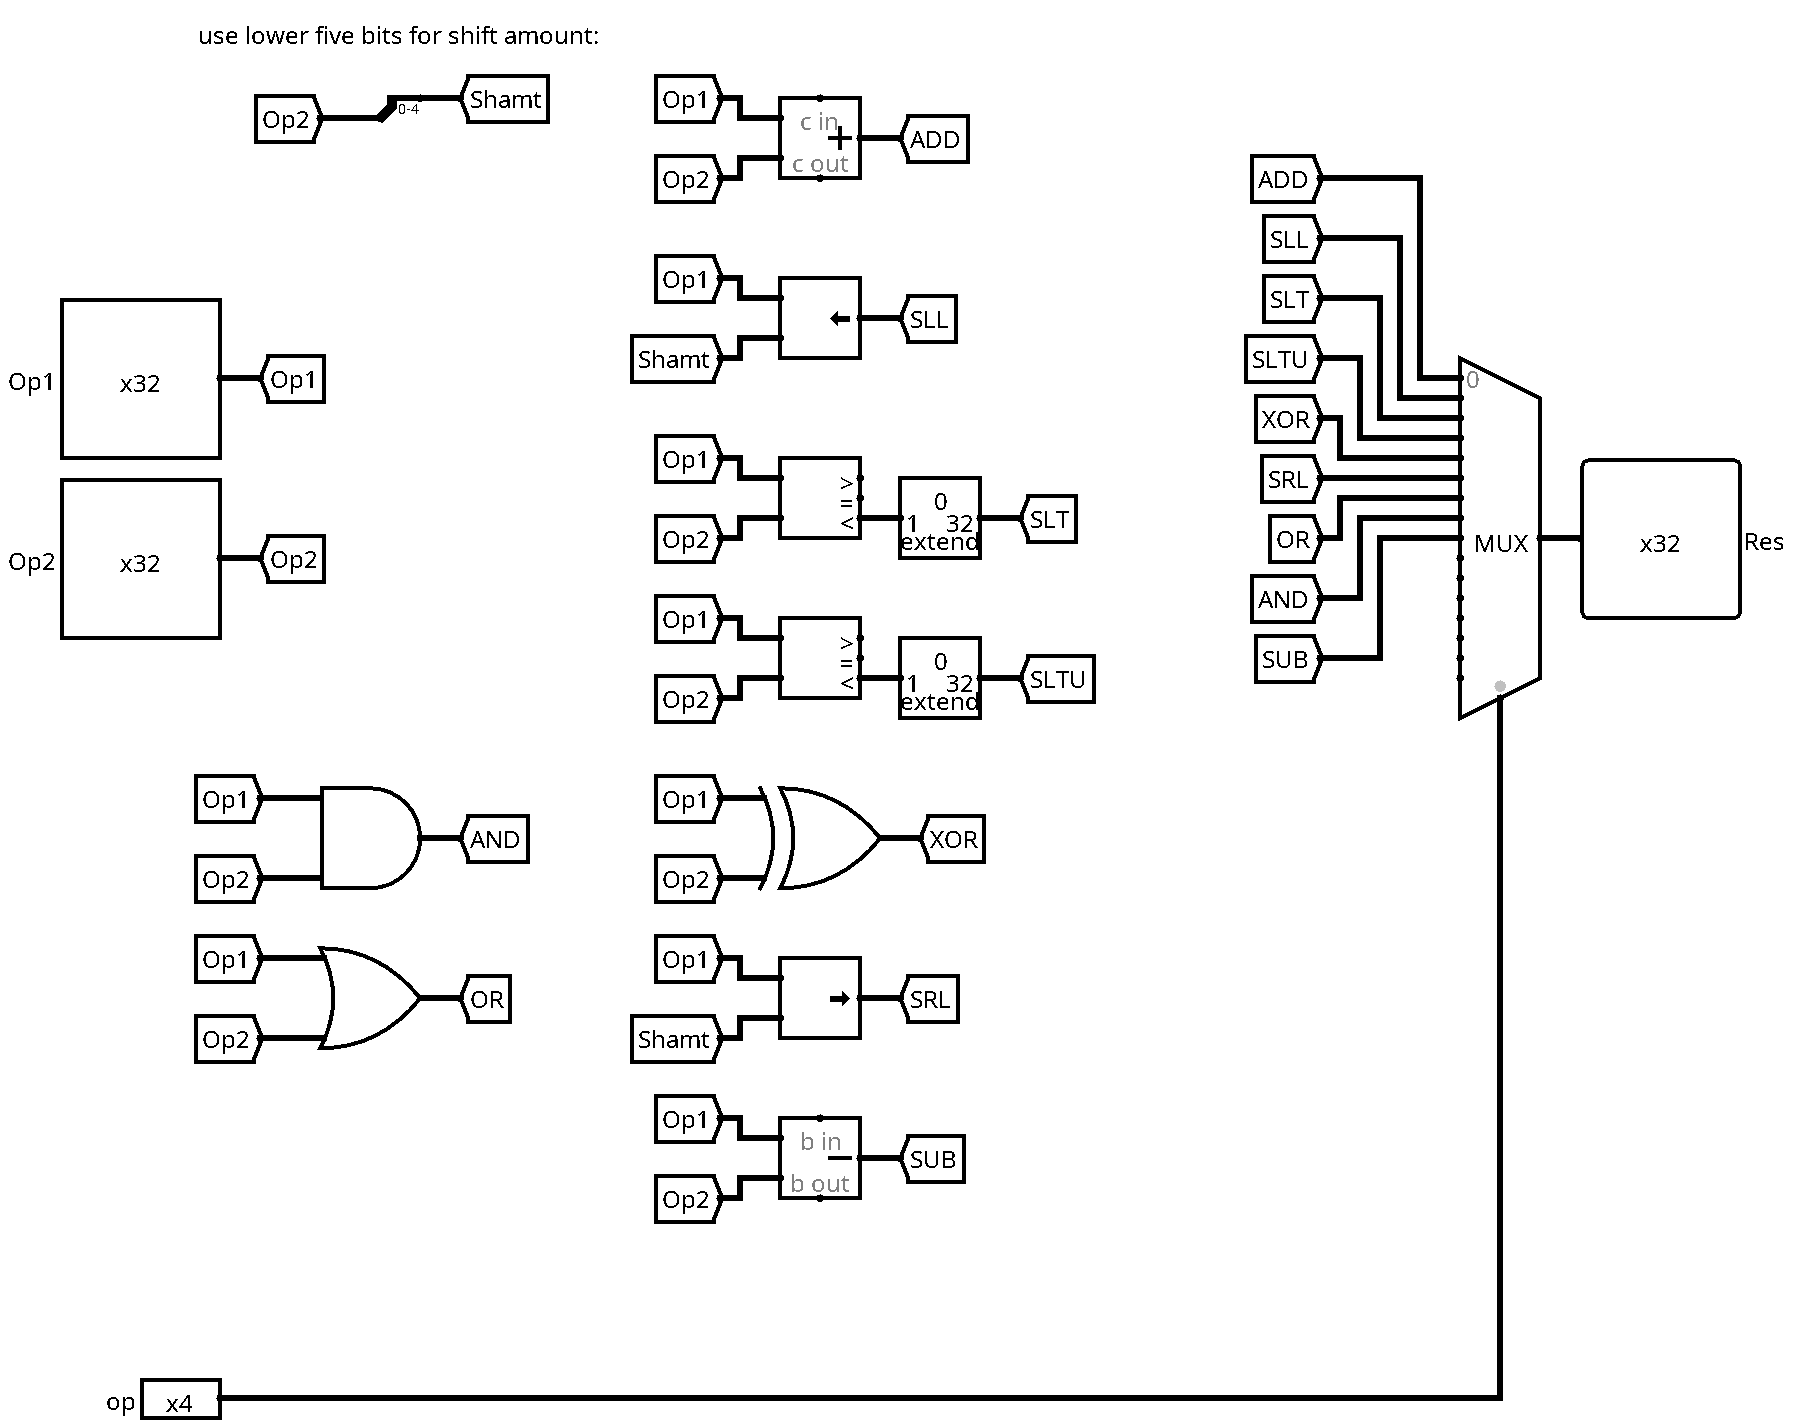
It is basically a big multiplexer that selects the adequate result among the different computations. Each computation has been realised by a basic gate or a block from the logisim arithmetic library. Note that we have extracted the lower five bits of the second input for the shift operations.
Decode Unit
Here is a working decode unit for R-type instructions:
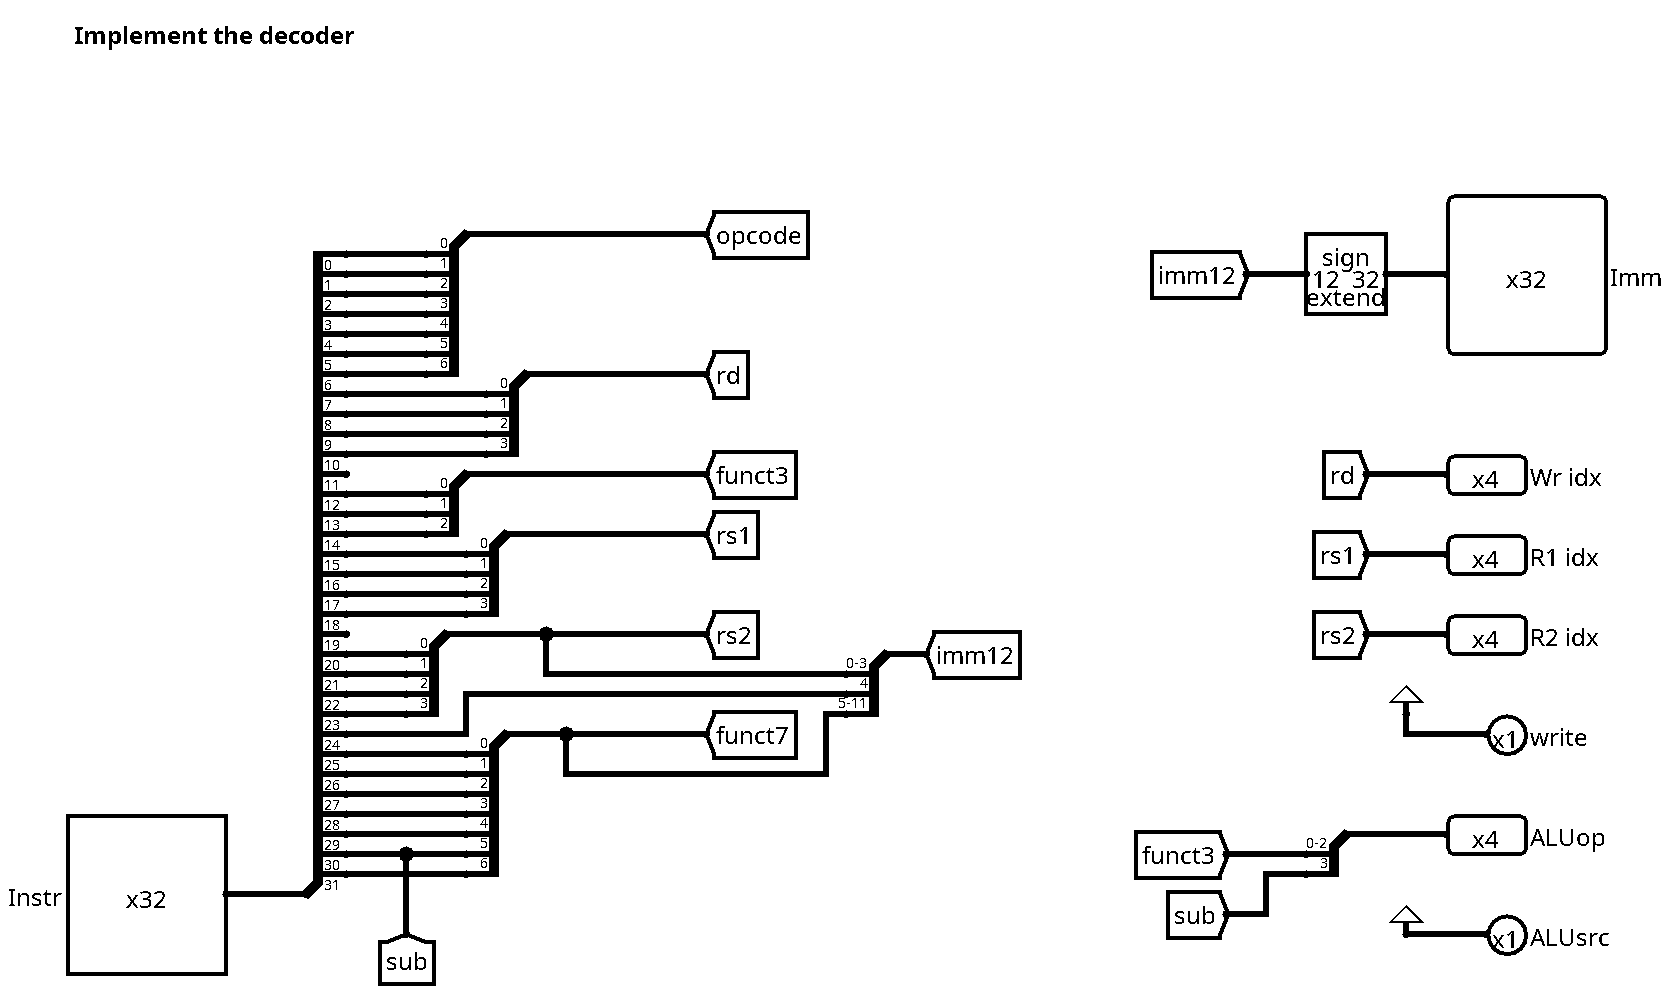
For R-type instructions, there is actually not much to do, since most outputs are just redirections of wires from the instruction word. We have extracted bit 30 (cf label sub), which is used together with the funct3 field to construct the ALU operation output. For now, both write and ALUsrc outputs can be hard wired to the value 1: All instructions write the register file, and all of them use the second register for ALU computations.
We have already prepared the immediate constant, even if it is not used by R-type instructions. We make use of the bit extender module of the logisim library for sign extension from 12 to 32 bits.
Immediate Instructions
Here is the new version of the decode unit:
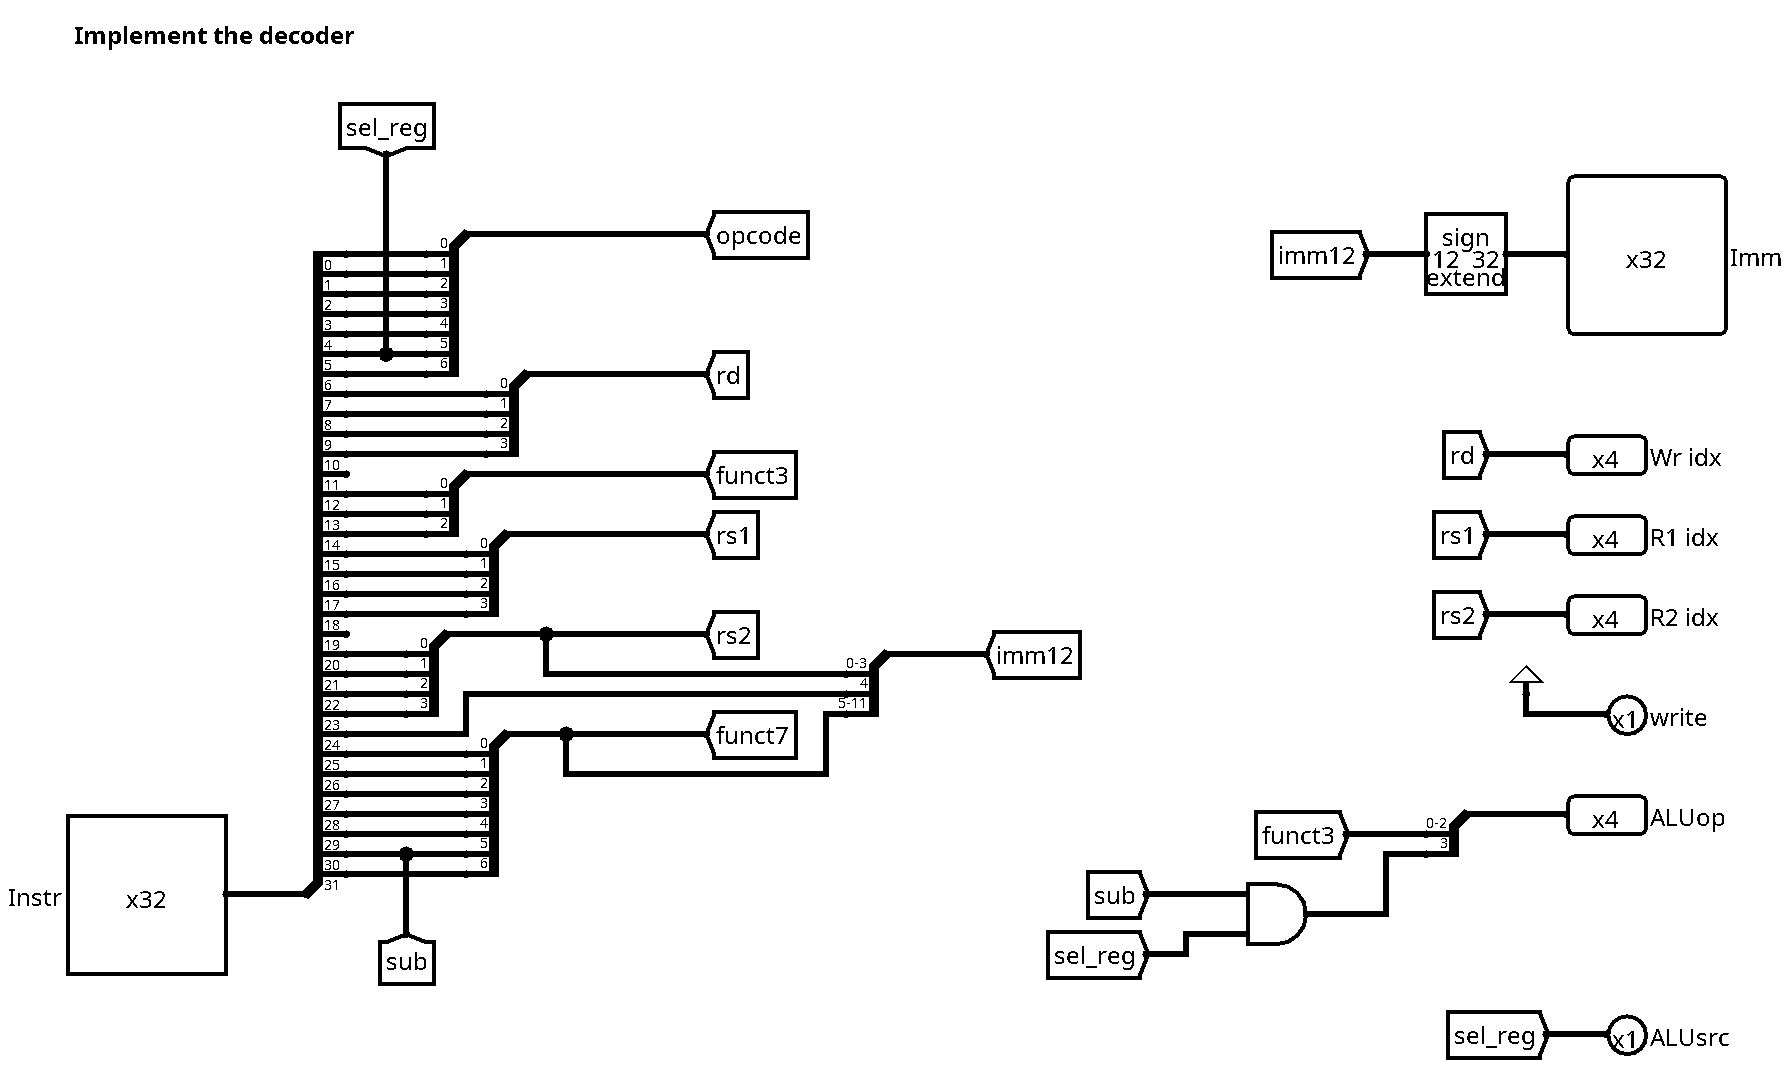
There are two changes with respect to the previous version:
- We now use bit 5 of the opcode to decide on the second ALU source
- The same bit needs to be taken into account to determine the ALU operation
For the first part (ALU source), note that the opcodes for R-type instructions
(0110011) and immediate instructions (0010011) only differ in bit 5. We can
therefore directly use this bit (extracted to the label sel_reg) to select
the ALU source, where 1 corresponds to the second regiser, and 0 to the sign
extended immediate value.
For the second part, note that the only R-type instruction making use of bit 30
for the ALU operation is sub. For all other R-type instructions, this bit is
zero, and therefore also the most significant bit of the ALUop output. Note
also that there is no subtract immediate instruction, all immediate
instructions will set the MSB of ALUop to zero. We need to be careful not to
use bit 30 (label sub) for immediate instructions, since bit 30 is part of the
immediate constant encoded in the instruction word. It could be 1 or 0,
depending on the value of the constant. This is why we need to add an AND gate
in order to set the MSB of ALUop to zero for all immediate instructions.
Load instruction
Data Path
Here is the data path for the load word instruction lw:
Let's zoom in on the interesting part:
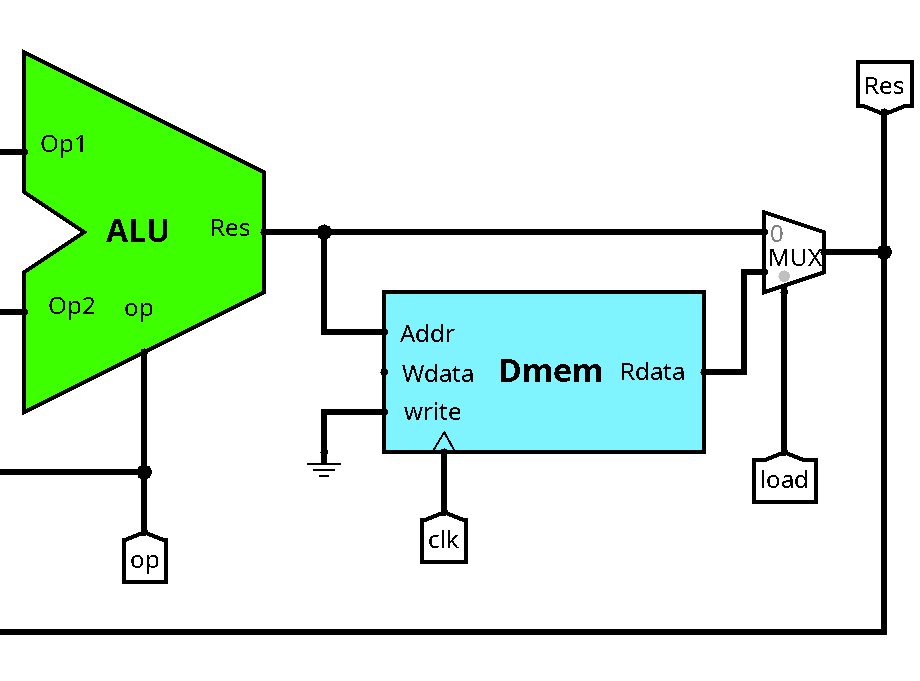
The address of the data memory (first register plus constant offset) will be
computed by the ALU, this corresponds actually to the same computation as for
the addi instruction. For the moment, we can leave the data input of the
memory unconnected, we will need it later to store data. Don't forget to connect
the clock and to connect the write input to 0 (ground symbol).
We now have two different possibilities for the data written back to the register file: It could be the ALU result (for R-type and immediate instructions) or the data read from the data memory (for load instructions). We need to add another multiplexer in order to choose among these two options. The select input is connected to the new control signal load.
Decode Unit
Here is the new version of the decode unit, taking into account lw:
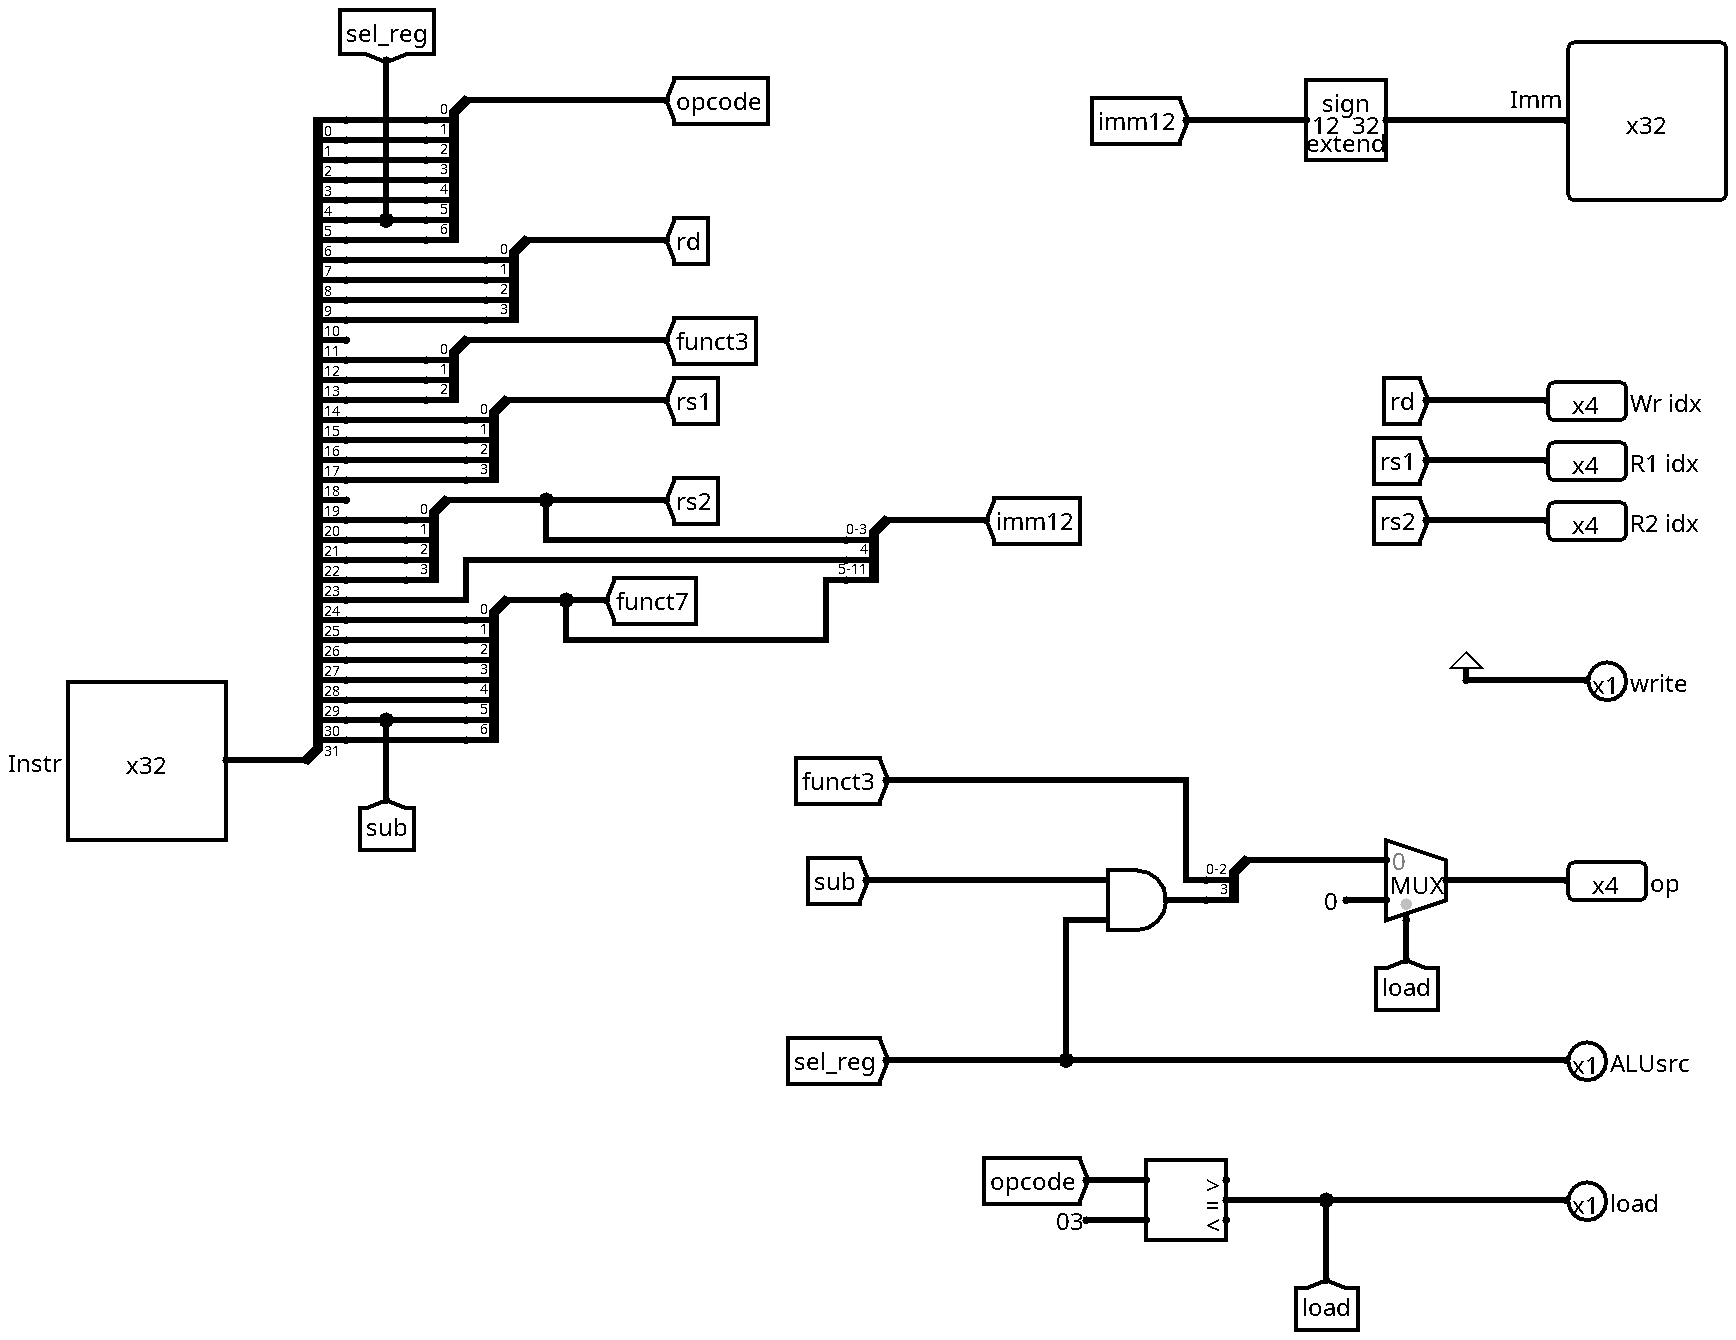
There are two changes with respect to the previous version:
- We need to compute the new load signal
- We need to update the computation of the ALUop signal
For the first part, we can simply use a comparator to check if the opcode
corresponds to the lw instruction (0000011 or 3 in decimal).
Remember that we want the ALU to perform an addition of the first register and the immediate constant from the instruction word. So we need to make sure that
- The ALUsrc chooses the immediate value for the second operand (0)
- The ALUop is set to addition (0)
Looking at the lw opcode, we notice that we can reuse bit 5 (label sel_reg)
for the ALU source, since it is 0. Unfortunately, we cannot reuse the funct3
field for the ALU operation, since for load instructions, this field indicates
the size of the loaded data (we only do word size loads here). So instead we add
a multiplexer that will set the ALU operation to zero if we are decoding a load
instruction. For the select input of the multiplexer, we can simply use the
newly created load signal.
Store Instruction
Data Path
There are two changes in the data path:
- We need to connect the new store signal to the write control input of the data memory
- We need to connect the second register output to the Wdata input of the data memory
Decode Unit
Here is a working implementation of the decode unit for store instructions:
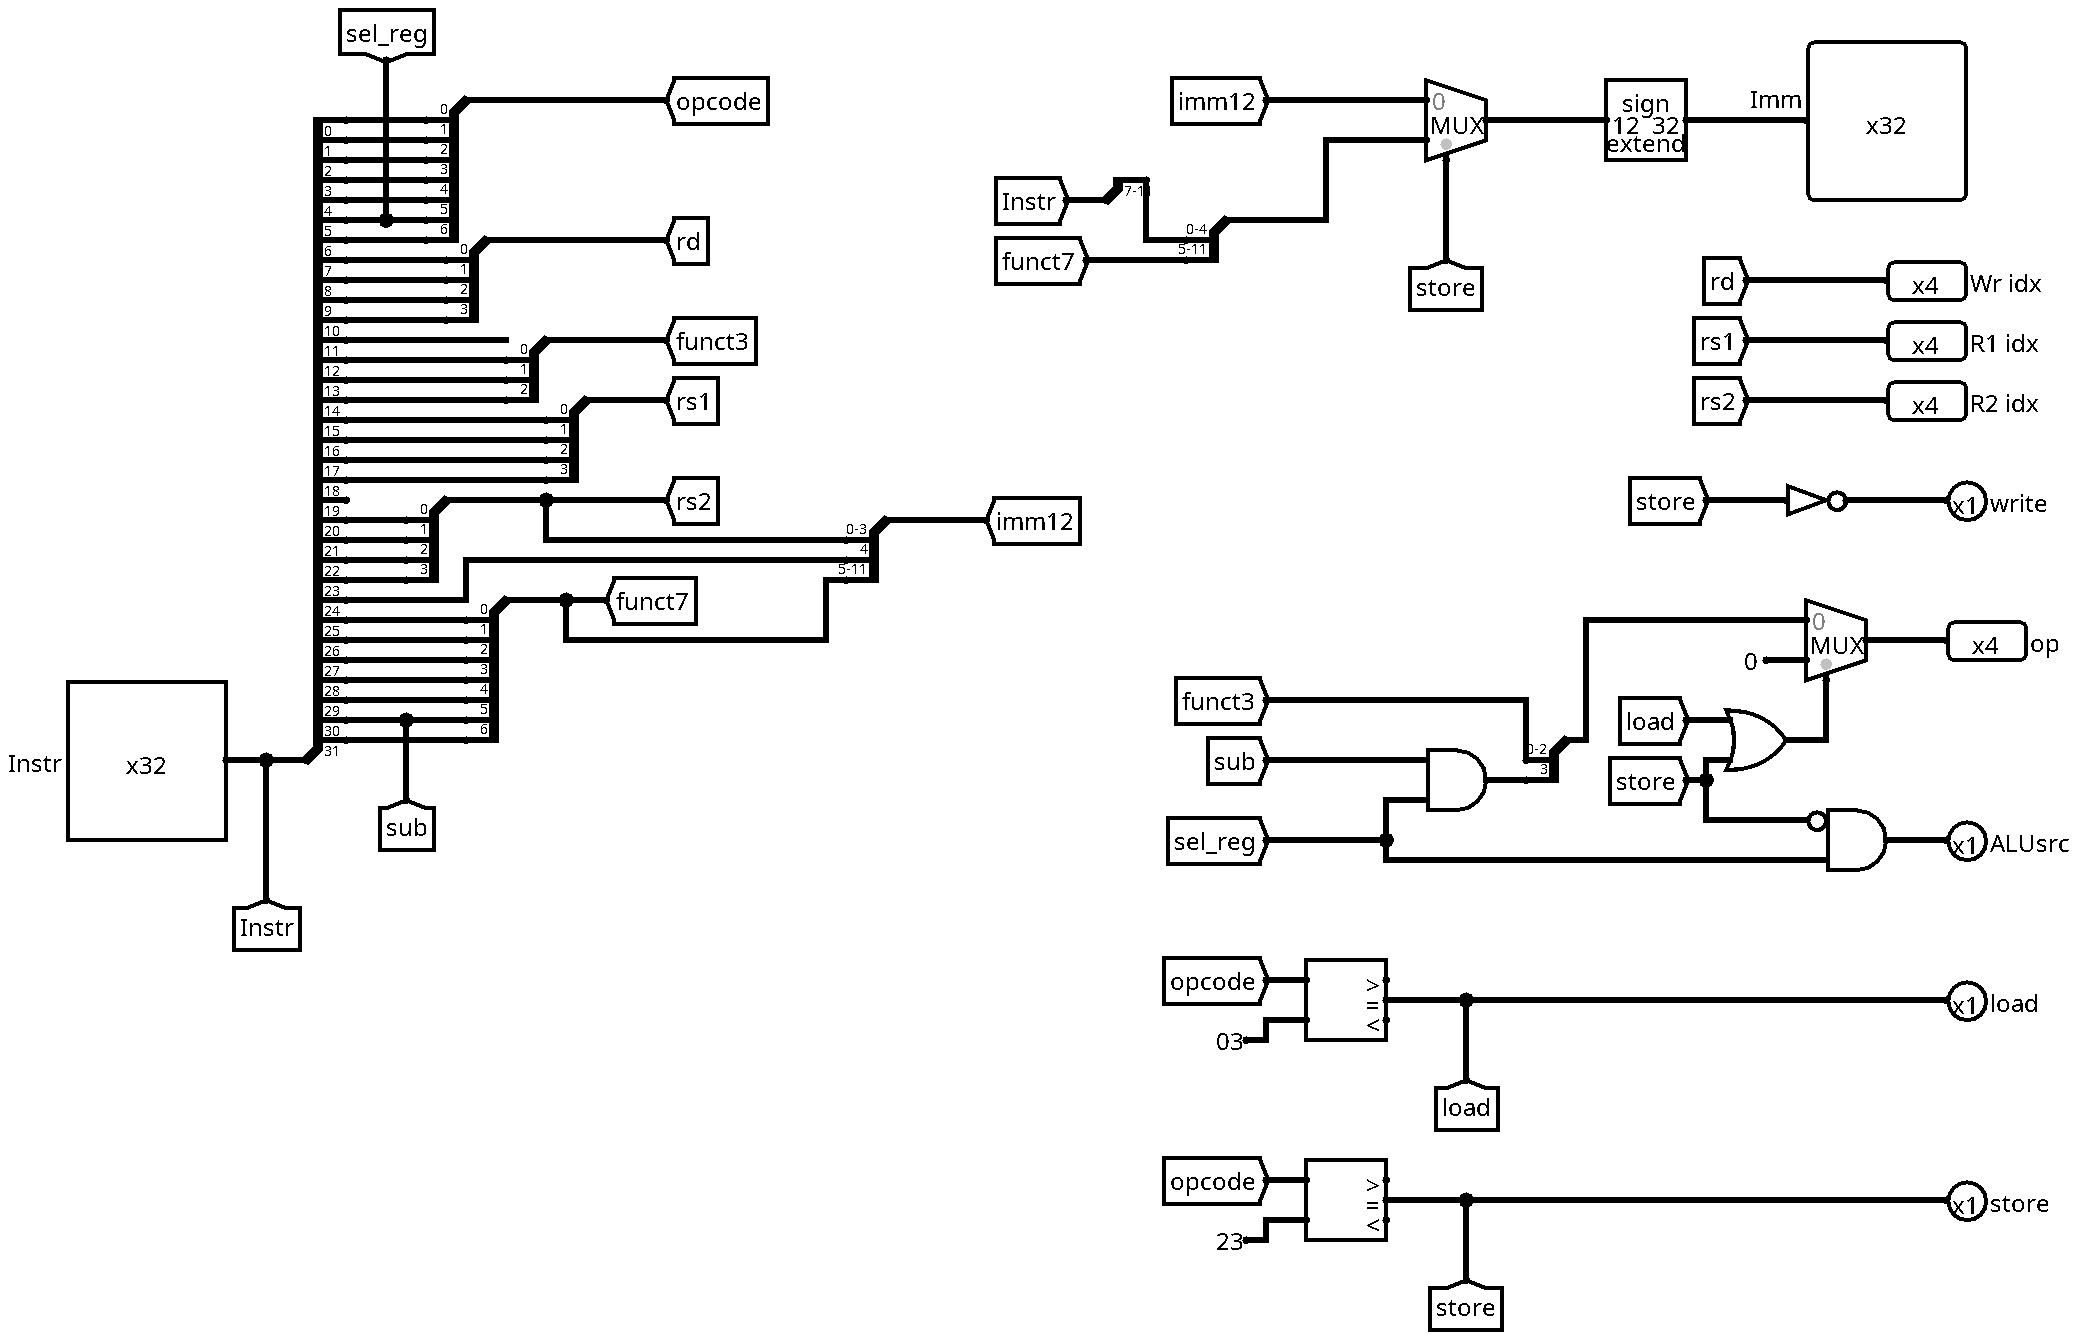
There are several changes:
- The new store control signal
- The immediate value
- The ALU operation
- The ALU source
- The write signal
We can compute the store control signal in the same way as the load signal,
by comparing the opcode with the value for store instructions (0100011 or 23
in hexadecimal). The store signal will be useful for the computation of the
remaining control signals.
The immediate value needs to be adapted since it is encoded differently for store instructions. The reason is that we have two source registers, but no destination register. The design decision of the RISC-V creators was to always keep register addresses at the same place in the intruction word. Therefore, the five lower bits of the immediate value cannot be stored in bit 20 to 24, since this is the place for the second source register address. Instead, we use the place freed by the destination register (bits 7 to 11). In order to distinguish between these two immediate encodings, we add a multiplexer with the store signal as select input.
The ALU operation is the same as for load instructions (0), since we need to compute the sum of the first register and the immediate value. We just add a condition to the already existing multiplexer by adding an OR gate, taking load and store as inputs.
Regarding the ALU source, unfortunately, the store instruction breaks the simple logic that worked for all previous instructions, since the opcode bit number 5 (labeled sel_reg) is 1 for store, but ALUsrc must be 0 in order to select the immediate value as second operand. We can fix this by adding an AND gate with sel_reg and the negation of store as inputs. In this way, ALUsrc is set to 0 whenever we decode a store instruction.
Finally, we need to adapt the write signal, since store instructions do not write the register file (they write to the memory instead). The solution is to define write as the negation of store.
Homework — Programming in Assembler
Overview
The aim of this homework is to explore how high level languages constructions (if/then/else, for loops...) can be expressed in assembly language.
We suppose that i is a variable containing a 32-bit integer (for instance a int32_t in C language) stored at address 0x10000000 in memory.
You can test your answers using Ripes, a RISC-V simulator (the instructions are at the bottom of the page).
Load a 32-bit value into a register
The first construction we need is a way to load an arbitrary value into a register of the processor.
Question 1: using the instruction ORI (OR with immediate value), and the fact that the register x0 always contains the value 0, how can we load a 12-bit unsigned value (such as 0x1A0) into register x6?
Loading a 12-bit value is nice but we would like to load any 32-bit value into a register. Hopefully, the LUI instruction can help us.
Question 2: using the instruction LUI and the answer to question 1, how can we load an arbitrary 32-bit value (such as 0xBEEF01A0) into register x6?
Often, in real code, the loading of an arbitrary constant into a register is done differently. The constant is directly embedded into the code section of the program (as if it was an instruction) and loaded into a register with a
LW(load word) instruction.
Note also that the goal of loading a 32 bit value into a register can be achieved with the pseudo instruciton
LI(load immediate), which is automatically translated toLUIandORIorADDIinstructions
Use of variables
As you have seen during the lectures, in the RISC-V, all arithmetic and logic operations (addition, subtraction...) are performed on operands stored in registers and the result is stored in a register. In high-level programming languages (C, Python, Rust...), variables are often stored in memory. So when the content of a variable is manipulated, it is often necessary to:
- read the value of the variable from the memory to a register,
- manipulate the content of the register,
- store the new value from a register to the memory.
Let's consider the following code snippet:
i = i + 1;
Question 3: write the sequence of assembly instructions required to increment the content of the variable i by 1 (corresponding to the code snippet above). Use as many registers as necessary. Hint: you will need the following instructions: LW (load word), SW (store word), ADDI (add with immediate), and the result of question 2.
Reminder: i is stored at address 0x10000000 in memory. In Ripes, we can initialise i by adding the following assembler code to the end of your program:
.data
i: .word 127
The directive
.dataindicates that the following code (or data) will be stored at the beginning of the data section, which happens to be located at adress0x10000000. You will learn more about memory layout in the second part of the lecture.i:is a label.
If/then/else constructions
We will now see how to translate an if/then/else construction.
If/then
Let's consider the following code snippet (in C language):
if (i == 0) {
    i = 1;     // code block #1
}
i = i + 1;     // code block #2
If you are not (yet) familiar with the C language, the code does the following:
- If the value of the variable
iis 0, the code block in braces{ }is executed - Next, whatever the value of
i, the code block after the braces us executed
In assembly, if constructions are built using a conditional branch instructions (BEQ, BNE, BLT, BGE). These instructions take three parameters:
- two registers (
src1andsrc2), - an 12-bit signed immediate value (
offset).
When the condition is met, i.e. :
- for
BEQ, when the content of the registersrc1is equal to the content of the registersrc2, - for
BNE, when the content of the registersrc1is not equal to the content of the registersrc2, - for
BLT, when the content of the registersrc1is less than the content of the registersrc2, - for
BGE, when the content of the registersrc1is greater than or equal to the content of the registersrc2,
Two other instructions exist (
BLTUandBGEU) which do the same asBLTandBGEbut using unsigned comparisons instead of signed comparisons.
the processor jumps to the instruction at the address: PC + offset, where PC
is the address of the conditional branch instruction. However, the usual way to
indicate a jump target is a label, which will be translated into the correct
offset during asembly. In order to declare a label for a certain assembler
instruction, start the line before the instruction with the label identifier (it
must begin with a letter), followed by a colon :.
Question 4: write the sequence of assembly instructions that behaves the
same as the code block above. You should reuse your solution to Question 3 in
order to load variable i into a register before testing its value. The
assignment i = 0 and addition i = i + 1 can be done locally in a register,
but don't forget to store the result in the correct memory location at the end.
If/then/else
We now want to translate the following C code:
if (i == 0) {
    i = 1;     // code block #1
}
else {
    i = -i;    // code block #2
}
i = i + 1;     // code block #3
If the content of the variable i is 0, code block 1 then code block 3 are executed, else (if i is not equal to 0), code block 2 then code block 3 are executed.
To translate this block of code, we will need to use, in addition to a conditional branch instruction, an unconditional jump instruction. In the RISC-V, an unconditional jump is encoded as jal x0, offset where offset is a 20-bit signed immediate value. When the processor executes this instruction it jumps to the instruction at address A + offset where A is the address of the jal instruction. As for branches, we can use labels for jump targets.
The 'l' in
jalstands for 'link', which means basically storing the address of the next instruction in a register as return address for a function call. If we don't care about returning, we can use register x0 (zero) as target, since writes to the zero register will just be ignored. There is even a pseudo instructionj(jump), which is translated tojal zero.
Question 5: write the sequence of assembly instructions that behaves the same as the C code shown above. As before, reuse your code to load i into a register. All arithmetic operations can be performed on this register. Note that arithmetic negation can be realised by subtracting a value from zero. Use Ripes and different initial values of i to test your code.
For loops
The next construction we will study is the for loop. Let's consider the following code snippet:
for (j = 0; j < 10; j++) {
    i = i + 10; // code block # 1
}
// code block #2
At the beginning of the loop, the variable j is initialized with value 0. Next, the exit condition (j < 10) is evaluated. If it is false, we exit the loop (code block 2), else, we execute the content of the loop (code block 1). In this latter case, after one iteration of the loop, the variable j is incremented by 1 (j++) and the exit condition is evaluated again.
An equivalent program using the while construct instead look like this:
j = 0;
while (j < 10) {
    i = i + 10;  // code block #1
    j++;
}
// code block #2
Question 6: write the sequence of assembly instruction that behaves the same as the code block above. You can use a register for the loop variable j, no need to store it in memory. Reuse your code in order to load i from memory, and to save it at the end (in code block #2.)
Squaring a number
Now you should have developped enough assembler skills to implement a function that computes the square of an integer. It uses the simple mathematical fact:
\[ n^2 = \sum_{i=1}^{n} (2n - 1), \quad \text{for}\; n \geq 1 \]
So all we need to do to compute the square is summing up the first \(n\) odd numbers. In C, this corresponds to the following code:
if (n < 0) {

    // make sure n is positive
    n = -n;
}
s = 0;  // square
k = 1;  // odd number to sum up
for (int i=0; i<n; i++) {
    s = s + k;
    k = k + 2;
}
Question 7: Write an assembler program that computes the square of n, where n is stored at address 0x10000000. The result shall be stored at address 0x10000004. You can use registers for intermediate results and loop variables. You can initialise the memory by adding the following code to the end of your program:
.data
n: .word 42
s: .word 0
Change the value of n to test your code. We do not consider arithmetic overflows, i.e. we make the hypothesis that \(n^2\) is small enough to fit into a 32 bit signed integer.
Test with Ripes
You can test your answers using Ripes.
Configuration
Launch Ripes.
On the school's computer labs machines,
Ripesis already installed and can be launched from a terminal:
$ Ripes
Note: do not type
$, it represents the prompt, i.e. what is displayed by the shell to invite you to type a command. Be also careful about the uppercase and lowercase letters as the shell is case-sensitive.
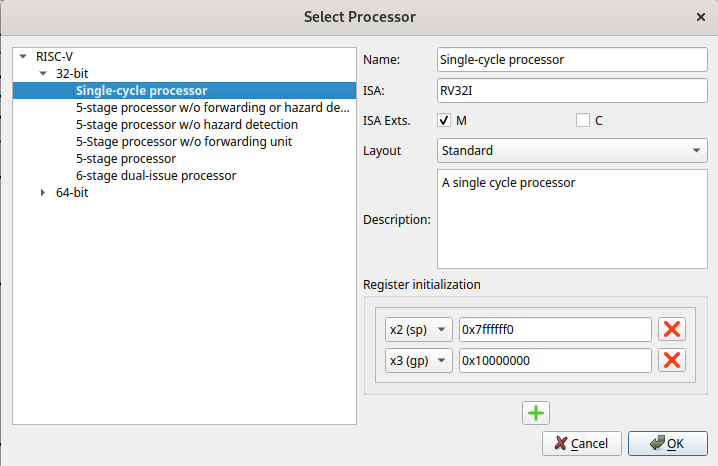
Next, using the first icon Select processor (just below the menu File), select a Single-cycle processor.
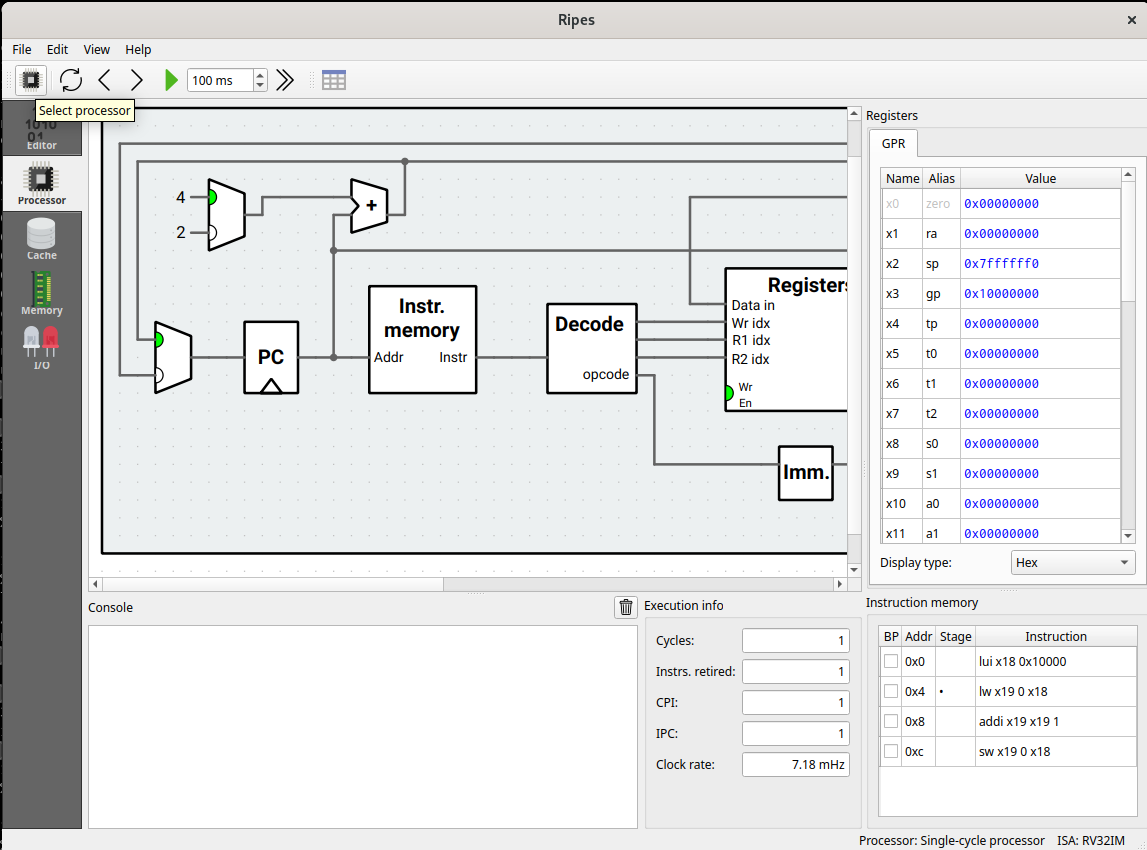
Write assembly code
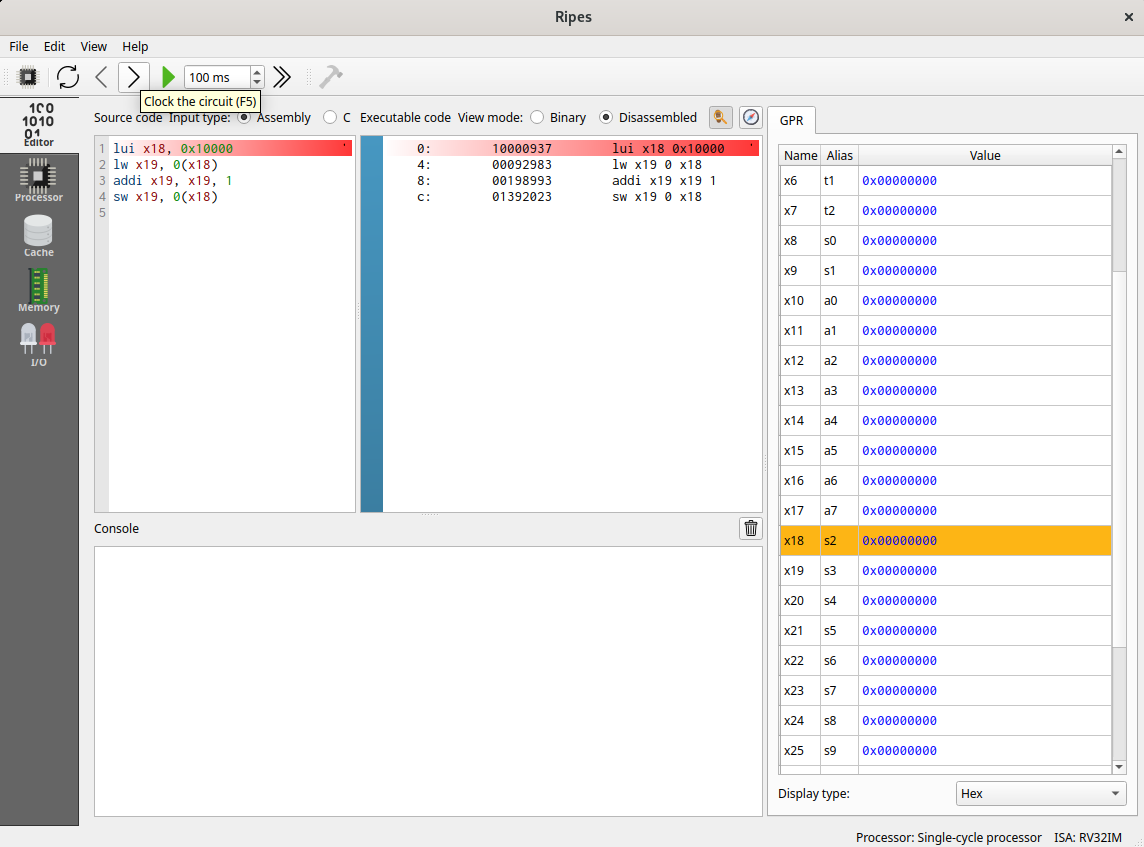
In the Editor panel, on the left (below Source code), you can directly write assembly code.
For instance, you can type:
lui  x18, 0x10000
lw   x19, 0(x18)
addi x19, x19, 1
sw   x19, 0(x18)
The next instruction to be executed is highlighted in red. You can execute it using the icon representing a right black arrow (clock the circuit). The value of the registers is shown on the right (GPR) and the registers that has been modified by the previous instruction are highlighted in orange.
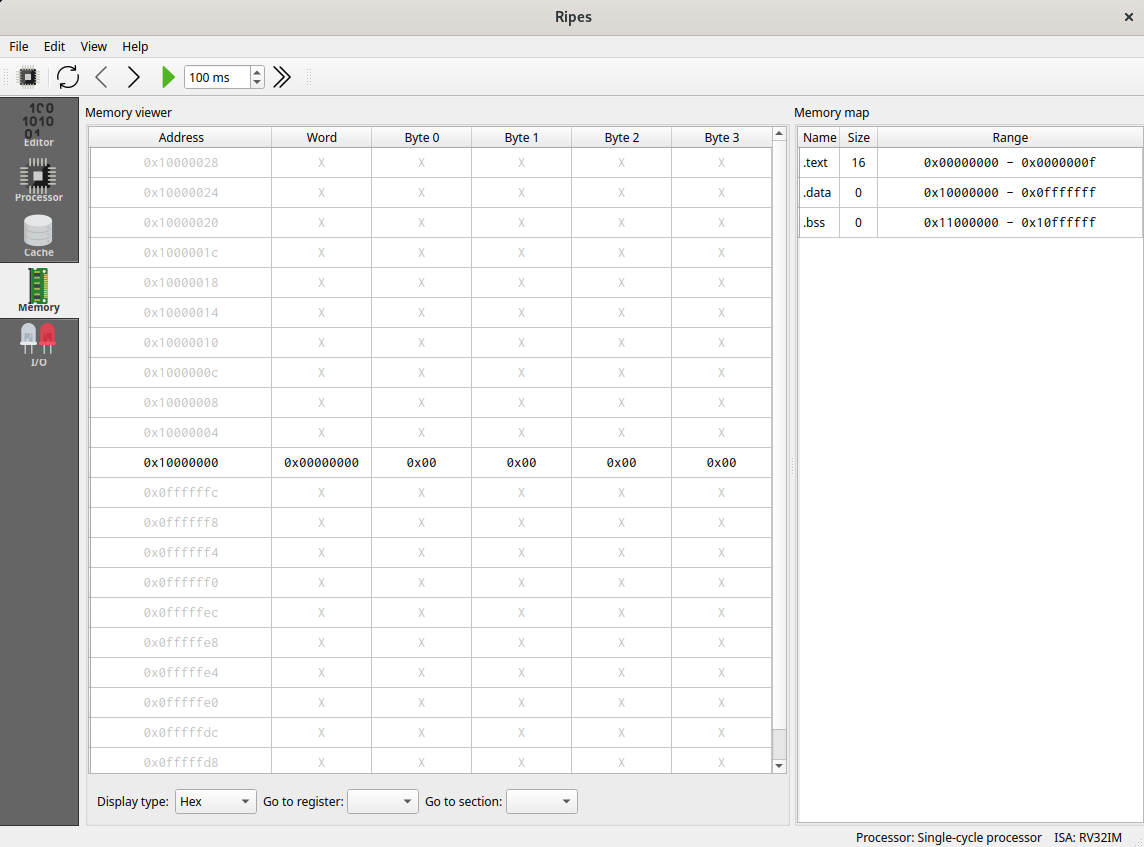
See the content of memory
You can see the content of the memory using the Memory panel. The address 0x10000000 used in the text above can be accessed by selecting .data in Go to section list at the bottom of the screen.
Part 2 — Du processeur aux programmes systèmes
Overview
Getting Started with C
Setup
As you have seen in the lecture, the C language is (typically) a compiled language. In order to execute a program written in C you first have to compile it to machine code. There are several commercial and open-source compilers available to chose from, for instance:
- Clang/LLVM
- Clang/LLVM is the basis for many other compilers ...
- Intel oneAPI C/C++ compilers
- AMD Optimizing C/C++
- IBM Open XL C/C++
- C++ Builder
- Windriver Diab (for embedded systems)
- Microsoft Visual Studio C/C++
- Tasking (for embedded systems)
- Compcert (a French success story!)
- GCC
On the lab machines you have access to the clang and gcc compilers. We'll use gcc, but clang is an equally good (probably even better) compiler.
The compiler alone is evidently not sufficient to develop programs - let alone large projects. Many of the compilers mentioned above are actually part of larger development suites that come with an integrated development environment (IDE). For this course it is suggested to use Visual Studio Code as an editor. Well, it is a complete IDE, but you should use the compiler on the command line to get a better understanding of what is happening behind the scenes.
First create a new folder for the lab exercises of this course (you may of course change the folder name) by typing the following command into the command-line (terminal):
mkdir inf107
cd inf107
code .
This should open a new Visual Studio Code window and maybe a dialog that asks whether you trust the files in the folder. Well there aren't any files in the folder yet and only you will add new files, so you should be ok trusting yourself.
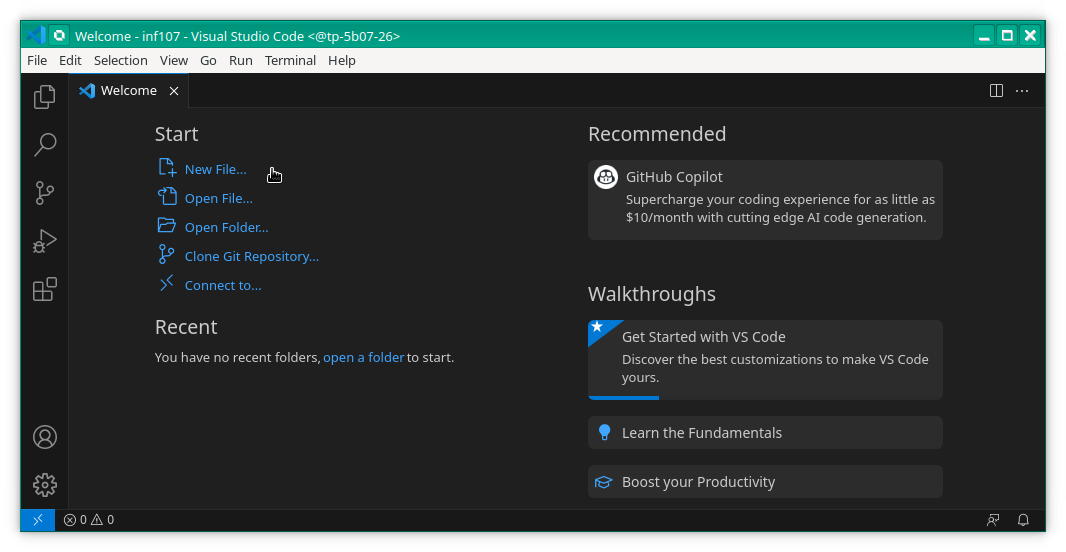
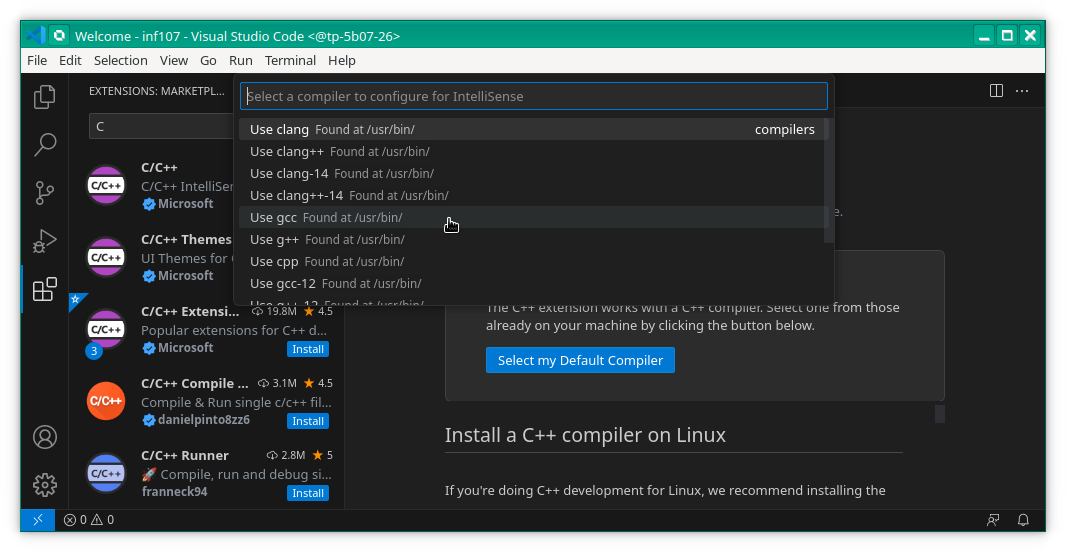
Next you have to install an extension in order for the editor to support the C/C++ language. Click on the icon with the four small squares (on the left of the mouse pointer in the figure above). Type "C" into the search bar on the top and select the C/C++ extension by Microsoft by clicking on "Install" as shown in the following screen shot:
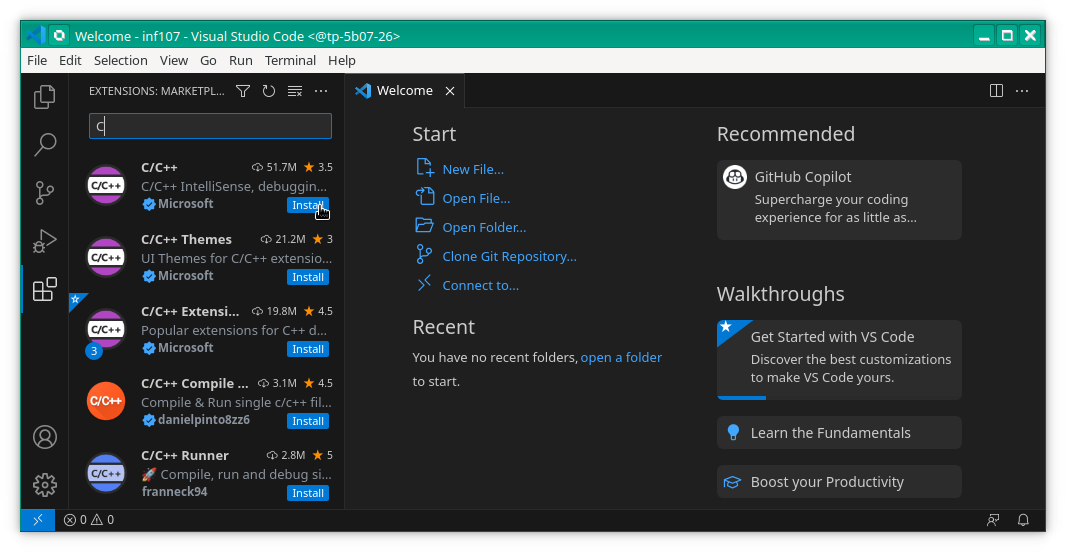
Click on "Select my Default Compiler" and select gcc in the drop-down lost.
Compiling on the command line
Now you are good to go. Click on the New file ... (or use the keyboard shortcut Ctrl + N). Save the empty file under the name hello-world.c using the shortcut Ctrl + S. Don't use the menu use the shortcut! Then copy-and-paste the following C code - the obligatory "Hello World" program - into the editor. Don't forget to save using the shortcut Ctrl + S:
#include <stdio.h>
#include <stdlib.h>

int main(int argc, char *argv[])
{
  printf("Hello World\n");
  return EXIT_SUCCESS;
}
Go back to the command-line terminal, or open a terminal inside of Visual Studio Code (shortcut `Ctrl + ```) and type the following compiler command into the terminal (followed by enter/return):
gcc -Wall -pedantic -std=c11 -O0 -g hello-world.c -o hello-world
Normally you should not have any compiler messages for this code. If you have some, check that you copied all of the code (no missing characters on the first/last line, no missing line, ...). You may now run the program by typing the following command into the command-line terminal:
./hello-world
The following table briefly explains the compiler options used:
| Options | Description |
|---|---|
-Wall | Activate all warnings. |
-pedantic | Reject programs that do not comply with the ISO standard. |
-std=c11 | Apply the ISO standard for C11. |
-O0 | Disable all compiler optimizations. |
-g | Enable debug information (we'll get back to this in a minute). |
-o <filename> | Tell the compiler to use the provided <filename> for the executable file. |
\
|  | You should always use at least these options whenever you compile a C file for this course. |
| | |
| You should always use at least these options whenever you compile a C file for this course. |
| | |
Manual Pages
You can consult the complete list of gcc's compiler options and their meaning on the command line as follows:
man gcc
The man command is useful in may situations. It is intended to provide quick access to documentation - so-called manual pages or man pages. The man pages are structured in sections, which are in-turn described in a man page. Have a look:
man man
By the way, you can also use the man command to obtain information on functions of the C library. The following command provides information on the printf function:
man 3. printf
Here the argument 3. explicitly indicates the section, which in this case is the section on library functions. You can use the same command for all C library functions that you will discover in the course of this course.
Debugging with gdbgui
Create a new file division.c based on the following erroneous code. Compile this file (using all the options seen before), check the compiler's error message, fix the code and, finally, run the resulting program.
#include <stdio.h>
#include <stdlib.h>

unsigned int division(unsigned int dividend, unsigned int divisor) {
  unsigned int result = 0;
  for(unsigned int rest = dividend; rest >= divisor; result++)
    rest = rest - ;
  return result;
}

const char message[] = "Hello World";
short data = 25;
int division_result;

int main(int argc, char *argv[]) {
  division_result = division(data, 7) + 2;
  printf("%s\n", message);
  printf("%d\n", division_result);
  return EXIT_SUCCESS;
}
The compile should display an error message for this code (before you fix it). The message should look something like this:
division.c: In function ‘division’:
division.c:7:19: error: expected expression before ‘;’ token
    7 |     rest = rest - ;
      |                   ^
The compiler messages always follow the same pattern:
- First, the compiler tries to provide context for the error. In this case the problem occurred when processing the file
division.cand, more precisely, within the functiondivision. - Then the compiler shows a precise error message, which indicates, once more, the file (
division.c), the line (7), and offset on the line (19). Then a textual description of the problem is provided. - Finally, the compiler prints an excerpt of the code that caused the problem.
Always read error/warning messages carefully. Try to understand whet the compiler is trying to tell you. In this particular case, the compiler indicates that it expected an expression after the subtraction (-) and before the semi-colon (;). The code was covered in the lecture. So you should be able to fix this problem (in the worst-case by comparing the code here with the lecture slides).
Stepping through the Program
While working on the up-coming exercises of this course you will inevitably make mistakes. Some of them are easy to spot, e.g., when the compiler prints an error message or warning. In other cases your program will compile without problems, but not produce the expected output. In this case it is sometimes helpful to use a debugger.
A debugger is a special program that is able to execute your program in a controlled way. You may step through your program, inspect the values of variables, pause the program when specific events occurred, et cetera. On Linux the standard debugger is called gdb. However, gdb only offers a textual command-line interface, which is great to use when you are used to it, but somewhat of a challenge for novices. We will thus use gdbgui, a graphical interface wrapped around gdb. The idea is to allow novice users to explore the graphical interface and gradually learn the shortcuts of the command-line interface - which is always displayed and actually usable within gdbgui.
Let's give it a try, on the command-line type:
/comelec/softs/bin/gdbgui division
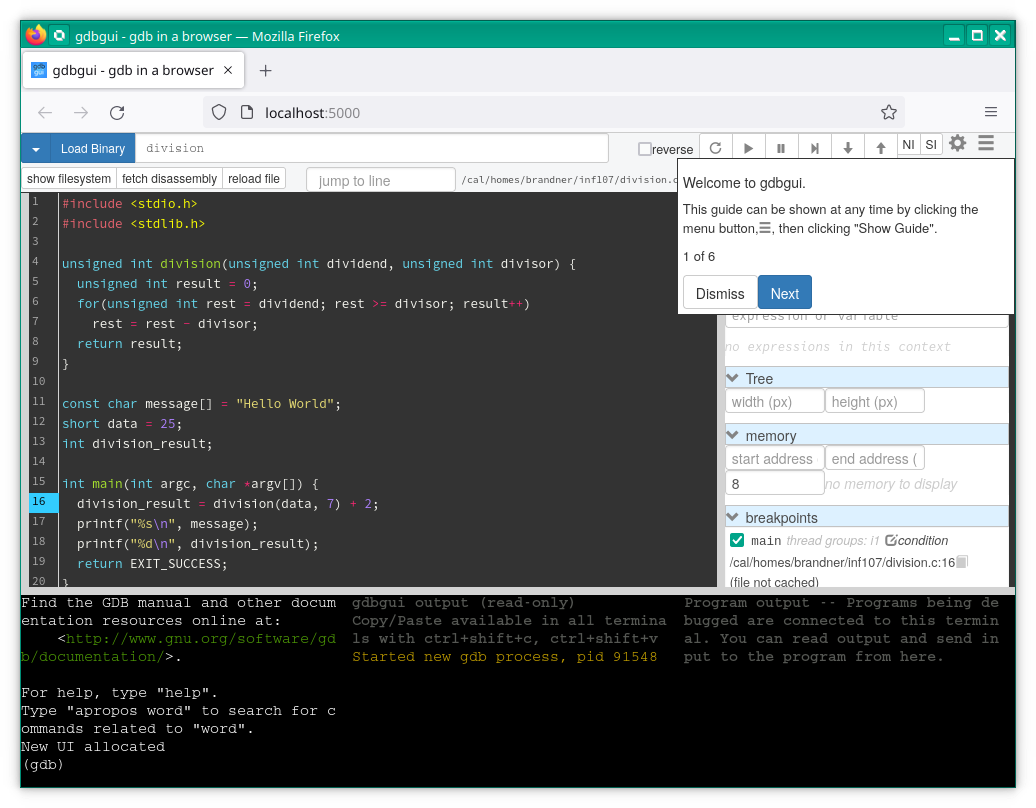
This should open a new browser window (or tab) with gdbgui's graphical interface. Follow the guide by clicking next in order to discover the different elements of the graphical interface.
You can start the program by clicking on the left-most button on the top-right of the interface (the button with the circular arrow, right above the word "Welcome" in the screenshot above). You will notice that the program starts and immediately stops on the first line of the main function (on line 16).
Use the button "Step over" (the fourth from the left, with the triangle pointing to a bar on the right) in order to step through the program. You will notice that the debugger advances line by line until you reach the end of the main function. If you continue to click on the button, the debugger takes you to some machine code of the standard C library that is actually executed before main.
Restart the program, this time use the button "Step into" button, the fifth button from the left (with the arrow pointing downwards), in order to step through the program. Whenever the program encounters a function call this button will follow the call and continue inside the called function. Step through the division function an observe, via the tab local variables on the right, the different values of the variable rest as the program executes.
Try hovering about the buttons "Start", "Step over", "Step into" with your mouse. Normally a tool tip should pop up. Carefully read the tool top and, in particular, look for keyboard shortcuts. Try using those shortcuts, e.g., click into the source code then push r on the keyboard then push s a couple of times. Using the shortcuts is more convenient and faster than clicking on the buttons with the mouse. Try to use those shortcuts from now on. If you forget them, just hover with your mouse over the buttons to recall them.
Breakpoints
It is often cumbersome and time-consuming to go through a program step-by-step until am interesting point is reached. Breakpoints help with this. They allow to stop the program's execution at a specified location. You may even indicate a condition with a breakpoint, the execution then only stops there when the condition is satisfied.
You can set/unset a breakpoint by clicking on the line number on the left of the source code. Set breakpoints on lines 7 and 8 (the lines with the body of the for loop and the return statement). Then remove the breakpoint in the main function and restart the program.
You can resume the execution by clicking on the button "Continue" (second from the left, with the triangle) or using the shortcut c.
You can see the list of breakpoints on the tab breakpoints on the right. The checkbox allows to enable/disable a breakpoint, e.g., if you don't need it right now, but you don't want to remove it completely. You can also add a condition to a breakpoint. Try to click on the button "condition" for the breakpoint on line 7 and enter the condition: rest < 20. Confirm the condition by pressing enter, otherwise it is not token into account.
Inspecting Variables
The values of local variables and parameters of functions are shown in the tab local variables. In addition you can inspect global variables in the tab expressions, just type in the name of the global variable (or any valid C expression actually). Try entering the expressions division_result; remove all breakpoints; set a new breakpoint on line 16; restart the program and step over the function call. Check the value displayed of the expression for division_result before and after the call to division.
Primes
Computing Primes
Your next task is to implement an ancient algorithm known as Sieve of Eratosthenes. The objective is to find all prime numbers up to a specified limit, 100 in your case.
Implementing the algorithm is simple:
- Create a new file with name
sieve.c. - Declare a global array with static linkage consisting of 100 elements of type boolean. The boolean value of element i will, at the end of the algorithm, indicate whether i is prime or not.
- Define a function
sievethat takes not argument and does not return any value.- Initialize all elements in the array to
true, i.e., initially you assume that all numbers might be primes. - You then go through the numbers starting with 2, marking all multiples of your current number with
falsein the array, i.e., the multiples are evidently not primes.
- Initialize all elements in the array to
- Provide a
mainfunction that callssieve, then prints all the primes computed by the algorithm on a separate line (see the lecture slides for the corresponding escape code), and returnsEXIT_SUCCESS. - Compile and run your code, fixing compiler errors/warning, and verifying that the produced output is correct.
Primes in Columns
Extend your code such that the prime numbers are printed in columns:
- The output should be printed in three columns.
- The numbers should be separated by a horizontal tab (see the lecture slides for the corresponding escape code).
- The last line should end with a line feed in any case.
Sorting Floats
Finding the Smallest Element
Now we would like you to implement a sorting algorithm, based on selection sort:
-
Create a new file
sort.c. -
Declare a constant global array
datawith static linkage and containing the following 50 float numbers:18042893.83, 8469308.86, 16816927.77, 17146369.15, 19577477.93, 4242383.35, -7198853.86, 16497604.92, 5965166.49, 11896414.21, 10252023.62, 13504900.27, 7833686.90, 11025200.59, 20448977.63, 19675139.26, 13651805.40, 15403834.26, 3040891.72, 13034557.36, 350052.11, 5215953.68, 2947025.67, 17269564.29, 3364657.82, 8610215.30, 2787228.62, 2336651.23, 21451740.67, 4687031.35, 11015139.29, 18019798.02, 13156340.22, 6357230.58, 13691330.69, 11258981.67, 10599613.93, 20890184.56, 6281750.11, 16564780.42, 11311762.29, 16533773.73, 8594844.21, 19145449.19, 6084137.84, 7568985.37, 17345751.98, 19735943.24, 1497983.15, 20386643.70.
-
Implement a function
minIndexthat takes an unsigned integerstartas argument and returns an unsigned integer.- The function should traverse the array starting from the element indicated by
startto the end of the array (50). - When you visit an element check if it is smaller than any of the elements visited so far. If so, remember the position of the element in a variable.
- Return the value of the variable holding the position of the smallest element.
- The function should traverse the array starting from the element indicated by
-
Provide a
mainfunction that calls theminIndexfunction (with varying values forstart) and prints the returned positions. Verify that the output is correct. -
What happens when you call
minIndexwith a start value that is larger than the array size? Try numbers to start from that are close to 50, but also larger numbers.
Sorting the Array
Once you have tested the minIndex function thoroughly, you can implement the actual sorting algorithm:
- Implement a function
sortthat traverses the array from beginning to end:- Find the minimal element, starting at the position of the currently visited element.
- Copy the value of the currently visited element into a temporary variable, with block scope.
- Overwrite the value of the current element with the value of the minimal element.
- Overwrite the value of the minimal element with the value stored in the temporary variable.
- Modify the
mainfunction to sort the contents of the arraydataand print each element of the array on a separate line. The numbers should be printed in exponent notation (aka, scientific notation). - Make sure that output is correctly sorted.
Manipulating Integers
The Sign of Integers
You should now write your first C program on your own:
- Create a new empty file
integers.c. - Write a function
isNegative, which takes a signed integer (int) as an argument and returns a boolean value. The function should returntruewhen the value of the integer argument is negative,falseotherwise. - Then write a
mainfunction (as seen in the lecture and on the previous page). Call theisNegativefunction with some test values and display the return values using theprintffunction. Don't forget the#includestatements forstdio.handstdlib.h. Themainfunction should always returnEXIT_SUCCESS. - Compile the code, using the usual compiler arguments, fix any compiler errors.
- Run the program and make sure that the output, i.e., the return values of the calls to the
isNegativefunction, is correct.
The Sign of Integers using Arithmetic
You know that the lab machines use the two's complement representation with 32 bits for signed integer numbers of type int. This means that the sign is explicitly encoded in the number representation.
- Make sure to use the type
boolas a return type. Recall,boolis not a keyword of the C language. Instead this type is defined in the library. - Rewrite the
isNegativefunction so that it only contains a single return statement and only contains arithmetic operations. - Consequently, your code should not use any comparison operators (
<,<=, ...) or use any conditional constructs, such asifstatements or the conditional operator (? :). - Compile the code as usual, fix any compiler errors.
- Make sure that the output produced by your program did not change.
Solution - Getting Started with C
Primes
#include <stdbool.h>
#include <stdio.h>
#include <stdlib.h>

static bool primes[100];

void mark_multiples(unsigned int number)
{
  for(unsigned int i = 2*number; i < 100; i += number)
    primes[i] = false;
}

void compute_primes(void)
{
  for(unsigned int i = 0; i < 100; i++)
    primes[i] = true;

  for(unsigned int i = 2; i < 100; i++)
    mark_multiples(i);
}

int main(int argc, char *argv[])
{
  compute_primes();

  unsigned int counter = 0;
  for(unsigned int i = 2; i < 100; i++)
  {
    if (primes[i])
    {
      if ((++counter % 3) == 0)
        printf("%d\n", i);
      else
        printf("%d\t", i);
    }
  }

  printf("\n");

  return EXIT_SUCCESS;
}
Sorting Floats
Finding the smallest element
#include <stdio.h>
#include <stdlib.h>

float data[50] = {18042893.83, 8469308.86, 16816927.77, 17146369.15, 19577477.93, 4242383.35, 7198853.86, 16497604.92, 5965166.49, 11896414.21, 10252023.62, 13504900.27, 7833686.90, 11025200.59, 20448977.63, 19675139.26, 13651805.40, 15403834.26, 3040891.72, 13034557.36, 350052.11, 5215953.68, 2947025.67, 17269564.29, 3364657.82, 8610215.30, 2787228.62, 2336651.23, 21451740.67, 4687031.35, 11015139.29, 18019798.02, 13156340.22, 6357230.58, 13691330.69, 11258981.67, 10599613.93, 20890184.56, 6281750.11, 16564780.42, 11311762.29, 16533773.73, 8594844.21, 19145449.19, 6084137.84, 7568985.37, 17345751.98, 19735943.24, 1497983.15, 20386643.70};

unsigned int minIndex(unsigned int start)
{
  unsigned int result = start;
  for(; start < 50; start++)
  {
    if (data[start] < data[result])
      result = start;
  }

  return result;
}

int main(int argc, char *argv[])
{
  printf("%d %f\n", minIndex(5), data[minIndex(5)]);
  printf("%d %f\n", minIndex(21), data[minIndex(21)]);
  printf("%d %f\n", minIndex(45), data[minIndex(45)]);
  printf("%d %f\n", minIndex(78), data[minIndex(78)]);
  return EXIT_SUCCESS;
}
Sorting the Array
#include <stdio.h>
#include <stdlib.h>

float data[50] = {18042893.83, 8469308.86, 16816927.77, 17146369.15, 19577477.93, 4242383.35, -7198853.86, 16497604.92, 5965166.49, 11896414.21, 10252023.62, 13504900.27, 7833686.90, 11025200.59, 20448977.63, 19675139.26, 13651805.40, 15403834.26, 3040891.72, 13034557.36, 350052.11, 5215953.68, 2947025.67, 17269564.29, 3364657.82, 8610215.30, 2787228.62, 2336651.23, 21451740.67, 4687031.35, 11015139.29, 18019798.02, 13156340.22, 6357230.58, 13691330.69, 11258981.67, 10599613.93, 20890184.56, 6281750.11, 16564780.42, 11311762.29, 16533773.73, 8594844.21, 19145449.19, 6084137.84, 7568985.37, 17345751.98, 19735943.24, 1497983.15, 20386643.70};

unsigned int minIndex(unsigned int start)
{
  unsigned int result = start;
  for(; start < 50; start++)
  {
    if (data[start] < data[result])
      result = start;
  }

  return result;
}

void sort(void)
{
  for(unsigned int start = 0; start < 50; start++)
  {
    unsigned int idx = minIndex(start);
    float tmp = data[start];
    data[start] = data[idx];
    data[idx] = tmp;
  }
}

int main(int argc, char *argv[])
{
  sort();

  for(unsigned int i = 0; i < 50; i++)
    printf("%e\n", data[i]);

  return EXIT_SUCCESS;
}
Manipulating Integers
The Sign of Integers
#include <stdio.h>
#include <stdlib.h>

_Bool isNegative(int v)
{
  return (v < 0);
}

int main(int argc, char *argv[])
{
  printf("0: %d\n", isNegative(0));
  printf("-1: %d\n", isNegative(-1));
  printf("-8: %d\n", isNegative(-8));
  printf("1: %d\n", isNegative(1));
  printf("8: %d\n", isNegative(8));
  return EXIT_SUCCESS;
}
The Sign of Integers using Arithmetic
bool isNegative(int v)
{
  return (v >> 31) & 1;
}
Explanation: signed integers are encoded using two's complement (while this is not specified in the C standards, it is the case on all modern architectures). In two's complement, the most significant bit stores the sign (0: positive, 1: negative). The idea here is to retrieve this bit by right shifting the value so that the new least significant bit is this bit sign (so if the integer is represented with 32 bits, we have to right shift it by 31 bits). The bit-wise and (& 1) ensure that we return only 0 (positive) or 1 (negative).
Derived Types and Pointers
From now on you will develop a simple tool to process a star database. The database contains information on stars in different constellations, including the star's name, its distance, and magnitude (brightness). The data was obtained from the HYG (Hipparcos, Yale, Gliese) database V3.5. However, only a subset of the stars and star properties are used here.
Start by creating a new file stars.c, which you will gradually extend in the following exercises.
Strings and Pointers
If you have not done so yet, create a new file stars.c, which you will gradually extend in the following exercises.
Splitting a String
Your first task is to process the identifiers of stars in the database. Star identifiers consist of two parts, the name of the constellation and the name of the star itself. The two parts are stored as a combined string and only separated by a colon (':').
You are supposed to implement the following function that takes a combined star identifiers and splits it into two parts:
char *splitPrefix(char *s, char delimiter);
The input to the function is a string s, representing a combined star identifier, and a delimiter character, which will be ':' in our case. The function should then:
- Traverse the input string using a
forloop and pointer arithmetic.- Initialize a new pointer to the value of
sin the init expressions of theforloop. - The loop then should go on as long as the end of the string has not been reached.
- Recall that, in C, strings are terminated by a null character (
'\0'). - Consequently you have to dereference the pointer using the
*operator and check for a null character in theforloop's condition.
- Recall that, in C, strings are terminated by a null character (
- On each iteration advance the pointer using the post-increment operator
++in theforloop's iteration expression.
- Initialize a new pointer to the value of
- Check for the occurrence of the delimiter character:
- Dereference the pointer and check if the current character is a colon (
':'). - If so, replace it with a null character by dereferencing the pointer using the
*operator ... - ... and return a pointer to the rest of the input string after the delimiter symbol.
- Dereference the pointer and check if the current character is a colon (
- Return some meaningful value after the
forloop.
The idea is that after calling splitPrefix the prefix of the original input string is accessible using the pointer provided as input to the function, while the suffix is accessible using the returned pointer. The following figure illustrates the expected behavior on the example string "And:Alpheratz". The function's parameter s consequently points to the first character of the string, while another pointer traverses the string's characters until the delimiter symbol ':' is reached:

Once the delimiter character is reached, it should be replaced by a null character and a pointer to the suffix of the initial input string should be returned, as illustrated by the following figure:

Test
Write a test function (chose an appropriate name), that allows you to verify whether the splitPrefix function, developed above, works correctly. Be careful to catch corner cases and unexpected inputs in your tests. Make sure that the splitPrefix function has a well-defined behavior and return value in such cases. Write a short comment to explain each of your test cases. The following code lines show an example test case:
char in1[] = "a:x";
char *out1 = splitPrefix(in1, ':');
printf("%s %s\n", in1, out1);
Finally, write a main function that calls the test function. Don't forget to add the necessary lines with #include at the beginning of your file. Make sure that the entire code compiles, runs, and works as expected.
Star Struct
Star Struct
Next extend your program (stars.c) so that it can represent and print information on stars as a structure. Define a structure that can store the following information:
- A numeric star identifier. Chose a basic type that can potentially represent all stars of an actual star databases, which may contain hundreds of millions of stars.
- The name of the star in the form of a string. The string should be stored inside of the structure and hold names with up to 20 character symbols. Recall the representation of strings in C.
- The name of the star's constellation, which are typically represented by 3-letter acronyms. Shorter acronyms may still occur. The constellation should also be stored inside the structure.
- The star's distance from Earth in Parsecs as an integer number.
- The star's magnitude. The magnitude is a logarithmic measure of the star's brightness. Chose an appropriate data type to store such values.
Chose a meaningful name for your the structure and use the typedef keyword to introduce a short name for the structure. Comment each member of the structure, i.e., explain its meaning, the expected value ranges, and units (if any).
Initializing Star Structs
Write a function that is able to initialize an existing star structure, i.e., that is stored either in a global variable with static storage duration, a local variable with static or automatic storage duration, or on the heap.
- Chose a meaningful name for the function.
- The function takes a pointer to a star structure as an argument and does not return any value (
void). - Use the notation to access structure members through a pointer (
->) seen in the class and initialize the structure members as follows:- All numeric values should be initialized to zero.
- All string values should be initialized to the empty string. Attention, the strings are stored as arrays. So think about what it means to have an empty string in an array? Ask a TA if you have doubts. A safe option is to initialize all array elements using a
forloop.
Print Star Structs
Next write a function to print the information stored in a star struct to a file:
- Chose a meaningful name for the function.
- The function should take a pointer to a
FILEstructure and a constant pointer to a star as inputs (const). - The function is not supposed to return a value.
- Use the
fprintffunction to display the information as follows:- First print the numeric ID. Make sure that the number are printed with a minimal width of 6 characters and aligned to the right.
- Then print the star's constellation. All constellations should be printed with a minimal width of 3 and aligned to the right.
- Then print the distance of the star with a width of 3.
- Next, print the star's magnitude. Make sure that the magnitude's sign is always printed (for both positive and negative values). Print only 2 digits after the decimal point and make sure that the whole number along with its sign is printed with a total width of 5.
- Finally, print the star's name.
- The star information should be printed on a single line ending with a line feed (
'\n'). Fields should be separated by a single space (' ').
- Check the return value of
fprintffor errors. If an error is signaled, print an error message usingperrorand end the program by calling the functionexitas explained in the lecture.
Lookup the usage of fprintf and its format strings in the lecture slides, the book, or on the cppreference website.
Test
Write a test function (with an appropriate name) to test the two functions from above, i.e., by printing the information stored in a star structure after initialization. Also test printing star structures that you initialize manually using the {} notation for structures, e.g., using the initializer {30365,"Canopus","Car", 94,-0.62}.
Call the test function from your main function. Make sure that the entire code compiles, runs, and behaves as expected.
Reading the Database
Download the Star Database
You can download the star database from here. Save it in the same directory as your C source code stars.c under the name stars.csv.
The input file use a format commonly called CSV, for comma-separated values. It is a simple form of a database, stored in a text file. Each line represents an entry in the data base, while columns hold different fields of an entry. The columns are separated by some delimiter symbol (often ',', ';', '\t', or ' ').
In our case the columns are separated by simple commas (','), where each column represents the following property of the star:
- The star's numeric ID.
- The star's textual identifier, which is composed of the constellation and the star's name.
- The star's distance from Earth in Parsecs.
- The star's magnitude.
You may open the CSV file in an editor or have a quick peak on the first couple of lines on the command line using the following command:
tp-5b07-26:> head stars.csv
676,And:Alpheratz ,29.744200,2.070000
744,Cas:Caph ,16.784201,2.280000
1065,Peg:Algenib ,120.047997,2.830000
2076,Phe:Ankaa ,25.974001,2.400000
2914,Cas:Fulu ,181.818207,3.690000
3172,Cas:Schedar ,69.978996,2.240000
3413,Cet:Diphda ,29.533400,2.040000
3814,Cas:Achird ,5.953100,3.460000
4412,Cas:Castula ,61.274502,4.620000
4417,Cas:Cih ,168.350204,2.150000
First off, you need to determine the number of entries in the CSV file. This can be done on the command line using the command wc. Look up the manual page (man page) of wc and find out how you can determine the number of lines in the CSV file. Command line tools are described in Section 1 of the manual page system (contrary to library functions you have seen before, which are described in Section 3). Write down the number you have obtained, you'll need it in one of the the following exercises.
Opening the Star Database File
In order to read information from the star database you have to open the file (and finally close the file) using the functions you have seen in the lecture. Implement the following function, which is supposed to read all stars of a CSV database:
- Use a meaningful function name in your code.
- The function takes a single argument, a constant string indicating the database's filename.
- The function does not return any value.
- Open the star database using the provided filename, i.e., the input string. The file is only used for reading all the information from the beginning of the file. Store the
FILEpointer returned byopenin a local variable. - Immediately close the file using the function
fclose. - Check for errors in both cases and use use
perrorto print an error message andexitto terminate the program.
Implementing the main Function
The goal is now to open the star database file using a filename that is provided on the command line when you run your program. For this you should call the function you have developed above from the main function and process the command-line arguments in argv/argc.
- First, remove the test code from the previous exercises in the
mainfunction (you may leave the test functions themselves in the code, they might be useful if you run into problems later). - Check that the value of
argcis equal to 2. If this is not the case print a short error message usingfprintfto the standard streamstderr. Then terminate the program. - Call the function of the previous exercise from your
mainfunction. Useargv[1]as the filename. - return EXIT_SUCCESS.
The main function should not contain any other code, i.e., comment or remove the function calls that you used for testing your code so far.
Test your code from the command line by running your program with different command-line arguments, e.g.:
./stars
./stars wrongfile.csv
./stars stars.csv
Make sure that your code compiles without errors or warnings and verify that the code prints error messages as expected.
Reading a Star
Now implement a function that reads a single star with all its information from the star database, i.e., reads a single line from the CSV file.
- Use a meaningful function name in your code.
- The function takes two arguments, a pointer to a
FILEstructure and a pointer to a star structure. - The function returns a boolean value.
- You should use the
fscanffunction in order to read from the file. - Read the different columns following the CSV file format and store the information in local variables/arrays:
- Elaborate your format string such that
fscanfskips any white spaces in-between columns. - Elaborate your format string such that
fscanfskips the comma (',') in-between columns. - Read the star identifier into a local array and chose the array size sufficiently large to store the constellation (up to 3 characters), the star name (up to 20 characters), the delimiter, and any additional characters needed to represent strings properly. Be careful to indicate the size of the local array in the format string in order to avoid a buffer overflow.
- Use the appropriate format string for numerical values depending on the data format stored in the CSV file.
- Elaborate your format string such that
- If
fscanfsignals an error useperror/exitus usual. - If
fscanfsignals the end of the file using the return valueEOF, initialize the star using the initialization function that you have developed in the previous exercise and returnfalse. - Otherwise assign the obtained values to the star structure to which points the second function argument:
- Initialize the star structure using the initialization function that you have developed in the previous exercise.
- Be careful to assign a value to all members of the star structure -- recall the member access operator for pointers (
->). - Use casts where necessary.
- You will notice that the star identifier is stored as a combined string in the CSV file, while the structure has two different members. Use the
splitPrefixfunction to split the name into two strings:- Recall how
splitPrefixworks. - After calling
splitPrefixthe null-terminated string stored in the local array will represent the constellation, ... - ... while the returned pointer represents the star's name.
- However, you cannot assign the pointer/local array to the members of the star structure directly.
- Instead you have to use
strncpyto copy the respective strings into the structure members. Recall thatstrncpytakes an argument n and that at most n characters are copied. Note that you can apply thesizeofoperator on expressions. - What happens when
strncpydid not reach the end of its input string? Do you have to modify your code to handle this situation?
- Recall how
- Return
true.
- Don't forget to add the necessary lines with
#includeat the beginning of your file.
Reading all the Stars
Go back to the function that opens/closes the star database. In-between the calls to open and close insert the following code:
- Use a
whileorforloop in order to read all stars from the file. - Declare a local array within this function (chose a meaningful name) that stores star structures and has static storage duration. Chose the size of the array such that all entries from the CSV file can be stored in the array.
- Call the function you have just implemented in order to read individual stars and check its return value in order to determine whether you should stop or not.
- Store the stars in the order that they appear in the star database in the local array.
- Once a star has been read print it using the print function that you have implemented in a previous exercise and the standard stream
stdout.
Debugging the Read function
In order to make sure that the code from before works as expected, lets debug it:
- Start
gdbguion the command line as follows. The--argsoption tellsgdbgui(and also regulargdb) that the remaining arguments are the program and its command-line arguments:
/comelec/softs/bin/gdbgui --args ./stars ./stars.csv
- Set a breakpoint after the call to
fscanfin the function that reads an individual star. - Verify that the local variables (after calling
fscanf!) have the expected values for the first couple of stars in the CSV database.gdbguidisplays character arrays as a sequence of integer numbers (and not as string).- However, you may use the command shell at the bottom of the graphical interface. Simply type the command
printfollowed by the name of your local char array to inspect the content of the entire array. The result is also displayed in the command shell. - Single step until your reach the call to
splitPrefixand verify that it works as expected by printing the constellation and name.
- Now set a breakpoint inside the
whileloop of the function that reads all stars. - Verify that the content of the array is correct. Inspect the first star in the array, look at the values of all of its members. Notably, check the constellation and name using the
printcommand on the command shell at the bottom of the graphical interface.
Test
Make sure your program compiles without any errors or warnings. Let it run on the command line and verify that your program produces the same output as below:
   676 And  29 +2.07 Alpheratz
   744 Cas  16 +2.28 Caph
  1065 Peg 120 +2.83 Algenib
  2076 Phe  25 +2.40 Ankaa
  2914 Cas 181 +3.69 Fulu
  3172 Cas  69 +2.24 Schedar
  3413 Cet  29 +2.04 Diphda
  3814 Cas   5 +3.46 Achird
  4412 Cas  61 +4.62 Castula
  4417 Cas 168 +2.15 Cih
  5337 Phe  91 +3.94 Wurren
  5436 And  60 +2.07 Mirach
  5725 Psc  53 +5.21 Revati
  6397 And  65 +4.87 Adhil
  6672 Cas  30 +2.66 Ruchbah
  7083 Psc 107 +3.62 Alpherg
  7499 And  13 +4.10 Titawin
  7574 Eri  42 +0.45 Achernar
  7593 And  54 +3.59 Nembus
  8183 Psc  85 +4.26 Torcular
  8777 Tri  19 +3.42 Mothallah
  8813 Ari  50 +3.88 Mesarthim
  8867 Cas 126 +3.35 Segin
  8884 Ari  17 +2.64 Sheratan
  9618 And 120 +2.10 Almach
  9861 Ari  20 +2.01 Hamal
 10800 Cet  91 +6.47 Mira
 11734 UMi 132 +1.97 Polaris
 12673 Cet  24 +3.47 Kaffaljidhma
 13176 Ari  50 +3.61 Bharani
 13234 Per 269 +3.77 Miram
 13254 Eri  57 +4.76 Angetenar
 13667 Eri  41 +3.89 Azha
 13813 Eri  49 +2.88 Acamar
 14100 Cet  76 +2.54 Menkar
 14540 Per  27 +2.09 Algol
 14632 Per  34 +3.79 Misam
 14802 Ari  52 +4.35 Botein
 14843 For  14 +3.80 Dalim
 15159 Eri  33 +4.80 Zibal
 15824 Per 155 +1.79 Mirfak
 16496 Eri   3 +3.72 Ran
 17406 Per 343 +3.84 Atik
 17447 Tau 115 +5.45 Celaeno
 17457 Tau 124 +3.72 Electra
 17489 Tau 125 +4.30 Taygeta
 17532 Tau 117 +3.87 Maia
 17537 Tau 114 +5.76 Asterope
 17566 Tau 116 +4.14 Merope
 17661 Tau 123 +2.85 Alcyone
 17805 Tau 117 +3.62 Atlas
 17809 Tau 117 +5.05 Pleione
 18497 Eri  62 +2.97 Zaurak
 18567 Per 381 +3.98 Menkib
 19538 Eri  37 +4.04 Beid
 19799 Eri   4 +4.43 Keid
 20483 Eri  90 +3.97 Beemim
 20837 Tau  44 +3.53 Ain
 20842 Tau  46 +3.40 Chamukuy
 21340 Eri  65 +3.81 Theemin
 21368 Tau  20 +0.87 Aldebaran
 21541 Eri  33 +3.86 Sceptrum
 22396 Ori   8 +3.19 Tabit
 22961 Aur 151 +2.69 Hassaleh
 23361 Aur 653 +3.03 Almaaz
 23398 Aur 240 +3.69 Saclateni
 23712 Aur  74 +3.18 Haedus
 23820 Eri  27 +2.78 Cursa
 24378 Ori 264 +0.18 Rigel
 24549 Aur  13 +0.08 Capella
 25273 Ori  77 +1.64 Bellatrix
 25364 Tau  41 +1.65 Elnath
 25542 Lep  49 +2.81 Nihal
 25865 Ori 212 +2.25 Mintaka
 25920 Lep 680 +2.58 Arneb
 26142 Ori 336 +3.39 Meissa
 26176 Ori 714 +2.75 Hatysa
 26246 Ori 606 +1.69 Alnilam
 26386 Tau 136 +2.97 Tianguan
 26569 Col  80 +2.65 Phact
 26662 Ori 225 +1.74 Alnitak
 27298 Ori 198 +2.07 Saiph
 27559 Col  26 +3.12 Wazn
 27919 Ori 152 +0.45 Betelgeuse
 28288 Aur  24 +1.90 Menkalinan
 28309 Aur  50 +2.65 Mahasim
 28962 Col 221 +5.00 Elkurud
 29582 Gem 117 +3.31 Propus
 30049 CMa 111 +3.02 Furud
 30251 CMa 151 +1.98 Mirzam
 30270 Gem  71 +2.87 Tejat
 30365 Car  94 -0.62 Canopus
 31601 Gem  33 +1.93 Alhena
 32161 Gem 259 +3.06 Mebsuta
 32263 CMa   2 -1.44 Sirius
 32276 Gem  17 +3.35 Alzirr
 33492 CMa 124 +1.50 Adhara
 33769 CMa 343 +3.49 Unurgunite
 33956 CMa 135 +4.11 Muliphein
 34000 Gem 421 +4.01 Mekbuda
 34354 CMa 492 +1.83 Wezen
 35453 Gem  18 +3.50 Wasat
 35806 CMa 609 +2.45 Aludra
 36087 CMi  49 +2.89 Gomeisa
 36744 Gem  15 +1.58 Castor
 37159 Gem  50 +4.89 Jishui
 37173 CMi   3 +0.40 Procyon
 37718 Gem  10 +1.16 Pollux
 38062 Pup 367 +3.34 Azmidi
 39318 Pup 332 +2.21 Naos
 39644 Pup  19 +2.83 Tureis
 40411 Cnc  93 +3.53 Tarf
 40766 Cnc 140 +5.92 Piautos
 40921 Car 185 +1.86 Avior
 40959 Lyn 117 +4.25 Alsciaukat
 41586 UMa  54 +3.35 Muscida
 42283 Hya 114 +4.45 Minchir
 42437 Cnc 179 +6.29 Meleph
 42794 Vel  24 +1.93 Alsephina
 42990 Hya  39 +3.38 Ashlesha
 43464 Cnc  12 +5.96 Copernicus
 43939 Cnc  57 +4.26 Acubens
 44000 UMa  14 +3.12 Talitha
 44343 UMa 109 +3.57 Alkaphrah
 44689 Vel 166 +2.23 Suhail
 44819 Cnc 114 +5.16 Nahn
 45106 Car  34 +1.67 Miaplacidus
 45425 Car 234 +2.21 Aspidiske
 45809 Vel 175 +2.47 Markeb
 46259 Hya  55 +1.99 Alphard
 46339 UMa  85 +5.40 Intercrus
 46617 Leo 100 +4.32 Alterf
 47297 Hya  80 +3.90 Ukdah
 47373 Leo  39 +3.52 Subra
 48219 Hya  80 +4.11 Zhang
 48318 Leo  38 +3.88 Rasalas
 48478 Hya 188 +4.94 Felis
 49528 Leo  24 +1.36 Regulus
 50193 Leo  84 +3.43 Adhafera
 50440 Leo  39 +2.01 Algieba
 53075 LMi  29 +3.79 Praecipua
 53565 UMa  14 +5.03 Chalawan
 53584 Crt  48 +4.08 Alkes
 53754 UMa  24 +2.34 Merak
 53905 UMa  37 +1.81 Dubhe
 54712 Leo  17 +2.56 Zosma
 54718 Leo  50 +3.33 Chertan
 56044 Dra 102 +3.82 Giausar
 57226 UMa  56 +3.69 Taiyangshou
 57459 Leo  10 +2.14 Denebola
 57584 Vir  10 +3.59 Zavijava
 57828 UMa  25 +2.41 Phecda
 58777 Cam  97 +5.78 Tonatiuh
 59020 Crv  14 +4.02 Alchiba
 59565 Cru 105 +2.79 Imai
 59592 UMa  24 +3.32 Megrez
 59621 Crv  47 +2.58 Gienah
 59945 Vir  81 +3.89 Zaniah
 60075 Cru  70 +3.59 Ginan
 60530 Cru  98 +0.77 Acrux
 60776 Crv  26 +2.94 Algorab
 60893 Cru  27 +1.59 Gacrux
 61124 CVn   8 +4.24 Chara
 61166 Crv  44 +2.65 Kraz
 61748 Vir  11 +2.74 Porrima
 62228 Dra 227 +5.43 Tianyi
 62239 Cru  85 +1.25 Mimosa
 62757 UMa  25 +1.76 Alioth
 62876 Dra  29 +5.23 Taiyi
 62890 Vir  60 +3.39 Minelauva
 63405 Vir  33 +2.85 Vindemiatrix
 64037 Com  17 +4.32 Diadem
 65173 UMa  26 +2.23 Mizar
 65269 Vir  76 +0.98 Spica
 65272 UMa  25 +3.99 Alcor
 66040 Vir  22 +3.38 Heze
 67088 UMa  31 +1.85 Alkaid
 67711 Boo  11 +2.68 Muphrid
 68483 Cen 120 +0.61 Hadar
 68537 Dra  92 +3.67 Thuban
 68714 Cen  18 +2.06 Menkent
 69205 Vir  78 +4.18 Kang
 69451 Boo  11 -0.05 Arcturus
 69479 Vir  22 +4.07 Syrma
 69510 Boo  30 +4.18 Xuange
 69751 Vir  57 +4.52 Khambalia
 70532 Vir  36 +4.81 Elgafar
 70851 Boo  26 +3.04 Seginus
 71453 Cen   1 +1.35 Toliman
 71879 Boo  62 +2.35 Izar
 72261 Boo  48 +5.76 Merga
 72380 UMi  40 +2.07 Kochab
 72396 Lib  23 +2.75 Zubenelgenubi
 73327 Boo  69 +3.49 Nekkar
 73486 Lib  88 +3.25 Brachium
 74556 Lib  56 +2.61 Zubeneschamali
 74868 UMi 149 +3.00 Pherkad
 75182 Boo  34 +4.31 Alkalurops
 75229 Dra  31 +3.29 Edasich
 75466 CrB  34 +3.66 Nusakan
 76035 CrB  23 +2.22 Alphecca
 76100 Lib  50 +3.91 Zubenelhakrabi
 76835 Ser  22 +2.63 Unukalhai
 77214 Ser 117 +4.09 Gudja
 77868 Sco 144 +3.87 Iklil
 78029 Sco 179 +2.89 Fang
 78165 Sco 150 +2.29 Dschubba
 78580 Sco 123 +2.56 Acrab
 78804 Her 112 +5.00 Marsic
 79134 Sco 145 +4.00 Jabbah
 79870 Sco 213 +2.90 Alniyat
 80089 Dra  28 +2.73 Athebyne
 80221 Her  76 +4.57 Cujam
 80519 Sco 169 +1.06 Antares
 80571 Her  42 +2.78 Kornephoros
 80593 Her  79 +8.15 Ogma
 80637 Oph  53 +3.82 Marfik
 81020 Sco 145 +2.82 Paikauhale
 82022 TrA 119 +1.91 Atria
 82144 Sco  19 +2.29 Larawag
 82263 Sco 153 +3.00 Xamidimura
 82294 Sco 145 +3.56 Pipirima
 83351 Dra  27 +4.91 Alrakis
 83638 Dra 100 +3.17 Aldhibah
 83755 Oph  27 +2.43 Sabik
 84086 Her 110 +2.78 Rasalgethi
 84121 Her  23 +3.12 Sarin
 84147 Oph   5 +4.33 Guniibuu
 85410 Dra 116 +2.79 Rastaban
 85433 Her 113 +4.41 Maasym
 85436 Sco 176 +2.70 Lesath
 85560 UMi  52 +4.35 Yildun
 85665 Sco 175 +1.62 Shaula
 85769 Oph  14 +2.08 Rasalhague
 85965 Sco  92 +1.86 Sargas
 86347 Dra  22 +4.57 Dziban
 86475 Oph  25 +2.76 Cebalrai
 86515 Dra 163 +5.75 Alruba
 86529 Ara  15 +5.12 Cervantes
 86991 Sco  38 +3.19 Fuyue
 87314 Dra  34 +3.73 Grumium
 87561 Dra  47 +2.24 Eltanin
 88361 Sgr  29 +2.98 Alnasl
 90065 Dra  96 +4.82 Fafnir
 90979 Lyr   7 +0.03 Vega
 92133 Lyr 294 +3.52 Sheliak
 92471 Sgr 344 +4.86 Ainalrami
 92564 Sgr  69 +2.05 Nunki
 92654 Ser  47 +4.62 Alya
 92902 Lyr 190 +3.25 Sulafat
 93213 Sgr  27 +2.60 Ascella
 93452 Aql  25 +2.99 Okab
 93819 CrA  38 +4.11 Meridiana
 93846 Sgr 156 +2.88 Albaldah
 94081 Dra  29 +3.07 Altais
 94186 Lyr 425 +4.43 Aladfar
 95052 Sgr  55 +3.96 Rukbat
 95473 Vul  91 +4.44 Anser
 95648 Cyg 133 +3.05 Albireo
 95799 Dra   5 +4.67 Alsafi
 96450 Sge 130 +4.39 Sham
 96858 Cyg  50 +2.86 Fawaris
 96970 Aql 121 +2.72 Tarazed
 97338 Aql   5 +0.76 Altair
 97627 Aql  56 +4.71 Libertas
 97725 Aql  13 +3.71 Alshain
 97755 Sgr  25 +4.70 Terebellum
 99743 Cap  32 +3.58 Algedi
 99985 Cap  77 +4.77 Alshat
100020 Cap 100 +3.05 Dabih
100128 Cyg 561 +2.23 Sadr
100425 Pav  54 +1.94 Peacock
101095 Del 101 +4.03 Aldulfin
101442 Del  30 +3.64 Rotanev
101629 Del  77 +3.77 Sualocin
101767 Cyg 432 +1.25 Deneb
102157 Cyg  22 +2.48 Aljanah
102287 Aqr  63 +3.78 Albali
103195 Del  75 +5.51 Musica
104649 Equ  58 +3.92 Kitalpha
104861 Cep  15 +2.45 Alderamin
105691 Cep 210 +3.23 Alfirk
105936 Aqr 164 +2.90 Sadalsuud
106444 Aqr  54 +4.68 Bunda
106642 Cap  48 +3.69 Nashira
106795 Cyg 529 +4.69 Azelfafage
106972 Peg 211 +2.38 Enif
107742 Gru  64 +3.00 Aldhanab
108573 Cep  29 +4.26 Kurhah
108728 Aqr 160 +2.95 Sadalmelik
108922 Gru  30 +1.73 Alnair
109081 Peg  28 +3.52 Biham
109657 Aqr  57 +4.17 Ancha
110049 Aqr  50 +3.86 Sadachbia
111359 Aqr  65 +5.04 Situla
111676 Peg  62 +3.41 Homam
111768 Gru  54 +2.07 Tiaki
111804 Peg  65 +2.93 Matar
112389 Peg  32 +3.51 Sadalbari
112776 Aqr  49 +3.27 Skat
112997 Peg  15 +5.45 Helvetios
113008 PsA   7 +1.17 Fomalhaut
113521 Peg  60 +2.44 Scheat
113529 Psc 125 +4.48 Fumalsamakah
113603 Peg  40 +2.49 Markab
114887 Peg  49 +4.58 Salm
115258 Peg  52 +4.42 Alkarab
115711 And  79 +5.22 Veritate
116361 Cep  14 +3.21 Errai
119058 Sco  24 +4.84 Graffias
119127 Dra  23 +5.63 Alrakis
Stars on the Heap
Linked Lists
Following the example from the lecture implement a data structure and some basic functions to manipulate linked lists. Contrary to the lecture, your lists should hold entire star structures and not pointers.
- Implement a type for a node in a linked list.
- Implement a function that returns an empty list.
- Implement a function that allows to append an element at the end of a list:
- Use
mallocto allocate memory on the heap for new list elements. - Be sure to handle the case of an empty list correctly.
- Use
memcpyto initialize the star structure of a newly allocated list node. - Check for errors and report error messages using
perror/exitas usual.
- Use
- Implement a function to free the entire memory of a list of stars:
- Use
freein your code. - Make sure that all list elements are freed.
- Make sure to not use a pointer that was already freed!
- Use
Read Stars into the Heap
Rewrite the code of the function that reads all stars from the star database such that the stars are stored in a linked list instead of an array:
- Declare a local variable with automatic storage duration holding a pointer to the list that you have implemented above.
- Initialize it with an empty list.
- Declare a local variable with automatic storage duration and use it to read a single star from the database.
- Append the newly read star to the end of the list.
- Modify the return type of the function and return the list.
Modify the main function to print all the stars in the star list returned from your function to the standard stream stdout. Don't forget to free all list elements along with their stars.
Test
Make sure that the code compiles without errors or warnings and verify that the output is the same as for your program before.
Solution - Derived Types and Pointers
Strings and Pointers
Star Struct
Reading the Database
Stars on the Heap
Part 3 — From Programs to Operating Systems
Overview
- TP — Multiprocessing & multithreading
- Homework — Signals
- TD — Synchronization
- Homework — Semaphores
- TP — File system
- TP — Pipe FIFO
All the sources are available here
TP — Multiprocessing & multithreading
- Processes
- Programming processes in C
- Programming processes in Shell
- Implementation of a simple shell
- Fork-join execution mode (optional)
All the sources are available in the part-3 tarball.
The C files are located in directory part-3/tp-proc-thread/material/.
The general specifications of the POSIX functions are available at OpenGroup website
Overview
The aim of this lab is to learn how to use Unix system calls to manage processes.
After several simple exercises, we shall design a simple Unix shell. A Unix shell is a command-line interpreter or shell that provides a command line user interface for Unix-like operating systems. This application is probably the most typical example of the use of the four basic functions for process management, fork(), exec(), exit() and wait().
As an optional problem, we shall study one of the most typical concurrency design patterns, the fork-join model. In parallel computing, the fork-join model is a way of executing a program in parallel, so that the execution splits (fork) in several subtasks to execute them in parallel, only to merge (join) at a later point and resume sequential execution.
The sources for the labs are in the archive you downloaded at the beginning of the course.
Processes
This section is a short course about UNIX processes.
Unix is a multi-tasking system, meaning it can run several programs at the same time. A process is an instance of a running program. Each process has a process id which designates an entry in the system process table, a data structure in the computer memory. Each entry holds the context of the process such as its state (active, running, blocked), its registers (stack pointer, program counter...), pointers to the program code and the memory address space...
fork() is a system call that the parent process uses to clone itself into another identical process, called the child process. After calling fork(), the child process is an exact copy of the parent process, except for the return value of the fork() call. This exact copy includes open files, register status and all memory allocations, including the program's executable code.
The new process is a child of the parent process and has a new process identifier (PID). The fork() function returns the child's PID to the parent process. The fork() function returns 0 to the child process. This distinguishes the two processes, even if they are executing the same code.
When the parent process modifies its memory space, since the child process only has an earlier copy of its parent's space, this modification is not reflected in the child process' space.
In some cases, both processes continue to execute the same code, but often one of them (usually the child process) switches to executing another executable code using the exec() system call. When the child process calls exec(), with a new program to run as a parameter, all data in the original program is lost and replaced by a running copy of the new program.
The parent process can either continue execution or wait for the child process to finish. If the parent process chooses to wait() for the child process to complete, it will receive the exit status of the program the child has executed. To do this, the child process uses the exit() system call. The integer parameter of exit() specifies the state of the terminating child process. If a program terminates without exit(), the system terminates with a default status of 0, this value indicating an error-free termination.
When a child terminates, its address space is deallocated, leaving only its entry in the process table. The child becomes a zombie process. In other words, the child is dead, except for its entry in the process table to preserve its status for its parent. The parent must call wait() on its children, either periodically, or when it is notified that a child process has terminated (see later in the course). In this case, the child's termination status can be transmitted and its entry in the process table completely deallocated. If the parent terminates before its child or without calling wait() on a zombie child, the child becomes orphan. The first process started by the system adopts any orphan process, i.e., a process whose parent has terminated before its child becomes a child of this first process, and call wait() for this process. Note that getpid() returns the process id of the current process and getppid() the process id of the current process' parent.
Programming processes in C
We first review functions of process management from the POSIX API and propose simple exercises.
Function fork()
int fork();
- This function will create a process. The returned value rv of this function indicates:
- rv > 0 We are in the parent process and rv is the child process id,
- rv == 0 We are in the child process,
- rv == -1 fork failed, no process created. This situation occurs when there are not enough resources (memory for instance) to duplicate the parent process.
int getpid();
- This function returns the process id of the current process.
int getppid();
- This function returns the process id of the parent process.
- Complete the fork-single.c file to create a process. Compile and run it.
- Understand the code to answer the next questions.
- Why are there five lines displayed when there are only three printf calls in the program?
- Run the program several times.
- Why is it very likely (e.g. on a single processor) that the parent process will continue to run after the call to fork()?- Give a scenario, even if unlikely, such that the child process continues to run after the call to fork()?
We now want several fork() system calls to have parent, child and grandchild processes.
- Complete the fork-multiple.c file to create several processes. Compile and run it.
- After execution, note down the process ids.
- Define the execution order of the printf instructions so as to find the execution order of the processes.
- Represent these processes as a process tree (one node per process, one arc between each process and its parent).
- After the last call to fork() but before the last call to printf():
- Make the grandchild process execute the sleep system call for 1 second.
- What do you observe ? Explain why.
Functions wait() and exit()
We recall some function specifications.
void exit(int status);
- Ends a process, status is a byte (0 to 255) returned as an
intto the parent process.
pid_t wait(int *status);
- The current process waits for the termination of one of its children, changing its own state to blocked. When a process terminates, it signals its completion to its parent. This causes the parent process to switch from the blocked state to the ready state. The parent process thus leaves the wait() function.
- The return value of wait() is the id of the child process that has just terminated. When there are no children to wait for, the wait() function returns -1. Each time a child terminates, the parent process returns from wait() and can inspect the returned parameter
statusto obtain information on the child that has just terminated. - status is a pointer to a two-byte word: the most significant byte contains the value returned by the child (status from the exit() function), the least significant byte contains 0 in the general case. Otherwise, it contains information on the abnormal termination of the child process.
- Complete the fork-wait.c file to force the parent process to wait for the child process. Compile and run it.
- Check that the display is consistent in terms of status and returned value.
Function execvp()
The exec family of functions shall replace the current process image (code + data) with a new process image. One form of this family is execvp():
int execvp(const char *file, char *const argv[]);
- execvp() replaces the current process image with a new process image.
- file is the process image file that will be loaded into the code area of the process calling execvp. If this file is not in the current directory, or if it is not accessible via the list of directories referenced by the PATH variable, you must specify the path to the file (relative or absolute).
- The argv argument is an array of null-terminated strings that is used to provide a value for the argv argument to the main function of the program to be executed. The last element of this array must be a null pointer. By convention, the first element of this array is the file name of the program. For example, if you want to load a file called prog, which is located in the current directory and uses two arguments passed on the command line:
execvp("prog", (char *[]){"prog", "x", "y", NULL}). - The returned value is -1 when an error occurs (for instance when the the process image file does not exist).
- Complete the fork-exec.c file to execute the rest of the command line in a new process. Compile and run it.
- Note that the argument list to be passed to execvp() does not start at argv[0] but at argv[1].
- To check that it's working properly, we'll have to invoke exec on a very simple program. You can then run the fork-exec program by passing it various commands as arguments, such as:
$ fork-exec fork-exec
$ fork-exec /bin/ps
$ fork-exec ls -l
Programming processes in Shell
The following exercises focus on the use of few shell commands that allow you to view the list of processes, launch them with or without blocking the execution of the shell, and finally replace the code of the shell process with that of another process.
Command ps
To see the list of processes and the different properties concerning them, try the following sequence of commands:
$ ps -l              # list of processes attached to the terminal
$ ps -edf            # list of processes present on the system
$ ps -axl            # same with more details
$ ps -ael            # or depending on the system used
$ ps -axjf --forest  # same with parent process identifier and tree representation
Note the very first process with pid 1 (process id) and its tree of processes (a parent process and its child processes). The process 1 is the parent of all processes. It adopts any orphan process, i.e. a process whose parent has terminated before its child becomes a child of process 1.
Command in background
In this exercise, we illustrate the use of '&' option when launching a process from the shell.
- Compile the program fork-nothing. Run fork-nothing program.
$ ./fork-nothing
You can't type any more commands until you've closed or stopped it.
-
Stop it with Ctrl-C.
-
Now launch the same program with the '&' option:
$ ./fork-nothing &
This time, the fork-nothing program is launched, but you can continue to type new commands.
Let's take another example using sleep n which pauses the process executing this command for n seconds.
- Send the following sequence and observe the process filiation:
$ ps -l # list of processes attached to the current terminal
$ sleep 20& # process sleeping for 20s in the background
$ sleep 30& # process sleeping for 30s in the background
$ ps -l
This last command let you view the new process configuration.
- Note that that the process running the shell has several child processes, each running the sleep command.
Command exec
We will now see the effect of the exec command, which like the system call of the same name, replaces the code and data of the process that executes it with the code of a binary file referenced when launching 'exec'.
exec ps
What is happening and why ?
For exec, as for some other commands (built-in commands such as cd, echo, exit, kill, ...) the shell does not create a new process, i.e. it does not use a fork for the command, but executes it directly in the shell code.
To validate this mechanism, open a new terminal window, Now enter the command zsh. Note the pid of the process that runs this new current shell (by making ps -l), then run 'exec ps -l'. Retrieve the pid of the process that runs this program ps -l. What is its value and why?
Implementation of a simple shell
A (simple) shell implementation
The shell is as a typical application of the four system calls fork, exec, wait and exit. To understand the behaviour differences between a given command line and the same command line with '&', let's give a pseudo code describing the implementation of the shell.
forever
    print $prompt$
    $command$ = read the command line

    create process $child$ using fork()

    # both child and parent processes execute the next instructions

    if ($current_process$ is $child$)
        launch $command$ using exec()
        # the child process does not return from exec() (if $command$ exists)

    if ($current_process$ is $parent$) and ($command$ does not end with '&')
        wait for $child$ completion using wait()
When we previously launched the fork-nothing program on the command line, was 'fork-nothing'. The shell creates a new process, and this child process runs 'exec fork-nothing'. The shell or the parent process waits for its child process completion. But when we launch the fork-nothing program with '&', the shell does not wait for its child process completion.
- Use the fork-shell.c file which provides a code to convert a string (or a command line) into a structure argc/argv.
- Implement a shell that executes simple commands and check with several calls such as "ls -l" or "ps -a". Check that the result occurs before the new prompt. You can also reuse what you implemented in the fork-exec.c file.
- Use strcmp() to detect strings such as "&" or "exit".
- Extend your shell to execute simple commands and check with several calls such as "ls -l &" or "ps -a &". Check that the result occurs after the new prompt. You can use the strcmp() function to compare two strings.
A (simple) shell implementation with builtins
For built-in commands (cd, echo, exit, kill, ...) the shell does not create a new process, i.e. it does not use a fork for the command, but executes it directly in the shell code. For instance, exit must not create a new process, otherwise it would exit the child process and not the main process!
To illustrate this difference, we detail a bit more our initial shell implementation.
forever
    print $prompt$
    $command$ = read the command line

    if ($command$ in builtins)
        execute code of $command$
        # if $command$ = exit, leave forever loop

    else
        create process $child$ using *fork()*
        if ($current_process$ is $child$)
            launch $command$ using exec()

        if ($current_process$ is $parent$) and ($command$ does not end with '&')
            wait for $child$ completion using wait()
- Use the simple shell you implemented in the previous exercise.
- Extend your shell to execute simple builtin commands (exit and exec at least) and check with several calls such as "exit" or "exec ps".
Fork-join execution model (optional)
(Optional problem, to go further in the understanding of the course topics.)
We aim at implementing the Fork-Join execution model which is essentially a parallel divide-and-conquer model of computation. The general idea for this model is to solve a problem by breaking it up into identical sub-problems with smaller size (Fork part), then solve the smaller version of the problem in parallel, then combine the results (Join part). Do not get confused by the different meanings of the word "fork".
We implement this model with processes. Write a program whose operation is as follows:-
The parent process
- Reads from the command line (use argc and argv) N the number of processes to create.
- Creates N child processes by making N calls to fork (beware of doing this iteratively and not recursively, otherwise you risk creating \( 2^N \) processes!).
- Waits for the completion of these N child processes and displays their identity.
-
The i-th child process
- Displays its pid (getpid()) and that of its father (getppid()),
- Sleeps for 2 * i seconds and displays its completion,
- Ends by providing to its parent its index i.
- Complete the process-fork-join.c file. Take example from the previous implementations.
- After checking that the program is running correctly, cause one of the child processes to terminate abnormally (e.g., by doing an integer division by zero, or by dereferencing a NULL pointer) and note that the system does not return zero as a low-order state, but provides an error flag instead.
Homework — Signals
- Course on signal management
- Exercises on signal management
- Course on stack context management
- Exercises on stack context management
- Problem on implementing an exception like mechanism in C
All the sources are available in the part-3 tarball.
The C files are located in directory part-3/homework-signals/material/.
The general specifications of the POSIX functions are available at OpenGroup website
For all these exercises, you should compile with -std=gnu11 (or without -std at all) because you will have a compiler error with -std=c11.
Overview
In this homework, we study signals. A signal is a form of inter-process communication used by Unix systems. It is an asynchronous notification sent to a process to alert it to the occurrence of an event.
After a short course and few exercises to learn how to handle signals, we implement an incomplete but original exception handling mechanism for the C language. We shall handle an out-of-bounds access to an array or a division by zero, just as we would do with exceptions in python, java, c++, ada, etc.
The sources for the labs are in the archive you downloaded at the beginning of the course.
Course on signal management
This section is a short course about UNIX signals.
Signals are notifications sent to a process to inform it of "important" events like errors. A process receiving a signal interrupts what it was doing to handle the signal "immediately" (handling can consist in ignoring them, though). Each signal has an integer to represent it (1, 2, etc.), as well as a symbolic name which is usually defined in the /usr/include/signal.h file. These events may be intended for another process. Signals have various origins, and can be:
- forwarded by the kernel (from hardware): division by zero, overflow, forbidden instruction,
- sent from the keyboard by the user (keystrokes: CTRL-Z, CTRL-C, ...)
- sent by the kill command from the shell or by the kill() system call
Each signal can have a signal processing function, which is a function called when the process receives that signal. The function is called in "asynchronous mode", which means that no program code directly calls this function. Instead, when the signal is sent to the process, the operating system suspends the execution of the process and "forces" it to call the signal handling function. When the signal handling function returns, the process resumes execution where it was before the signal was received, as if the interruption had never occurred.
Sending a signal
The kill() system call allows to send a signal to a process.
-
In C:
int kill(pid_t pid, int sig);- pid designates the id of the targeted process.
- Note that a pid of 0, -1 or negative value are not incorrect, but designate a group of processes.
- The returned value is zero except when sig has an incorrect value, or the user has no right to send a signal to the process.
- Note: the sender has no way of knowing whether or not the recipient has received the signal.
- pid designates the id of the targeted process.
-
In Shell:
$ kill -SIGNAME pid
In these two cases, the signals originate from user requests, but signals can also be sent by the kernel itself.
Receiving a signal
The sigaction() function allows the receiving process to specify the desired handling of a specific signal.
Function sigaction()
int sigaction(int sig, struct sigaction *act, struct sigaction *oact);
- The sigaction() system call assigns an action for a signal sig.
- If act is non-zero, it specifies:
- a signal handler or action (SIG_DFL, SIG_IGN, or a user-defined subprogram) and
- a mask or a set of signals that are blocked when executing the signal handler and
- flags or options to change default parameters or behaviors.
- If oact is non-zero, it returns to the user the previous handling information for the signal.
act (or action) and oact (or old action) are parameters of type struct sigaction.
Structure sigaction
The type struct sigaction helps specifying the signal subprogram to call when receiving the signal.
struct  sigaction {
    void    (*__sa_handler)(int sig);
    void    (*__sa_sigaction)(int sig, siginfo_t *info, void *context);
    sigset_t sa_mask;                                                       /* signal mask to apply */
    int     sa_flags;                                                       /* signal options  */
};
- sa_handler and sa_sigaction attributes specify the signal subprogram to call when receiving the signal.
- sa_mask designates the set of signals that are blocked while executing the signal handler.
- sa_flags is a set of flags which allows to change the default behaviour of sigaction.
Only one of the sa_handler and sa_sigaction attributes is used. By default, the sa_handler is the only one considered. The last two attributes are intended for extended use. We shall go into more detail later about them, but let's first focus on sa_handler attributes and ignore the three other ones.
Function sa_handler
The sa_handler attribute may have the following values:
-
SIG_IGN specifies that the signal should be ignored, but some signals cannot be ignored, for instance SIG_KILL.
-
SIG_DFL specifies that when the signal is received, the processing must be the default one. For most signals, the default action is to terminate (or "kill") the process, explaining the (bad) naming of system call kill().
-
The name of a user-defined function with the following signature:
void my_handler(int sig);- In this case, when the signal is received, the function
my_handlerwill be called and the sig parameter will receive the number of the signal.
- In this case, when the signal is received, the function
Note: void (*__sa_handler)(int sig); defines a field __sa_handler with a strange type (at least not seen in the classes). It is a pointer to a function that returns void and takes one argument of type int. You can write sa.__sa_handler = my_handler; if my_handler is the name of a function that has the correct signature (void my_handler(int sig);).
Exercises on signal management
Ignore signals
#include <stdio.h>
#include <signal.h>
#include <unistd.h>
int main(int argc, char *argv[]) {
    int sig;
    struct sigaction sa;
    for (sig = 1; sig < NSIG; sig++) {
        /* For now, we do not use any option. By default, the signal handler sa_handler is used */
        sa.sa_flags = 0;

        /* sa.sa_sigaction is the pointer to a signal-catching function */
        sa.sa_handler = SIG_IGN;

        /* For now, we do not use any mask. By default, the signal received is included in mask */
        sigemptyset(&sa.sa_mask);
    }
    /* Manage signal processing for 30 sec whatever happens */
    int delay = 30;
    while (delay != 0) delay = sleep(delay);
}
- Write a program sig-ignore.c that ignores (almost) all signals. The code to be completed is given above.
- Test the return value of the signal function to note the (rare) signals that cannot be ignored.
- The command
/bin/kill -lgives a list of signals and their mnemonics. - Which signals cannot be ignored by the process?
- Use Ctrl-C or Ctrl-\ in the terminal where the program is running. For MacOS users, Ctrl-\ is Ctrl-`.
- Also send signals to this program using kill command from another terminal.
- Find a way to end the program without waiting for 60 seconds the end of the call to
sleep(30). Hint: note that SIGKILL (signal number 9) is not ignored by the program (why?) and still allows to terminate it.
About sleep()
unsigned sleep(unsigned s)
The sleep() function shall cause the calling thread to be suspended from execution until either a delay of s seconds has elapsed or a signal is delivered to the calling thread ("waking" it up) and its action is invoked. If the delay has elapsed, sleep() returns 0. If sleep() returns due to delivery of a signal, the return value is the "unslept" amount (the requested time minus the time actually slept) in seconds.
Handle signals with sa_handler
Let's now detail how to call a user-defined subprogram when receiving a signal. Write a program sig-user-def.c that handles signals with a user-defined function, called my_handler. You can make a copy of sig-ignore.c.
#include <stdio.h>
#include <signal.h>
#include <unistd.h>
int main(int argc, char *argv[]) {
    int sig;
    struct sigaction sa;
    for (sig = 1; sig < NSIG; sig++) {
        /* For now, we do not use any option. By default, the signal handler sa_handler is used */
        sa.sa_flags = 0;

        /* For now, we do not use any mask. By default, the signal received is included in mask */
        sigemptyset(&sa.sa_mask);
    }
    /* Manage signal processing for 30 sec whatever happens */
    int delay = 30;
    while (delay != 0) delay = sleep(delay);
}

void my_handler(int sig) {
  printf("Enter signal handler %d\n", sig);
  sleep(3);
  printf("Leave signal handler %d\n", sig);
}
- Write a program sig-user-def.c that handles signals with a user-defined function, called my_handler. The code to be completed is given above.
- Test the return value of signal() to identify the signals for which no user-defined processing can be defined.
- Do Ctrl-C or Ctrl-\ in the terminal where the program is running.
- Send signals to this program using the
killcommand from another terminal. - Do Ctrl-C twice in a raw. What do you observe ?
- Modify sa.sa_flags to add SA_NODEFER. The second call to the signal handler will no longer be deferred after the execution of the first one.
- Do Ctrl-C twice in a raw. What do you observe ?
- Do Ctrl-C and Ctrl-\ in a raw. What do you observe ?
More about struct sigaction
- sa_handler and sa_sigaction specifies the signal handler to call when receiving the signal. Only one of these two attributes is used. By default, the sa_handler is considered.
- sa_mask designates the set of signals that are blocked while executing the signal handler.
- By default, the signal being delivered is included in the mask.
- It means that receiving the same signal twice in a raw will cause the second occurence to be deferred until the first one is handled.
- sa_flags is a set of flags which allows to change the default behaviour of sigaction.
- By default, the interface sa_handler is used. If flag SA_SIGINFO is set, then sa_sigaction is used instead.
- By default, the signal being delivered is included in the mask. If flag SA_NODEFER is set, then the signal is no longer included in the mask.
As described above, there are two possible ways to call a user-defined subprogram when receiving a signal: sa_handler (default) and sa_sigaction.
Function sa_sigaction
When SA_SIGINFO is specified in sa_flags, sa_sigaction specifies to use the sa_sigaction to call when receiving the signal. As a consequence, the system ignores the sa_handler attribute. sa_sigaction has to be an user-defined function with the following signature:
void my_sigaction(int sig, siginfo_t *info, void *context);
- The sig parameter specifies the received signal.
- The info parameter of type siginfo_t explains the reason why the signal was generated. The structure siginfo_t includes several attributes among which we have:
- int si_pid designates the sending pid,
- *void si_address designates the address of faulting instruction,
- The context parameter of type ucontext_t refers to the receiving thread's context that was interrupted when the signal was delivered. The structure ucontext_t includes several attributes among which we have:
- sigset_t uc_sigmask specifies the set of signals that are currently blocked.
Handle signals with sa_sigaction
Let's now detail how to call a user-defined subprogram with sa_sigaction interface. Write a program sig-user-def-ext.c that handles signals with a user-defined function, called my_sigaction. You can make a copy of sig-user-def.c.
- Configure sigaction() to use the sa_sigaction interface.
- Display the pid of the current process.
- Do Ctrl-C or Ctrl-\ in the terminal where the program is running. Which process did send the signal ? Explain
- Send signals to this program using kill command from another terminal. Which process did send the signal ? Explain
Course on stack context management
To implement our exception like mechanism, we have to introduce two system calls related to stack context management.
The system call sigsetjmp() allows to save the execution context in order to restore it later on with a call to siglongjmp(). When a call is made to the siglongjmp() function with a given sigjmp buffer, execution resumes at the point where sigsetjmp() did saved the sigjmp buffer. Somehow, it is equivalent to a goto.
int sigsetjmp(sigjmp_buf env, int savemask);
void siglongjmp(sigjmp_buf env, int val); [Option End]
If sigsetjmp() returns from a siglongjmp() call, it returns the value passed to siglongjmp() call. If sigsetjmp() does not return from a siglongjmp() call, because it is the first call to sigsetjmp(), it returns 0.
Exercises on stack context management
We consider the following code :
#include <setjmp.h>
#include <stdio.h>

int main(int argc, char *argv[]) {
    sigjmp_buf env;
    int val = sigsetjmp(env, 1);
    printf("val is %d\n", val);
    printf("new val (0 to exit): ");
    scanf("%d", &val);
    if (val != 0)
        siglongjmp(env, val);
}
- Compile and run it.
- Check that at runtime the program loops until you answer 0, even though its code does not include a for or while loop.
This behavior comes from the siglongjmp() system call, which causes execution to resume at the sigsetjmp() system call.
Note that to restore the stack context, siglongjmp() should not be called once sigsetjmp() has left the function in which it was invoked (the stackframe). Somehow, the sigjmp buffer does not exist anymore and the behaviour is undefined.
Problem on implementing an exception like mechanism in C
In this problem, we implement an exception mechanism in C. When we access an element in an array that is too far from its bounds, the system raises an interrupt and then a signal SIGBUS. When we access the content of a NULL pointer, the system raises an interrupt and then a signal SIGSEGV. In other languages such as python, these errors are translated into exceptions. The user can also define his/her own exceptions. This is what we are going to implement.
Reminder of python exceptions
In the Python code below, similarly to other languages with exceptions, the runtime first executes the code located in the try section. If an error occurs during this execution (for example, array_index is out of range), the runtime raises an exception corresponding to the error. If an except clause matches this exception, the code corresponding to the clause is executed. Otherwise, the exception is propagated to the upper block containing the try section. It is also possible to raise (or "throw") an exception explicitly, in particular an user-defined one in alternative to predefined exceptions.
## enter try block
try:
    ## main code of try block
    element = array[array_index]

## catch block for IndexError
except IndexError:
    element = array[0]

## leave try block
Overview of the code
As the C language does not propose an exception mechanism, we do not have the help of the compiler and therefore we have to use functions from an API to mimic the mechanism. In this lab, we define the following API:
#define OUT_OF_RANGE_EXCEPTION 1001
#define NULL_POINTER_EXCEPTION 1002
#define USER_DEFINED_EXCEPTION 1003

typedef struct _exception_t {
    int id;
    struct sigaction sa;
    jmp_buf block;
} exception_t;

/* Function declarations */
void on_error(int sig);
#define exception_enter_try_block(e) (e)->id = sigsetjmp((e)->block, 1);
void exception_add_catch_block(exception_t *e, int exception_id);
void exception_leave_try_block(exception_t *e);
void exception_raise_exception(int exception_id);
-
exception_t is a structure that includes:
-
an exception id and we consider three possible exceptions: OUT_OF_RANGE_EXCEPTION raised when we access an array with an index out of bounds, NULL_POINTER_EXCEPTION raised when we access a null pointer, USER_DEFINED_EXCEPTION raised by the user for implementation purpose.
-
It also includes a sigaction structure used to catch a potential system signal: SIGBUS when a process is trying to access memory that the CPU cannot physically address (OUT_OF_RANGE_EXCEPTION) and SIGSEGV when a process refers to an invalid memory area (NULL_POINTER_EXCEPTION).
Note that a process can access an array with an index out of bounds without causing a SIGBUS interrupt. For instance, the address may be out of bounds, but not out of bounds of the process physical memory.
- The attribute block of type jmp_buf is used to save the current execution context with function sigsetjmp(). This attribute can later be used to restore the current execution context with siglongjmp(). That is, when a call to siglongjmp() function is made with the attribute block, the execution continues at the particular call site that constructed the jmp_buf attribute block. In that case sigsetjmp() returns the value passed to siglongjmp(). If sigsetjmp() does not return from a siglongjmp() call, because it is the first call to sigsetjmp(), it returns 0.
-
-
exception_enter_try_block() is a "function" to declare the beginning of the try section.
- Actually, it is a macro but the rationale for that is out of the scope of this lab. For those who are interested, exception_enter_try_block() calls sigsetjmp() and if it was a function, the jmpbuf execution context would point to a context no longer available once we leave the function call. exception_enter_try_block() is a macro to force inlining.
-
exception_add_catch_block() is a function to register an exception clause for a given exception passed as an exception id. It should be done right after entering the try section.
-
exception_leave_try_block() is a function to declare the end of the try section.
-
exception_raise_exception() is a function to raise an exception, in particular an user-defined exception, as would do a raise exc python instruction.
The result is the code provided in sig-try-catch.c, which mimics the Python code described above:
/* enter "try:" section -- initialise the exception mechanism */
exception_enter_try_block(&exception);

/* declare the "except:" clauses in advance -- no help from compiler */
exception_add_catch_block(&exception, OUT_OF_RANGE_EXCEPTION);

switch (exception.id) {
/* No exception: execute the main code of the try: section */
default:
    element = array[array_index];
    break;

/* OUT_OF_RANGE_EXCEPTION exception: execute the code of the OUT_OF_RANGE_EXCEPTION clause */
case OUT_OF_RANGE_EXCEPTION:
    element = array[0];
    break;
}

/* leave try: section -- clean the exception mechanism */
exception_leave_try_block(&exception);
Implementation of the exception mechanism step by step
- First build the sig-try-catch application and execute it.
- Run option 1. The program just fails when accessing to content of array[1000000] because the SIGSEGV signal is not handled.
- Fix this issue in function exception_add_catch_block() for the exception OUT_OF_RANGE_EXCEPTION associated to the SIGSEGV signal.
- Run option 1. The program keeps failing forever. Why ? It does not get back to exception_enter_try_block() either.
- Fix this last issue in function on_error().
- Run option 1. Call the following command and check that the test with an exception handler works (almost):
./sig-try-catch |& less- Why does it not work without an exception handler ? What should be the behaviour when there is no exception handler ?
- Fix this issue in function exception_leave_try_block().
- Run option 1. This should be fine this time.
- Implement the same mechanism for the exception NULL_POINTER_EXCEPTION associated to the SIGBUS signal.
- Run option 2. This should be fine as well.
- Implement the same mechanism for the exception USER_DEFINED_EXCEPTION associated to the SIGUSR1 signal.
- Run option 3. Analyse the function exception_test_main() to understand the issue.
- Implement the appropriate function.
- Run options 1, 2 and 3. All should be fine now.
TD — Synchronization
All the solutions are available in the part-3 tarball.
Overview
In this lab, we first study the blocking queue, one of the best-known design patterns for implementing the producer-consumer model. We implement it with semaphores.
Next, we study the rendez-vous mechanism to easily solve two synchronisation problems of the dayly life, the barber shop and the bus station.
Finally, we study the ultra-classical dining philosophers problem, which highlights two major synchronisation problems: starvation and deadlock.
Note: in the following, all requests to "model" or "implement" a solution, refers to solutions in pseudo-code using the synchronization tools seen during the course lectures (e.g., semaphores), not implementation in concrete programming languages (e.g., C). A separate homework is dedicated to how to use OS semaphores from the C programming language.
Producer consumer model
The aim is to implement a fixed-size blocking buffer service. This concurrency design pattern is probably the advanced synchronization mechanisms you should be familiar with. It was popularized by Java with its ArrayBlockingQueue service. The buffer will be implemented as a circular buffer and we enforce synchronization problems with semaphores.
This circular buffer consists of a fixed-size max_size array, an index first (or start) designating the first full slot in the array, an index last (or end) designating the last full slot in the array and size the number of full slots in the buffer. As we are implementing a circular buffer, to store a new element, a producer appends it at the end of the full slots. When the producer reaches the end of the array, it stores this element at the start of the array in a circular fashion. To remove an element, a consumer removes it at the start of the full slots. When the consumer reaches the end of the array, it removes this element at the start of the array in a circular fashion. Thus, we assert (first + size) % max_size == (1 + last) % max_size. When the producer stores an element in a full buffer, it blocks until an empty slot becomes available. When a consumer removes an element in an empty buffer, it blocks until a full slot becomes available.
- Propose a first implementation that implements the behaviour above without considering synchronisation issues.
- Extend this implementation by considering that two producers (resp. two consumers) can store (resp. remove) data at the same time in the buffer. Use synchronisation mechanisms and provide their initialisation.
- Extend this implementation by considering that a producer has to block when the buffer is full.
- Extend this implementation by considering that a consumer has to block when the buffer is empty.
Rendez-vous
The objective is to implement a rendez-vous mechanism (or "handshake"). Two processes have a rendez-vous at some point of execution, when neither is allowed to proceed until both have arrived. We enforce proper synchronisation with semaphores.
- Provide a way for the first process to wait for the second one.
- Provide a way for the second process to wait for the first one. Beware of deadlock.
Barber shop
In a barber shop, there is a barber, a chair in which the customer sits to have his or her hair done and N seats in the waiting room. We want to model the system in the following manner:
- If a customer arrives:
- if one of the N seats is free, the customer sits and waits in the waiting room to be invited by the barber,
- otherwise, he or she leaves (immediately).
- If the chair is free:
- the barber invites the first customer waiting to get the chair,
- he or she waits for this customer to sit on the chair.
- If the customer sits on the chair:
- the barber brushes the customer for m minutes, and then invites him or her to leave the chair.
- the customer waits for the barber to invite him or her to leave the chair and then leaves the shop.
- Model the waiting room with a mutual exclusion mechanism.
- Model the interactions between the barber and the customer with rendez-vous.
Dining philosophers
(Optional exercise, to go further in the understanding of the course topics.)
Five philosophers dine together at the same table. Each philosopher has his own plate on the table. There is a fork between each plate. The dish served is a kind of spaghetti that must be eaten with two forks. (Don't ask: philosophers, like engineers, can be weird in their own ways.) Each philosopher can only think and eat alternately. Moreover, a philosopher can only eat his spaghetti if he or she has both their left and right fork. The two forks will therefore only be available when their two nearest neighbors are thinking and not eating. When a philosopher has finished eating, he or she puts down both forks.
- We propose the following algorithm. A philosopher does the following:
- Pick the left fork, if available; otherwise, think until it becomes available.
- Pick the right fork, if available; otherwise think until it becomes available.
- Eat and then put down the forks in the same order they were picked up.
- Repeat.
- Give a scenario that would raise a critical issue.
- We propose to give a unique identifier to each fork. A philosopher does the following:
- Pick the fork with the smallest id; otherwise, think until it becomes available.
- Pick the other fork; otherwise, think until it becomes available.
- Eat and then put down the forks in the same order they were picked up.
- Repeat.
- Explain how it improves the behaviour.
Bus station
(Optional exercise, to go further in the understanding of the course topics.)
A passenger arriving at the bus station queues in the boarding area. The bus arrives with N seats available. The boarding process is as follows:
- When the bus arrives, users already present board as long as there are seats available and passengers in the queue.
- Once there are no more seats available or no more passengers in the queue, the bus departs.
We consider two alternative approaches:
- The bus driver invites all passengers in the boarding area to board, as there are seats available and passengers in the queue.
- If either condition is not met, the driver leaves.
- The bus driver invites the first passenger to board if there is a seat available and a passenger in the queue. Then, the last passenger to board invites the next passenger to board if there is a seat available and a passenger in the queue.
- If one of the two conditions is not met, the driver leaves or the last passenger asks the driver to leave.
Exercises:
- Model the problem with mutual exclusion and rendez-vous for the first approach.
- Model the problem with mutual exclusion and rendez-vous for the second approach.
Homework — Semaphores
All the sources are available in the part-3 tarball.
The C files are located in directory part-3/homework-semaphores/material/.
The general specifications of the POSIX functions are available at OpenGroup website
Overview
In this work, we will implement in practice (in C) the synchronization scenarii modeled in the TD about synchronisation: producer-consumer, rendez-vous, barber shop, dining philosophers, and bus station.
Semaphores
Here is a brief summary of the main system calls used to manipulate semaphores.
int sem_unlink(const char *name);
- Remove the semaphore named by the string name.
- Always remove semaphores before using them in order to start with a clean environment.
- Check the returned value. If the semaphore cannot be removed, it is very likely that a process is still using it and that you should kill it.
sem_t *sem_open(const char *name, int oflag, mode_t mode, unsigned int value);
- Create or open a named semaphore name.
- name is the semaphore name. If it starts with a slash, e.g.,
/identifier, then the syscall creates a named semaphore, which can be used by unrelated processes: all processes opening the same named semaphore will share it (which is needed for synchronization purposes). Otherwise the semaphore is unnamed and can only be shared among threads sharing it in memory. - oflag is similar to the flag used with system call open().
- The third parameter is the access mode given to the created file, for instance 0644.
- The fourth parameter is critical as it represents the number of resources in the semaphore initially.
- name is the semaphore name. If it starts with a slash, e.g.,
- Example:
fd = sem_open("/my-semaphore", O_CREAT, 0644, 1)creates a named semaphore called"/my-semaphore", withrw-------access mode and 1 initial resource. It can used as mutual exclusion for instance.
int sem_wait(sem_t *sem);
The sem_wait() function shall get a resource from the semaphore referenced by sem. If the semaphore value (that is the available resources) is currently zero or negative, then the calling thread shall not return from the call to sem_wait() until a resource becomes available.
int sem_post(sem_t *sem);
The sem_post() function shall put a resource in the semaphore referenced by sem. If the semaphore value (that is the available resources) resulting from this operation is positive, no process has been blocked while waiting for the semaphore; the semaphore value is simply incremented. If the semaphore value resulting from this operation is zero or negative, one of the blocked processes waiting for a resource will be woken up, return from its call to sem_wait().
Producer consumer
In this lab, we first study the array blocking queue, one of the best-known design patterns for implementing the producer-consumer model. The queue will be implemented as a circular buffer and we enforce synchronization features with semaphores. We recommend that you go back to the Synchronization TD to recall the properties and services we studied at the time.
Useful functions
Now you know that processes do not share memory space and therefore do not share variables. If they wish, they can share data via files. We provide four functions to help you writing and reading a shared variable or a shared array using a file:
int read_shared_var(char *name);
void write_shared_var(char *name, int value);
void read_shared_array(char *name, int *array, int size);
void write_shared_array(char *name, int *array, int size);
We also provide a function for generating a random integer value in a first ... last interval:
int value_between(int first, int last);
Implementation
We provide an incomplete implementation sem-prod-cons.c of the solution of the producer-consumer problem discussed in the Synchronization TD. This implementation does the following:
- Provide on the command line the number of consumers (n_consumers) and producers (n_producers) and the size of the buffer.
- Create n_consumers consumers and n_producers producers.
- Each producer produces n_consumers items and so n_producers x n_consumers items are produced overall.
- Each consumer consumes n_producers items and so n_producers x n_consumers items are consumed overall.
- Then, consumers and producers terminate.
- Complete the implementation using the algorithmic solution from the TD on synchronization.
- Test with different scenarii.
Rendez-vous
The objective is to implement in C a rendez-vous mechanism as described in the Synchronization TD. We propose the following specification:
void rendez_vous(sem_t *i_arrive, sem_t *u_arrive);
- Implement the function rendez_vous() using the algorithmic solution from the Synchronization TD.
- Test it in the context of the next exercise.
Barber shop
We provide an incomplete implementation sem-barber.c of the barber shop solution discussed in the Synchronization TD.
- Complete the implementation using the algorithmic solution from the Synchronization TD.
- Test with different scenarii (different arguments on the command line).
Dining philosophers
(Optional exercise, to go further in the understanding of the course topics.)
We provide an incomplete sem-diner.c implementation of the philosophers diner solution discussed in the Synchronization TD. The solution we have chosen to implement is the one free of starvation and deadlock issues.
- Complete the implementation using the algorithmic solution from the Synchronization TD.
- Test with different scenarii.
Bus station
(Optional exercise, to go further in the understanding of the course topics.)
We provide an incomplete sem-bus.c implementation of the bus station solution discussed in the Synchronization TD. The solution we have chosen to implement is one in which a passenger already on the bus invites the next passenger to board if necessary. Note that the driver is considered to be the first passenger. The last passenger is responsible for asking the driver to leave the station.
- Complete the implementation using the algorithmic solution from the Synchronization TD.
- Test with different scenarii.
TP — File system
All the sources are available in the part-3 tarball.
The C files are located in directory part-3/tp-file-system/material/.
The general specifications of the POSIX functions are available at OpenGroup website
Overview
The aim of this lab is to learn how to use Unix system calls to manage files.
We first study how to execute basic operations such as open(), read(), write(), lseek() and close(). We implement a program to output and modify a binary file.
Second, we manipulate files using Shell commands such as ls, ln, chmod, ...
Files
Here is a brief summary of the main system calls used to manipulate files.
open(), close() and unlink()
#include <fcntl.h>

int open(const char *path, int oflag, ... );
open opens a file located at path and returns an integer file descriptor to refer to it later. This descriptor allows us to perform other operations such as reading and writing without using the file name.
oflag specifies the operations allowed on the file. Values for oflag are constructed by a bitwise-inclusive OR. Applications shall specify one of the first three file access modes:
- O_RDONLY
- Open for reading only.
- O_WRONLY
- Open for writing only.
- O_RDWR
- Open for reading and writing.
Several other flags can be combined with them.
In particular, O_CREAT allows to create the file if it does not exist already. If it already exists, nothing is done and the existing file is opened.
If oflags is O_CREAT | O_WRONLY, the file is created if it does not already exist and the user can only write in it.
If the file is created, the third argument of open() represents the file mode of the file. The following code will create a file (if it does not exist) with permission mode 0644 (in octal), i.e., read and write modes for user, read mode for group and others.
fd = open("my_new_file.txt", O_CREAT | O_RDWR, 0644);
If the returned value of open() is -1, an error occurred and the file has not been opened.
Once all read and write operations have been performed on the file, the user can close the file. It will be closed anyway when the process ends.
To delete a file, use unlink on its path.
read() and write()
#include <unistd.h>

ssize_t read(int fd, void *buf, size_t nbyte);
ssize_t write(int fd, const void *buf, size_t nbyte);
The read() function reads nbyte bytes from the file associated with file descriptor, fd, into the buffer pointed to by buf.
The write() function writes nbyte bytes from the buffer pointed to by buf to the file associated with the file descriptor, fd.
Upon successful completion, read() or write() return the number of bytes actually read or written. Otherwise, they return -1 and set the global variable errno to indicate the error.
Typically, nbyte is set to the buffer (max) size when we read from a file, and if the operation is successful, the returned value indicates the number of bytes actually read from the file.
lseek()
Associated to each open file the operating systems maintains an offset---an integer between 0 (beginning of the file) and file length---indicating where in the file the next read/write operation (among others) will start operating.
Each read/write operation implicitly advances the file offset by the amount of bytes read or written.
off_t lseek(int fd, off_t offset, int whence);
The lseek() system call explicitly changes the position of the file offset for the open file fd, as follows:
-
If whence is SEEK_SET, the file offset shall be set to offset bytes (absolute positioning from the beginning of the file).
-
If whence is SEEK_CUR, the file offset shall be set to its current location plus offset (relative positioning w.r.t. the current file offset).
-
If whence is SEEK_END, the file offset shall be set to the size of the file plus offset (absolute position from the end of the file).
Upon successful completion, the returned value corresponds to the resulting offset, as measured in bytes from the beginning of the file. Note that using lseek() with offset set to 0 and whence to SEEK_END allow to get the size of the file as returned value.
File management in C
Output a binary file
- Complete the file fs-edit-file.c. Compile and run it to make it output a file. In this part, we want to output a binary file, each element representing a byte or a 8-bits unsigned integer. We want to output 4 bytes per line. At the beginning of each line, we output the offset (index) of the file. If any bytes are missing to complete the last line, they are ignored. Edit the fs-edit-file.c. This file will be enriched to implement several binary operations, including displaying the content of the file. To check the result, you can use the Unix command od. It should look that way:
> echo "hello world" > test.dat
> ./fs-edit-file test.dat output

00000000 : 68 65 6c 6c
00000004 : 6f 20 77 6f
00000008 : 72 6c 64 0a

> od -t c test.dat
0000000    h   e   l   l   o       w   o   r   l   d  \n
0000014

> od -t x1 test.dat
0000000    68  65  6c  6c  6f  20  77  6f  72  6c  64  0a
0000014
- Complete the file fs-edit-file.c. Compile and run it to make it output a file.
Modify a byte in a binary file
Next, we want to modify a byte in a binary file. This operation takes two parameters, the address to be modified and its new byte value. To do so, we move the file index to address. Then we change the current byte to value.
To check the result, you can use the Unix command od. It should look that way:
> echo "hello world" > test.dat
> ./fs-edit-file test.dat output

00000000 : 68 65 6c 6c
00000004 : 6f 20 77 6f
00000008 : 72 6c 64 0a
> ./fs-edit-file test.dat modify 0x6 0x57
> ./fs-edit-file test.dat output

00000000 : 68 65 6c 6c
00000004 : 6f 20 57 6f
00000008 : 72 6c 64 0a
> od -t c test.dat
0000000    h   e   l   l   o       W   o   r   l   d  \n
0000014
- Complete the fs-edit-file.c file. Compile it and run it to modify a binary file as described above.
Insert a byte in a binary file
Now we want to insert a byte into a binary file. This operation takes two parameters, the address to insert and the value of the byte to insert. Note that unlike the modify operation, we need to push forward the bytes from address before inserting the new byte.
To check the result, you can use the Unix command od. It should look that way:
> echo "hello world" > test.dat
> ./fs-edit-file test.dat output

00000000 : 68 65 6c 6c
00000004 : 6f 20 77 6f
00000008 : 72 6c 64 0a
> ./fs-edit-file test.dat insert 0x6 0x20
> ./fs-edit-file test.dat output

00000000 : 68 65 6c 6c
00000004 : 6f 20 20 77
00000008 : 6f 72 6c 64
0000000c : 0a
> od -t c test.dat
0000000    h   e   l   l   o           w   o   r   l   d  \n
0000015
- Complete the fs-edit-file.c file. Compile it and run it to modify a binary file as described above.
Append a byte to a binary file
Here we want to append a byte to a binary file. This operation takes only one parameters, the value of the byte to append.
To check the result, you can use the Unix command od. It should look that way:
> echo "hello world" > test.dat
> ./fs-edit-file test.dat output

00000000 : 68 65 6c 6c
00000004 : 6f 20 77 6f
00000008 : 72 6c 64 0a
> ./fs-edit-file test.dat append 0xa
> ./fs-edit-file test.dat output

00000000 : 68 65 6c 6c
00000004 : 6f 20 20 77
00000008 : 6f 72 6c 64
0000000c : 0a 0a
> od -t c test.dat
0000000    h   e   l   l   o           w   o   r   l   d  \n  \n
0000015
- Complete the fs-edit-file.c file. Compile it and run it to modify a binary file as described above.
Truncate a binary file from a given address
This time, we want to truncate the file at a given address. To do so, we have to copy the truncated file to a temporary file, delete the original file and rename the temporary file to the original file name. To achieve this, we describe two new functions:
int unlink(char *path);
int rename(const char *old, const char *new);
- The unlink() function removes a link to a file. If there is no more links, the file is removed.
- The rename() function changes the name of a file.
To check the result, you can try the following scenario:
> echo "hello world" > test.dat
> ./fs-edit-file test.dat output

00000000 : 68 65 6c 6c
00000004 : 6f 20 77 6f
00000008 : 72 6c 64 0a
> ./fs-edit-file test.dat remove 0x5
> ./fs-edit-file test.dat output

00000000 : 68 65 6c 6c
00000004 : 6f
> od -t c test.dat
0000000    h   e   l   l   o
0000005
- Complete the fs-edit-file.c file. Compile it and run it to truncate a binary file as described above.
File management with Shell
Access modes
- Create a directory private and change its access modes so that the user can read, write and execute, the group and others can only execute it.
- In private, create a directory with a name that is hard to guess (e.g., 000_ooo_000).
- Move to the initial directory and execute ls private.
- Change access modes of private such that the user can only execute it and execute ls private.
- Create a directory hierarchy so that only your friends will be able to see your vacation photos, thanks to a secret you share with them.
Inodes
mkdir tmp
ls -il .
cd tmp
touch my_orig_file
Symbolic links
- Create a new directory tmp and move to it.
- Create a file my_orig_file in this directory.
- Create a symbolic link of my_orig_file names my_symb_link
- Execute ls -il. What does -i change in ls execution ?
- Create a hard link of my_orig_file names my_hard_link
- Execute ls -il. What is the difference ?
- Move my_orig_file into my_new_file.
- Execute ls -il. What happens to my_symb_link ?
- Remove my_new_file.
- Execute ls -il. What happens to my_hard_link ?
TP — Pipes & FIFOs
All the sources are available in the part-3 tarball.
The C files are located in directory part-3/tp-pipe-fifo/material/.
The general specifications of the POSIX functions are available at OpenGroup website.
Overview
In this TP, we study pipes and fifos.
After a short course, we propose few exercises to learn how to handle pipes and fifos.
Pipes and FIFOs
Pipes are Unix implementations of shared data based on the producer/consumer model. This model was described in the synchonisation TD and the synchronisation homework.
Access to a file declared as a "pipe" is managed by Unix according to the producer/consumer model. read and write on this file are similar to consume and produce respectively, but read operations are destructive. A read byte is removed from the tube. As for a consume operation, a read operation is blocking if the tube is empty. As for a produce operation, a write operation is blocking if the tube is full.
Pipe
pipe() creates a pipe, a unidirectional data channel that can be used for interprocess communication.
int pipe(int pipefd[2]);
The array pipefd is used to return two file descriptors referring to the ends of the pipe. pipefd[0] refers to the read end of the pipe. pipefd[1] refers to the write end of the pipe.
int p[2];
int rv = pipe(p);
assert(rv == 0);
while (read(p[0], ..., ...)>0){};
FIFO
A FIFO or a named pipe is similar to a pipe, except that it has a filename entered into the filesystem instead of being an anonymous communications channel. With this filename, any process can open the FIFO for reading or writing. mkfifo() creates a FIFO file with a mode access permissions.
int mkfifo(const char *pathname, mode_t mode);
Then, processes have to use open() in read or write mode to perform reading or writing operations respectively.
int rv = mkfifo("fifo", 0666);
assert(rv == 0);
int fd = open("fifo", O_RDONLY);
assert(0 <= fd);
while (read(fd, ..., ...)>0){};
Pipe in Shell
The symbol "|" designates a tube into which the output of the process on its left arrives, and from which the process on its right takes its input. Try the following shell commands :
who
who | grep $USERNAME
ls -rt
ls -rt | sort
ps aux
ps aux | wc -l
- who displays who is logged in.
- grep searches for lines that match one or more patterns.
- sort sorts text files by lines.
- wc displays the number of lines (-l), words (-w), and bytes (-c).
To illustrate that the pipe implements the producer / consumer model. Try the following :
for i in 1 2 3 4; do
ls
sleep 2
done | grep c
The output of ls is filtered four times by grep each time after 2 seconds of delay.
Pipes in C
In this exercise, we want to implement a ping pong mechanism.
Using pipe()
- Complete the pipe-ping-pong.c file. In this version, we use the pipe() system call. In this program, the main process creates a child process. The parent process creates two pipes, ping and pong. The parent writes a value into ping, and the child reads it from ping, it doubles this value and adds 1 and then writes it into pong. The parent reads the new value from pong, it doubles it and adds 1 and then sends it again to child. This is done for 3 times by the parent.
- Compiles and run it. You should get something like:
> ./pipe-ping-pong
15017 send ping 7
15018 recv ping 7
15018 send pong 15
15017 recv pong 15
15017 send ping 31
15018 recv ping 31
15018 send pong 63
15017 recv pong 63
15017 send ping 127
15018 recv ping 127
15018 send pong 255
15017 recv pong 255
Using mkfifo()
- Complete the fifo-ping-pong.c file. This time, we create two separate processes, ping and pong, in two separate shells. The ping process will run "fifo-ping-pong ping" and the pong process "fifo-ping-pong pong". The ping process creates two fifos, ping and pong. It opens ping in write-only mode and pong in read-only mode. The pong process does the opposite. Then, the ping process writes a value into ping fifo, and the pong process reads it from ping fifo, it doubles this value and adds 1 and then writes it into pong fifo. The ping process reads the new value from pong fifo, it doubles it and adds 1 and then sends it again to the pong process. This is done for 3 times by the ping process.
- Compiles and run it. You should get something like:
[shell ping]> fifo-ping-pong ping
28209 send to pong 7
28209 recv from pong 15
28209 send to pong 31
28209 recv from pong 63
28209 send to pong 127
28209 recv from pong 255

[shell pong]> ./fifo-ping-pong pong
28204 recv from ping 7
28204 send to ping 15
28204 recv from ping 31
28204 send to ping 63
28204 recv from ping 127
28204 send to ping 255
Note from OpenGroup specification : "An open() for reading-only shall block the calling thread until a thread opens the file for writing. An open() for writing-only shall block the calling thread until a thread opens the file for reading."