Getting Started with C
Setup
As you have seen in the lecture, the C language is (typically) a compiled language. In order to execute a program written in C you first have to compile it to machine code. There are several commercial and open-source compilers available to chose from, for instance:
- Clang/LLVM
- Clang/LLVM is the basis for many other compilers ...
- Intel oneAPI C/C++ compilers
- AMD Optimizing C/C++
- IBM Open XL C/C++
- C++ Builder
- Windriver Diab (for embedded systems)
- Microsoft Visual Studio C/C++
- Tasking (for embedded systems)
- Compcert (a French success story!)
- GCC
On the lab machines you have access to the clang and gcc compilers. We'll use gcc, but clang is an equally good (probably even better) compiler.
The compiler alone is evidently not sufficient to develop programs - let alone large projects. Many of the compilers mentioned above are actually part of larger development suites that come with an integrated development environment (IDE). For this course it is suggested to use Visual Studio Code as an editor. Well, it is a complete IDE, but you should use the compiler on the command line to get a better understanding of what is happening behind the scenes.
First create a new folder for the lab exercises of this course (you may of course change the folder name) by typing the following command into the command-line (terminal):
mkdir inf107
cd inf107
code .
This should open a new Visual Studio Code window and maybe a dialog that asks whether you trust the files in the folder. Well there aren't any files in the folder yet and only you will add new files, so you should be ok trusting yourself.
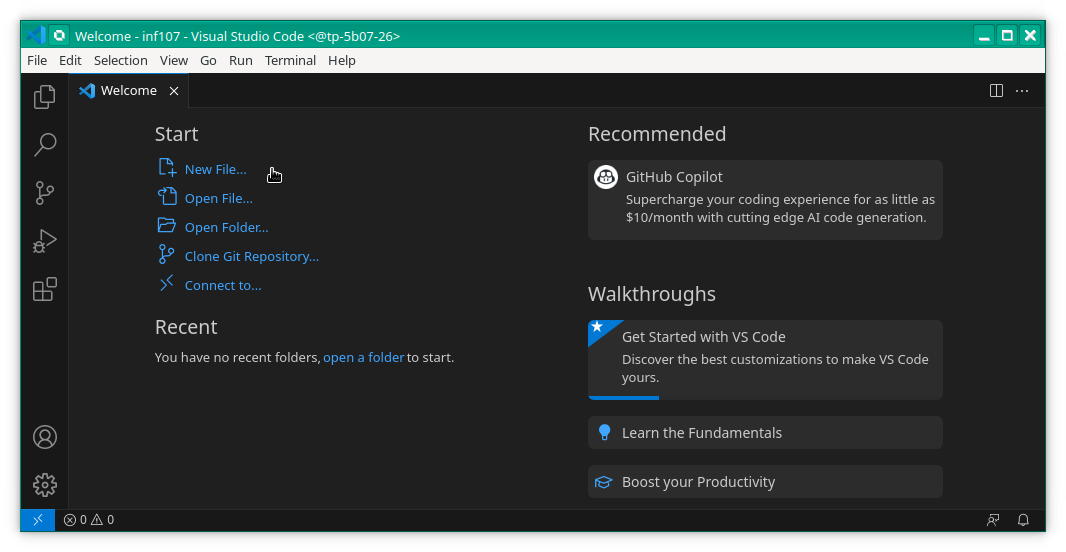
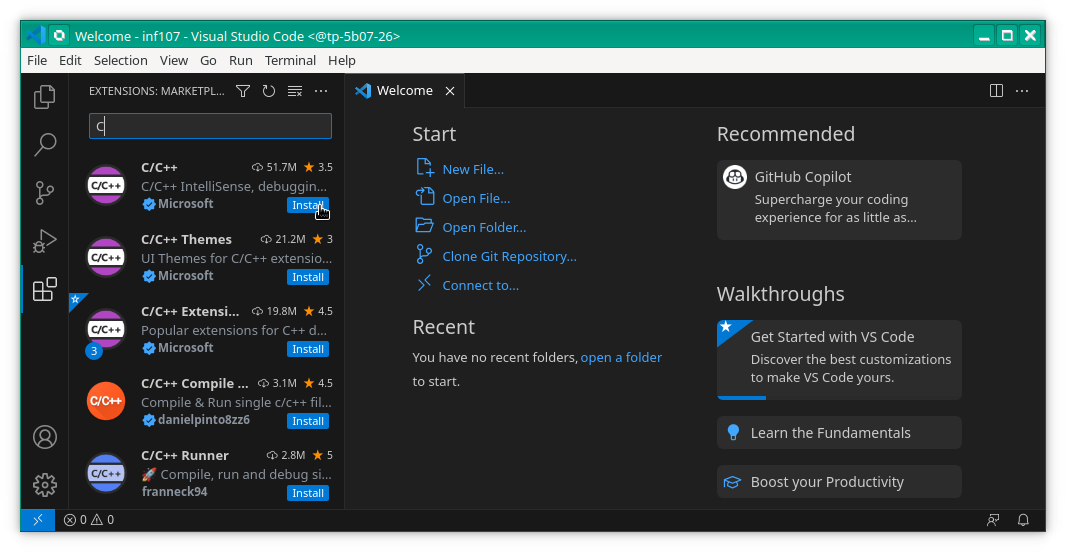
Next you have to install an extension in order for the editor to support the C/C++ language. Click on the icon with the four small squares (on the left of the mouse pointer in the figure above). Type "C" into the search bar on the top and select the C/C++ extension by Microsoft by clicking on "Install" as shown in the following screen shot:
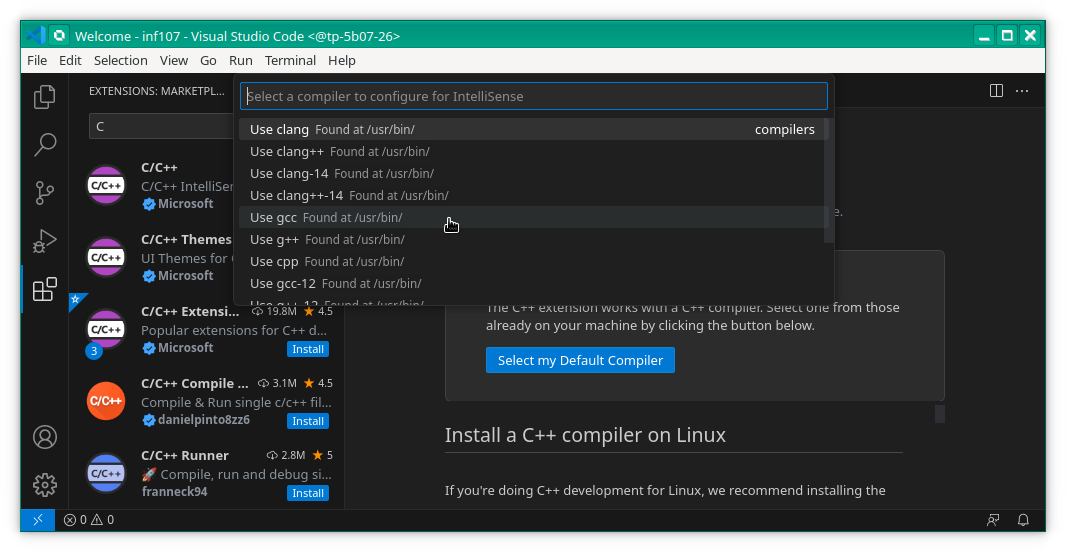
Click on "Select my Default Compiler" and select gcc in the drop-down lost.
Compiling on the command line
Now you are good to go. Click on the New file ... (or use the keyboard shortcut Ctrl + N). Save the empty file under the name hello-world.c using the shortcut Ctrl + S. Don't use the menu use the shortcut! Then copy-and-paste the following C code - the obligatory "Hello World" program - into the editor. Don't forget to save using the shortcut Ctrl + S:
#include <stdio.h>
#include <stdlib.h>

int main(int argc, char *argv[])
{
  printf("Hello World\n");
  return EXIT_SUCCESS;
}
Go back to the command-line terminal, or open a terminal inside of Visual Studio Code (shortcut `Ctrl + ```) and type the following compiler command into the terminal (followed by enter/return):
gcc -Wall -pedantic -std=c11 -O0 -g hello-world.c -o hello-world
Normally you should not have any compiler messages for this code. If you have some, check that you copied all of the code (no missing characters on the first/last line, no missing line, ...). You may now run the program by typing the following command into the command-line terminal:
./hello-world
The following table briefly explains the compiler options used:
| Options | Description |
|---|---|
-Wall | Activate all warnings. |
-pedantic | Reject programs that do not comply with the ISO standard. |
-std=c11 | Apply the ISO standard for C11. |
-O0 | Disable all compiler optimizations. |
-g | Enable debug information (we'll get back to this in a minute). |
-o <filename> | Tell the compiler to use the provided <filename> for the executable file. |
\
|  | You should always use at least these options whenever you compile a C file for this course. |
| | |
| You should always use at least these options whenever you compile a C file for this course. |
| | |
Manual Pages
You can consult the complete list of gcc's compiler options and their meaning on the command line as follows:
man gcc
The man command is useful in may situations. It is intended to provide quick access to documentation - so-called manual pages or man pages. The man pages are structured in sections, which are in-turn described in a man page. Have a look:
man man
By the way, you can also use the man command to obtain information on functions of the C library. The following command provides information on the printf function:
man 3. printf
Here the argument 3. explicitly indicates the section, which in this case is the section on library functions. You can use the same command for all C library functions that you will discover in the course of this course.
Debugging with gdbgui
Create a new file division.c based on the following erroneous code. Compile this file (using all the options seen before), check the compiler's error message, fix the code and, finally, run the resulting program.
#include <stdio.h>
#include <stdlib.h>

unsigned int division(unsigned int dividend, unsigned int divisor) {
  unsigned int result = 0;
  for(unsigned int rest = dividend; rest >= divisor; result++)
    rest = rest - ;
  return result;
}

const char message[] = "Hello World";
short data = 25;
int division_result;

int main(int argc, char *argv[]) {
  division_result = division(data, 7) + 2;
  printf("%s\n", message);
  printf("%d\n", division_result);
  return EXIT_SUCCESS;
}
The compile should display an error message for this code (before you fix it). The message should look something like this:
division.c: In function ‘division’:
division.c:7:19: error: expected expression before ‘;’ token
    7 |     rest = rest - ;
      |                   ^
The compiler messages always follow the same pattern:
- First, the compiler tries to provide context for the error. In this case the problem occurred when processing the file
division.cand, more precisely, within the functiondivision. - Then the compiler shows a precise error message, which indicates, once more, the file (
division.c), the line (7), and offset on the line (19). Then a textual description of the problem is provided. - Finally, the compiler prints an excerpt of the code that caused the problem.
Always read error/warning messages carefully. Try to understand whet the compiler is trying to tell you. In this particular case, the compiler indicates that it expected an expression after the subtraction (-) and before the semi-colon (;). The code was covered in the lecture. So you should be able to fix this problem (in the worst-case by comparing the code here with the lecture slides).
Stepping through the Program
While working on the up-coming exercises of this course you will inevitably make mistakes. Some of them are easy to spot, e.g., when the compiler prints an error message or warning. In other cases your program will compile without problems, but not produce the expected output. In this case it is sometimes helpful to use a debugger.
A debugger is a special program that is able to execute your program in a controlled way. You may step through your program, inspect the values of variables, pause the program when specific events occurred, et cetera. On Linux the standard debugger is called gdb. However, gdb only offers a textual command-line interface, which is great to use when you are used to it, but somewhat of a challenge for novices. We will thus use gdbgui, a graphical interface wrapped around gdb. The idea is to allow novice users to explore the graphical interface and gradually learn the shortcuts of the command-line interface - which is always displayed and actually usable within gdbgui.
Let's give it a try, on the command-line type:
/comelec/softs/bin/gdbgui division
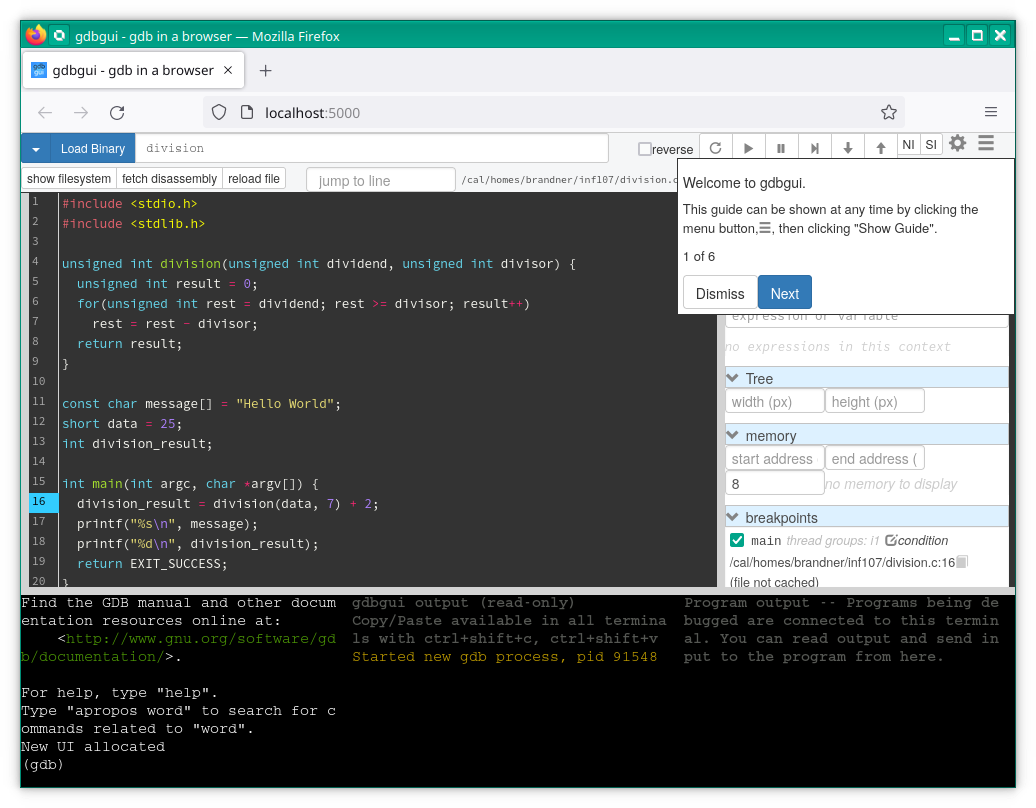
This should open a new browser window (or tab) with gdbgui's graphical interface. Follow the guide by clicking next in order to discover the different elements of the graphical interface.
You can start the program by clicking on the left-most button on the top-right of the interface (the button with the circular arrow, right above the word "Welcome" in the screenshot above). You will notice that the program starts and immediately stops on the first line of the main function (on line 16).
Use the button "Step over" (the fourth from the left, with the triangle pointing to a bar on the right) in order to step through the program. You will notice that the debugger advances line by line until you reach the end of the main function. If you continue to click on the button, the debugger takes you to some machine code of the standard C library that is actually executed before main.
Restart the program, this time use the button "Step into" button, the fifth button from the left (with the arrow pointing downwards), in order to step through the program. Whenever the program encounters a function call this button will follow the call and continue inside the called function. Step through the division function an observe, via the tab local variables on the right, the different values of the variable rest as the program executes.
Try hovering about the buttons "Start", "Step over", "Step into" with your mouse. Normally a tool tip should pop up. Carefully read the tool top and, in particular, look for keyboard shortcuts. Try using those shortcuts, e.g., click into the source code then push r on the keyboard then push s a couple of times. Using the shortcuts is more convenient and faster than clicking on the buttons with the mouse. Try to use those shortcuts from now on. If you forget them, just hover with your mouse over the buttons to recall them.
Breakpoints
It is often cumbersome and time-consuming to go through a program step-by-step until am interesting point is reached. Breakpoints help with this. They allow to stop the program's execution at a specified location. You may even indicate a condition with a breakpoint, the execution then only stops there when the condition is satisfied.
You can set/unset a breakpoint by clicking on the line number on the left of the source code. Set breakpoints on lines 7 and 8 (the lines with the body of the for loop and the return statement). Then remove the breakpoint in the main function and restart the program.
You can resume the execution by clicking on the button "Continue" (second from the left, with the triangle) or using the shortcut c.
You can see the list of breakpoints on the tab breakpoints on the right. The checkbox allows to enable/disable a breakpoint, e.g., if you don't need it right now, but you don't want to remove it completely. You can also add a condition to a breakpoint. Try to click on the button "condition" for the breakpoint on line 7 and enter the condition: rest < 20. Confirm the condition by pressing enter, otherwise it is not token into account.
Inspecting Variables
The values of local variables and parameters of functions are shown in the tab local variables. In addition you can inspect global variables in the tab expressions, just type in the name of the global variable (or any valid C expression actually). Try entering the expressions division_result; remove all breakpoints; set a new breakpoint on line 16; restart the program and step over the function call. Check the value displayed of the expression for division_result before and after the call to division.